Ereda Island (Season 2)


Ereda Island (Season 2)
| “ | A new PvP dungeon based mode!
|
” |

It was said that they both compete to promote unity and development, but in actual fact they compete because of the hidden artifacts in the island and both kingdoms fight for it.
The island battle was hidden with a mysterious force but now the mysterious land known as Ereda Island has appeared in the eyes of everyone.
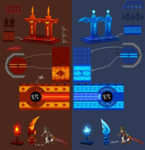
- Altar of Dedication must be completed once
- Accessible from dungeon maps between Feita and Elysion
- Waiting time for entry needs at least 6 ~ 8 people to be queuing.

- 1st Checkpoint: Teams must break the Sealed Device to move to the next checkpoint. The team who breaks the Sealed Device first will receive additional rewards whether they win or lose.
- 2nd and 4th Checkpoint: Random Battle – Defeat the monsters to open the portal to the next checkpoint. Monster types and patterns vary according to the party's average rank.
- 3rd and 5th Checkpoint: Random Movement – Overcome the stage's obstacles, and reach the portal to advance to the next checkpoint. One of three possible stage maps will appear randomly, and each map can only appear once in each dungeon instance.
- Final Checkpoint: The team which deals the most damage to the Guardian Tower wins.
Map mechanics
DO NOTE: Elements, stats (e.g Action Speed, critical, additional damage), and special effects from armor/weapon will be void during the game. However you can't change skills in-game.

Get the opportunity to improve your abilities each time you pass through a checkpoint.
Strengthen the Stat, Skill, or Resource ability of your choice up to 5 times by mouse click or pressing the Number Key (1~3). If a player does not select within 10 seconds, then a random ability will be strengthened.
Strengthened ability takes effect only in the current dungeon run.
 |
 |

|
|---|---|---|
| Stat Enhancement | Skill Enhancement | Resource Increase |
| Enhances character's base stats, all speeds and awakening ability.
Attack/Defense Increase: 10% All Speed Increase: 5%
|
Increase character's skill damage.
Character's skill damage will be increased by 5%.
|
Enhances MP, awakening and other related resources.
Natural MP recovery: +4 MP Gained when hit: 20% Awakening Time/Duration: 10% |
| Image | Description | Moves |
|---|---|---|

|
Velder Swordsman - A warrior who fights for Velder, use swift and simple slash attacks to damage players. |
|

|
Velder Mage - A magician who fights for Velder, uses various fire blast attacks to damage players. |
|

|
Velder Charger - A lancer who fights for Velder, uses mid-range technique to push players back. |
|

|
Velder Defender - A defender who fights for Velder, uses defensive move to prevent players from breaking through. |
|

|
Velder Siege Tower - A large tower that serves to block enemy forces from advancing. It can charge forward and deal damage if players get too close. It also periodically fires a cannon blast. |
|

|
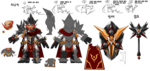
Vern - The swordsman of Velder's Chief Gatekeepers. |
|

|
Cain - The mage of Velder's Chief Gatekeepers. |
|

|
Lard - The defender of Velder's Chief Gatekeepers. |
|

|
Vanessa - The spearman of Velder's Chief Gatekeepers. |
|

|
Velder's Sealing Device - Velder's barrier generator, destroy it first to gain extra reward as well as continue the fight. |
|
| Image | Description | Moves |
|---|---|---|

|
Hamel Swordsman - A warrior who fights for Hamel, use swift and simple slash attacks to damage players. |
|

|
Hamel Mage - A magician who fights for Hamel, and uses various ice blast attacks to attack players. |
|

|
Hamel Charger - A lancer who fights for Hamel, uses mid-range technique to push players back. |
|

|
Hamel Defender - A defender who fights for Hamel, uses defensive move to prevent players from breaking through. |
|

|
Hamel Siege Tower - A large tower that serves to block enemy forces from advancing. It can charge forward and deal damage if players get too close. It also periodically fires a cannon blast. |
|

|
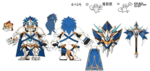
Sig - The swordsman of Hamel's Chief Gatekeepers. |
|

|
Leon - The mage of Hamel's Chief Gatekeepers. |
|

|
Net - The defender of Hamel's Chief Gatekeepers. |
|

|
Lexter - The spearman of Hamel's Chief Gatekeepers. |
|

|
Hamel's Sealing Device |
|
| Monster Image | Monster Description | Monster Moves |
|---|---|---|

|
Lantern Fly - This shining sphere of light tries to rush at you with its nimble body! |
|

|
Puppet Stone (Fake) - |
|

|
Puppet Stone (Real) - |
|

|
Mantares - This is one of the two spiders that you will encounter. It will attack by spewing acid from their mouth that will poison you while hitting you multiple times. |
|

|
Mantaray - This is the smaller and weaker spider that you will encounter in this dungeon. They will attack mainly with their claws. |
|

|
Glitter Rock Thrower - A Glitter who throws rocks down from high places. (immobile) |
|

|
Monkey King - The King of the monkeys that started attacking all intruders after the thieves had came. |
|

|
Fire Nasod: Ignis - The fire Nasod who uses fire blasts from his cannon to heat up any opponent. |
|

|
Water Nasod: Leviathan - The water Nasod who summons ice that can slow down any opponent. |
|

|
Barrier Machine-fire- - Ignis seems to have a barrier around himself making him impervious to damage! Destroy this machine to make him vulnerable. |
(None) |

|
Barrier Machine-water- - Leviathan seems to have a barrier around himself making him impervious to damage! Destroy this machine to make him vulnerable. |
(None) |

|
Magmanta |
|

|
Rash Vegar Trock - An evolved version of Vegar Trock that goes into stoic more frequently. |
|

|
Rash Oba Trock - An evolved version of Oba Trock that goes into stoic more frequently. |
|

|
Nasod Inspector - After the Secret Dungeon Reorganization, all robot based monsters are much smaller, including the Nasod Inspector. The Nasod Inspector is the gargantuan blue robot boss found in Wally's Underground Laboratory. |
|

|
Taranvash of Light - Possessing the ancient power of light.... Taranvash was the faithful watchdog who defended Hamel, but went insane due to the overwhelming forces of the El. |
|

|
Guardian Tower - At the center of the battlefield is a large tower that possesses the power of El. Whichever team manages to deal the most damage to it, wins. The tower isn't going to be destroyed so easily, however! |
|
| Obstacles Image | Obstacles Description |
|---|---|

|
Conveyor Belt - Moving floor panels that automatically move anything standing on it whichever direction it travels. |

|
Demoniac Cannon - You can flip the direction of the cannon by hitting it a few times or destroying it. Can be quite annoying at times. |

|
Launch Pad - Jumping on this platform will propel you into the air at a given direction. |

|
Mirror of Light - Throughout the stage various Mirrors of Lights will be found in certain location. |
| Pitfalls - A gaping hole in the ground, falling down one of these will result in a percent loss in HP.
}} |
You can acquire Battlefield ranking by Winning/Losing in Ereda Island(E ~ SSS Rank).
| Ereda Rank | |||||||||||
|---|---|---|---|---|---|---|---|---|---|---|---|
Conquest page added in Boards > [Ranking]

In Conquest, there is a highest rank called the "Star Rank".
| Rank | Detail |
|---|---|
 |
Awarded weekly to top 100 ranks. Star Rank characters can use 1 week timed title called the "Absolute of Ereda". |
Maximum and Minimum Ranks per level range.
Added so it can match against characters with similar skill and abilities.
| Character Level | Available Battlefield Rank |
|---|---|
| Lv. 1 ~ Lv. 40 | |
| Lv. 41 ~ Lv. 50 | |
| Lv. 51 ~ Lv. 60 | |
| Lv. 61 ~ Lv. 69 | |
| Lv. 70 ~ Lv. 99 |
-
Concept art of background objects in Ereda Island.
-
Concept art of Velder Shielder Lard.
-
Concept art of Hamel Shielder Net.
-
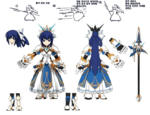
Concept art of Hamel Lancer Lexter.
-
Initial Stage design.
-

Finalized Stage design.
-

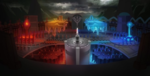
Ereda Island loading screen.


| Date | Changes | |
|---|---|---|
| KR | NA | |
| 11/06/2014 | 04/29/2015 |
|
| 03/16/2017 | 04/26/2017 |
|
| Server | Name | Translation |
|---|---|---|
| 에르다 아일랜드 | Ereda Island | |
| 艾特島 | Ereda Island | |
| 艾达岛 | Ereda Island | |
| Insel Ereda | Ereda Island | |
| Isla de Ereda | Ereda Island | |
| Siège d'Ereda | Ereda Siege | |
| Isola di Ereda | Ereda Island | |
| Wyspa Ereda | Ereda Island | |
| Ilha de Ereda | Ereda Island |
