| Monster Image
|
Monster Description
|
Info
|
| 6-1, Residential Area 3
|
|
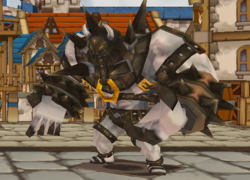
Uno Hound - A towering Glitter with a sinewy physique. Looks like a wrestler.... ALL HIS MOVES ARE DONE WITH IMMEDIATE SUPER ARMOUR.
|
Moves:
-Downward Punch: The Glitter pulls his arm back and punches downwards at you. The punch is inaccurate and it will miss you entirely if you stand right next to him.
-Double Lariat: The Glitter spins himself around with his arms wide apart, knocking everything in his radius away from him. This does rather substantial damage if he manages to combo you.
-Leap Smash: The Glitter leaps up into the air and smashes downwards.
-Running Punch: If the Glitter notices that you are some distance away from you, he will run towards you and punch you. This does not do much damage as long as he doesn't combo you.
-Seismic Smash: The Glitter squats, and repeatedly smashes the ground with his two arms. At the 4th smash, it will cause an earthquake effect on whoever is on the same level ground as it. Does substantial damage.
-Regeneration (Passive): This Glitter is so fit, he can recover health slowly...
Note:
- Super Armor: 30Hits
Drops:
|
| 6-2, Hope Bridge
|

|
Chloe - Apparent Leader of the Dark Elves; high evasion stat. High accuracy recommended.
- Has NPC version of evasion, if triggered she will automatically 'dodge' all other attacks from the player for several seconds. An accuracy of at least 10% is required to completely counter this.
|
Moves:
-Twin Shot: 2 arrows, one aimed forward and another upward, sprayed in one shot.
-3 Shot Combo: 2 shots followed by a Spray Shot.
-Ariel Bomber: High jump across the screen, shooting an arrow downwards that explodes on impact.
-Slash: Chloe draws her knife and quickly slashes her enemies twice.
-Tumble: A defensive move where Chloe backflips several times. During this move she is invulnerable.
-Summoning Call: Chloe summons 4 Dark Elves, usually when all the others have been defeated. When she does, she will jump to an unreachable platform, say a few words, and then her Dark Elves will drop into the room. Chloe will then drop from the sky afterwards on the left hand side of the far right upper platform (she may call them while in middle of combo to avoid you)
Note:
- Has extremely high resistance to Ice and Wind. Freezing from Blizzard Shower or Freezing Arrow - Sting/Drizzle will only last for 10% of the usual duration. (basically 0.2 - 0.5 sec)
Drops:
|
| 6-3, Palace Entrance
|

|
Glitter Vanguard - A powerful Battle Tank of Glitter origin. It has the aid of several unreachable Arc Glitter Snipers hiding atop the palace. The Vanguard has three different forms; as its health whittles away, the tank starts to break apart. In these new forms, it gains more attacks.
|
Moves:
-Drive: The machine moves around quickly. If hit head-on, it will skewer you and proceed to Ram you into the wall.
-Ram: The machine rams against a wall. This can injure you if you are on top of it.
-Spear Stab: The spears mounted on the sides of the tank eject forward, dealing damage on either side of the machine.
|
|
Glitter Vanguard (Stage 2) - This is the second phase of the Glitter Vanguard. The front plate of the tank is blown off revealing the mechanics of the tank tracks. After this the Glitter Vanguard will begin to use its cannons.
|
Moves:
-Drive: The machine moves around quickly. If hit head-on, it will skewer you and proceed to Ram you into the wall.
-Ram: The machine rams against a wall. This can injure you if you are on top of it.
-Spear Stab: The spears mounted on the sides of the tank eject forward, dealing damage on either side of the machine.
-Cannon Fire: Two cannons on either side of the machine pop out (which can injure you), then fire at either side of the battleground.
|

|
Glitter Vanguard (Stage 3) - This is the final form of the Glitter Vanguard. The sides of the tank has been destroyed, the Glitter Vanguard loses its ability to use its spears but will now be able to use its ultimate weapon, the Genesis Beam.
|
Moves:
-Drive: The machine moves around quickly. If hit head-on, it will skewer you and proceed to Ram you into the wall.
-Ram: The machine rams against a wall. This can injure you if you are on top of it.
-Cannon Fire: Two cannons on either side of the machine pop out (which can injure you), then fire at either side of the battleground.
-Genesis: A giant pod pops out from the center of the machine and fires a beam of energy to the sky. It then starts raining beams of white energy which can juggle and inflict lethal damage. The beams drop rather close to the machine, so keeping your distance would be a good idea.
Drops:
|
| 6-4, Burning Hope Bridge
|

|
Crazy Puppet - A pyromaniac puppet who apparently destroyed part of the Bridge of Hope.
|
Moves:
-Puppet Throw: Throws 3 puppets that explode in a matter of seconds. Being hit with a puppet as it's thrown will result in it exploding immediately dealing many times more damage than if it had just exploded on it's own.
-Fiery Whack: Clubs you with a burning stick in a variety of unorthodox movements.
-Ignite: The Crazy Puppet can set aflame any portion of the map for a period of time.
-Puppet Soul Transfer: The Crazy Puppet laughs in a sinister manner as a red orb pops out from its hat and then falls lifelessly to the ground. At this moment, the Crazy Puppet is intangible and numerous Puppet Stones are summoned. The player must find the 'odd puppet out' (that wears a red hat, a red scarf, and has a third 'horn') and destroy it within 15 seconds, eliminating the remaining puppets and taking a chunk out of the Crazy Puppet's health (the more remaining puppets, the more HP is taken out). If the player fails to do so, the Crazy Puppet will laugh maniacally, going into overdrive - having super armor and enhanced speed for 30 seconds. The remaining puppets on the field then explode.
Note:
- The Puppet Stones summoned/spawned during Puppet Soul Transfer are highly immune to knockback, and have too much hp to kill quickly without using skills, so make sure you have the mp to use a skill strong enough to wipe your target(s) out.
- The Puppet Stones summoned/spawned during Puppet Soul Transfer like to jump VERY frequently, so make sure you time it right so your Special Active freezes them where it will hit.
- Sometimes, as the Crazy Puppet uses Puppet Soul Transfer, it will instantly recoil in pain, losing hp, as though you killed the odd puppet. It will return to its normal state as usual, but the puppets spawned will remain.
- The Puppet Stones spawned have no attacks, and will only move around a lot.
Drops:
|
|
|
Puppet Stone (Real) - When using Puppet Soul Transfer Crazy Puppet will summon a single puppet who's appearance is distinctly different than the others, destroy this puppet to do extra damage to Crazy Puppet and prevent him from going into overdrive.
|
|

|
Puppet Stone (Fake) - When using Puppet Soul Transfer Crazy Puppet will summon many Puppet Stones who are only meant to be distractions.
|
|
| 6-5, Commercial Area 3
|

|
Spriggan - Elrios' Ultimate Test. Looks like a cute and chubby boy, but something seems to be hidden within that suit of armour...
|
Moves:
-Shadow Sword: (SUPER ARMOURED) Does a series of 3 slashes, ending with a dark mega slash.
-Shadow Trap: Spriggan hops on the ground twice and creates a shadow trap where he stands. Those caught in it will be unable to move or attack until the hole disappears. Similar to Entangle.
-Shadow Embrace: During the battle, black holes of dark energy will appear in the battlefield, accompanied with a low-key whistling sound. If the holes are not destroyed in time, they will expand into much larger portals. When Spriggan enters the range of these portals, his true demonic shadow form will be unleashed from the constrictions of his armor, announcing his arrival with eruptive bursts of dark energy around the battlefield.
Moves (Shadow Mode):
-Shadow Swipe: Slashes at you upwards, throwing you away from the Shadow Embrace it is under. Can be followed by tons of Dark Energy Splashes
-Dark Energy Slash: Spriggan's shadow swings his arm upwards and unleashes a violent eruption of dark energy beneath your feet, dealing substantial damage.
-Black Hole: Spriggan's shadow summons a black hole with his hand, sucking in everyone on the battlefield. It deals continuous hits of damage and ends with a powerful explosion. You will NOT survive this move. If he catches you, quickly mana break to avoid death.
Note:
-If you died after he summoned black holes, reviving will destroy all black holes on the field.
Drops:
|
| 6-6, Southern Gate
|
|
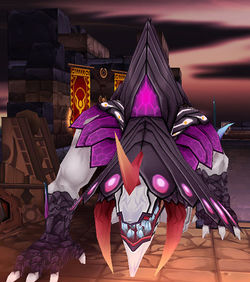
Dark Nephilim - At this stage, the Nephilim chases after you. You can temporarily immobilize it it by using the traps installed in the castle at the right time, that is your chance to attack it.
|
Moves:
-Double Pound: The Nephilim pounds on the ground twice and induces Flattening to the player.
-Claw Slam: It pulls back and smashes its right claw against the ground creating multiple pillars of debris. The pillars can juggle you to the left. Does immense damage.
-Purple Laser: The Nephilim slams the ground with both claws. A purple shockwave will quickly travel across the ground, launching any players into the air. The Nemphilim will finish off by firing a purple beam from its eye in its mouth, which can deal moderate damage.
-Shard of Darkness: If you keep a distance, the Nephilim will invoke one of these shards from the sky to strike the center of the screen.
Moves (Cornered):
-Claw Slam: It pulls back and smashes its right claw against the ground creating multiple pillars of debris. The pillars can juggle you to the left. Does immense damage.
-Purple Laser: The Nephilim slams the ground with both claws. A purple shockwave will quickly travel across the ground, launching any players into the air. The Nemphilim will finish off by firing a purple beam from its eye in its mouth, which can deal moderate damage.
-Shard of Darkness: If you keep a distance, the Nephilim will invoke one these shards from the sky to strike the center of the screen.
-Double Shard of Darkness: If you keep a distance, the Nephilim may howl into the sky and invoke two of these shards from the sky to strike the center of the screen.
-Enhanced Laser: A more powerful and enhanced version of the Purple Laser. This move does immense damage.
Drops:
|
| 6-X, Velder's Hallucination
|
|
|
Joaquin's Hallucination
|
Moves:
-Magic Shield: Joaquin will set up a shield that will drastically reduce all damage taken while drinking his potion to recover his health at an alarming rate.
-Hallucination: When you are in a party, Joaquin will randomly debuff one of the characters in your group. All attacks that the debuffed character makes will damage their teammates as well, including Special Actives. It is very possible to kill your own teammates while you are suffering from the debuff's effects.
-Dwarf: Joaquin will drink a potion and after flexing, he will release ghosts in all directions from his body, potentially dealing high damage. If you are standing close to him when he uses this it is possible to get hit by multiple ghosts. After the ghosts move off-screen, Joaquin will be minimized, therefore reducing his hitbox and making attacks difficult to use. Additionally he will gain super armor, 100% critical rate buff, and he will not possess a collision hitbox causing players to pass through him for the duration. This skill lasts for approximately 30 seconds.
-Thunderstorm: Joaquin will release several clouds in the air which will regularly shoot lightning at intervals, an electric effect will appear in the clouds over the player if this has targeted them. This move can be avoided if you move far away.
-Thunder: Joaquin can create smaller clouds in the air that will shoot a single bolt of lightning that can inflict status ailments such as Curse, Burn, Poison, and Confusion.
-Puppet Summoning: Joaquin will occasionally spawn Puppet Stones to distract and attack you.
-Zombie Summoning: Joaquin will occasionally create Zombie Glitter Graves at both ends of the map to spawn Zombie Glitters to slow you down.
-Building Crash: Throughout the battle, Joaquin will repeatedly create large portals in the air that will create buildings from the background and have them crash into the ground. These buildings will do damage and will act as large barricades to limit you from moving around the stage.
-Combustion: Joaquin can still use his old move where he toss black powder around him and ignite them to create an explosion.
-Potion Fling: In the same style as the Arc Glitter Alchemists, Joaquin will throw a potion at you to create a cloud that can inflict various status ailments.
|


