Dragon Nest: Abyss: Difference between revisions
From Elwiki
Gameboy224 (talk | contribs) No edit summary |
Gameboy224 (talk | contribs) No edit summary |
||
| (15 intermediate revisions by 3 users not shown) | |||
| Line 1: | Line 1: | ||
{{Languages| | :''For the previous iteration of this dungeon, see [[Dragon Nest: Abyss (Old)]].'' | ||
{{Languages|Dragon Nest: Abyss}} | |||
{{DungeonPage | {{DungeonPage | ||
| Orient=3 | |||
| Color={{ColorSel|Village|3}} | | Color={{ColorSel|Village|3}} | ||
| DunButton=3-XButton.png | | DunButton=3-XButton.png | ||
| Line 6: | Line 8: | ||
| BigPic=3-xnew.jpg | | BigPic=3-xnew.jpg | ||
| DunName=Dragon Nest: Abyss | | DunName=Dragon Nest: Abyss | ||
| Quotation=Kayak's conspiracy isn't over yet. The gate | | Quotation='''Dragon Nest: Abyss.''' Kayak's conspiracy isn't over yet. The gate to the accursed land has been opened. | ||
| Description=A sealed cursed place. A forbidden volcanic cave where Kayak escaped to. | | Description=A sealed cursed place. A forbidden volcanic cave where Kayak escaped to. | ||
| LvNeed=70-99 | | LvNeed=70-99 | ||
| LvFit= | | LvFit=15000 | ||
| XEntryReq=<span style="display:none">{{</span> | | XEntryReq=<span style="display:none">{{</span> | ||
*Have 1 Secret Dungeon Entry Permit [[File:HQ Shop Item 700015.png|50px]] in your inventory. | *Have 1 Secret Dungeon Entry Permit [[File:HQ Shop Item 700015.png|50px]] in your inventory. | ||
| Line 16: | Line 18: | ||
| Mob=<span style="display:none">{{</span> | | Mob=<span style="display:none">{{</span> | ||
|[[File:SaurusGuardianFace.png|60px]] | |[[File:SaurusGuardianFace.png|60px]] | ||
|'''Saurus Guardian''' - Similar to the '''Saurus Warriors''' in [[ | |'''Saurus Guardian''' - Similar to the '''Saurus Warriors''' in [[Bethma Lake (Night)]]. It also super armors itself frequently when attacking and possesses a stoic threshold. | ||
| | | | ||
*'''Overhead Smash:''' Draw its club and slam it with an overhead swing. | *'''Overhead Smash:''' Draw its club and slam it with an overhead swing. | ||
| Line 31: | Line 33: | ||
|- | |- | ||
|[[File:3-1-boss.jpg|60px]] | |[[File:3-1-boss.jpg|60px]] | ||
|'''Lizardman Warrior''' - Similar to the [[ | |'''Lizardman Warrior''' - Similar to the [[Dragon Road|Lizardman Warriors]] in [[Dragon Road]]. | ||
| | | | ||
*'''Slash:''' A single slash attack. | *'''Slash:''' A single slash attack. | ||
| Line 39: | Line 41: | ||
|- | |- | ||
|[[File:DNA3.jpg|60px]] | |[[File:DNA3.jpg|60px]] | ||
|'''Shadow Lizardman''' - Similar to the '''Shadow Lizardmen''', in [[ | |'''Shadow Lizardman''' - Similar to the '''Shadow Lizardmen''', in [[Bethma Lake (Night)]]. | ||
| | | | ||
*'''[[Block]]:''' The Lizardman can sometimes hold up their spear to defend themselves against oncoming attacks. | *'''[[Block]]:''' The Lizardman can sometimes hold up their spear to defend themselves against oncoming attacks. | ||
| Line 58: | Line 60: | ||
|- | |- | ||
|[[File:BoneGargoyleFace.png|60px]] | |[[File:BoneGargoyleFace.png|60px]] | ||
|'''Bone Gargoyle''' - Flying gargoyle skeletons that attack in a similar manner to [[ | |'''Bone Gargoyle''' - Flying gargoyle skeletons that attack in a similar manner to [[Shrine of Dedication Entrance|Wyverns]]. | ||
| | | | ||
*'''Gargoyle Dive:''' Gargoyle will stall in the air then dive at an angle. | *'''Gargoyle Dive:''' Gargoyle will stall in the air then dive at an angle. | ||
| Line 84: | Line 86: | ||
|- | |- | ||
|[[File:GenDarkBeraukFace.png|60px]] | |[[File:GenDarkBeraukFace.png|60px]] | ||
|'''Dark Berauk''': This mob's attack is virtually similar when he appears as a miniboss in [[3-4]]. | |'''Dark Berauk''': This mob's attack is virtually similar when he appears as a miniboss in [[Dragon Nest|3-4]]. | ||
| | | | ||
*'''Energy Ball:''' Berauk fires a ball of energy at you. | *'''Energy Ball:''' Berauk fires a ball of energy at you. | ||
| Line 105: | Line 107: | ||
|- | |- | ||
|[[File:GenShadowWarriorFace.png|60px]] | |[[File:GenShadowWarriorFace.png|60px]] | ||
|'''Shadow Warrior''': This mob's attack is virtually similar to when it appears as a boss in [[3-3]]. | |'''Shadow Warrior''': This mob's attack is virtually similar to when it appears as a boss in [[Bethma Lake (Night)|3-3]]. | ||
| | | | ||
*'''Swipe:''' The Lizardman will run over to you and use its dual swords to repeatedly hit you. | *'''Swipe:''' The Lizardman will run over to you and use its dual swords to repeatedly hit you. | ||
| Line 123: | Line 125: | ||
|[[File:Large Boulder.png|60px]] | |[[File:Large Boulder.png|60px]] | ||
|'''Large Boulder''' - A giant boulder that is pushed down hills ahead of the smaller boulders, flattens players for a long period of time and does extremely high damage. | |'''Large Boulder''' - A giant boulder that is pushed down hills ahead of the smaller boulders, flattens players for a long period of time and does extremely high damage. | ||
*It's still possible to avoid triggering the boulder. See [https://www.youtube.com/watch?v=evWDJM2LKN8 Video]. Currently only [[Aisha]] which could Levitation and | *It's still possible to avoid triggering the boulder. See [https://www.youtube.com/watch?v=evWDJM2LKN8 Video]. Currently only [[Aisha]] which could Levitation and [[Yama Raja]] and [[Lu/Ciel]] can use this trick. | ||
|- | |- | ||
|[[File:3-X Small Boulder.png|60px]] | |[[File:3-X Small Boulder.png|60px]] | ||
| Line 131: | Line 133: | ||
| Boss=<span style="display:none">{{</span> | | Boss=<span style="display:none">{{</span> | ||
|[[File:3-4-boss.jpg|60px]] | |[[File:3-4-boss.jpg|60px]] | ||
|'''[[Kayak|Kayak the Shadow Shaman]]''' - The boss from [[ | |'''[[Kayak|Kayak the Shadow Shaman]]''' - The boss from [[Dragon Nest|Dragon's Nest]] is back. His moves are exactly the same except he immediately summons a clone to aid in battle. | ||
| | | | ||
*'''Summon:''' Kayak will immediately summon a clone to aid in battle. | *'''Summon:''' Kayak will immediately summon a clone to aid in battle. | ||
| Line 166: | Line 168: | ||
{{tabs | {{tabs | ||
|name=2 | |name=2 | ||
|tab1=Dragonic- | |tab1=Dragonic-Breath | ||
|contents1={{: | |contents1={{:DragBreath}} | ||
|tab2=(Old) Dragonic- | |tab2=(Old) Dragonic-Fear | ||
|contents2={{: | |contents2={{:DragFear}} | ||
|tab3=(Old) Dragonic- | |tab3=(Old) Dragonic-Force | ||
|contents3={{: | |contents3={{:DragFor}} | ||
|tab4=(Old) Dragonic- | |tab4=(Old) Dragonic-Origin | ||
|contents4={{: | |contents4={{:DragOrg}} | ||
|tab5=(Old) Dragonic | |tab5=(Old) Dragonic-Caligo | ||
|contents5={{:Drag}} | |contents5={{:DragCal}} | ||
|tab6=(Old) Dragonic | |||
|contents6={{:Drag}} | |||
}} | }} | ||
| | | SBGM=[http://www.youtube.com/watch?v=ybuH_w31xpE '''''music018_stage'''''] | ||
[http://www.youtube.com/watch?v=ybuH_w31xpE '''''music018_stage'''''] | |||
[http://www.youtube.com/watch?v=xAVrtxgBcFs '''''music019_stage'''''] | [http://www.youtube.com/watch?v=xAVrtxgBcFs '''''music019_stage'''''] | ||
[http://www.youtube.com/watch?v=QAJkG_QAC30 '''''music022_stage'''''] | [http://www.youtube.com/watch?v=QAJkG_QAC30 '''''music022_stage'''''] | ||
[http://www.youtube.com/watch?v=rbFD3sWpqs8 '''''music011_boss'''''] | |||
| DLBGM=[https://www.youtube.com/watch?v=uVKoXEUjAPU '''''music033_stage'''''] | | DLBGM=[https://www.youtube.com/watch?v=uVKoXEUjAPU '''''music033_stage'''''] | ||
[http://www.youtube.com/watch?v=rbFD3sWpqs8 '''''music011_boss'''''] | |||
| Gallery= | | Gallery= | ||
<gallery widths=150px heights=150px> | <gallery widths=150px heights=150px> | ||
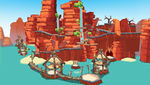
File:3-xExterior.jpg|Dragon Nest: Abyss exterior. | File:3-xExterior.jpg|Dragon Nest: Abyss exterior. | ||
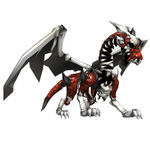
File:Ancient_Bone_Dragon.jpg|Ancient Bone Dragon | File:Ancient_Bone_Dragon.jpg|Ancient Bone Dragon | ||
File:3-4Button.png|Old Dungeon Button of ''' | File:3-4Button.png|Old Dungeon Button of '''Dragon Nest: Abyss''', it share the same button with [[Dragon Nest|3-4]]. | ||
File:HQ_Boss_Dark_Kayak.png|Kayak the Shadow Shaman's Skill Cut in (Unused) | File:HQ_Boss_Dark_Kayak.png|Kayak the Shadow Shaman's Skill Cut in (Unused) | ||
</gallery> | </gallery> | ||
Revision as of 00:53, 25 December 2019
- For the previous iteration of this dungeon, see Dragon Nest: Abyss (Old).

.png)
Dragon Nest: Abyss
| “ | Dragon Nest: Abyss. Kayak's conspiracy isn't over yet. The gate to the accursed land has been opened.
|
” |

Description
A sealed cursed place. A forbidden volcanic cave where Kayak escaped to.
Recommended Level
70-99
Required Combat Power
15,000
Entry Requirements
- Have 1 Secret Dungeon Entry Permit
 in your inventory.
 - Must be Level 70 or higher.

Mobs
{{
}}
| Monster Image | Monster Description | Monster Moves |
|---|---|---|

|
Saurus Guardian - Similar to the Saurus Warriors in Bethma Lake (Night). It also super armors itself frequently when attacking and possesses a stoic threshold. |
|

|
Shadow Shaman Lizardman - Similar to the Shaman Lizardmen seen in the Bethma Region. |
|

|
Lizardman Warrior - Similar to the Lizardman Warriors in Dragon Road. |
|

|
Shadow Lizardman - Similar to the Shadow Lizardmen, in Bethma Lake (Night). |
|

|
Fire Komodo - Similar to the Fire Komodos seen in the Bethma Region, except that it breathes fire faster and more often. It also super armors itself before & during it breathes fire and when struck. |
|

|
Flame Bat - A red bat that clings onto you and detonates itself, so watch out! |
|

|
Bone Gargoyle - Flying gargoyle skeletons that attack in a similar manner to Wyverns. |
|
General
{{
}}
| Monster Image | General Description | General Moves |
|---|---|---|

|
Brainwished Lizardman Saurus: This mob's attack is virtually similar to regular mobs but its stoic lasts longer. |
Notes:
|

|
Brainwashed Lizardman Chieftain: This mob's attack virtually similar to regular mobs but stoic last longer. This mob's attack virtually similar to the Capt. Vescoo field boss in Bethma. |
Notes:
|

|
Dark Berauk: This mob's attack is virtually similar when he appears as a miniboss in 3-4. |
Notes:
|

|
Brainwished Lizardman Warrior: This mob's attack is virtually similar to Lizardman Warrior. |
Notes:
|

|
Shadow Warrior: This mob's attack is virtually similar to when it appears as a boss in 3-3. |
Notes:
|
Obstacles
{{
}}
| Obstacles Image | Obstacles Description |
|---|---|

|
Totem - An inert Totem that stands still. But don't get too close to it or else fire will come out of its mouth straight at you! |

|
Geyser - A hole that spits fire at intervals and can cause burning damage. They are triggered by proximity |

|
Large Boulder - A giant boulder that is pushed down hills ahead of the smaller boulders, flattens players for a long period of time and does extremely high damage. |

|
Small Boulder - A small boulder that rolls down hills knocking down players and dealing minor damage.
|
Boss
{{
}}
| Monster Image | Boss Description | Boss Moves |
|---|---|---|

|
Kayak the Shadow Shaman - The boss from Dragon's Nest is back. His moves are exactly the same except he immediately summons a clone to aid in battle. |
|

|
Kayak the Shadow Shaman (Clone) - Identical to the boss in many ways, even the name is exactly the same. It has same abilities as the boss, the main difference being the clone has roughly half as much HP and is slightly darker in appearance. The clone will die automatically if its original is killed. |
|

|
Ancient Bone Dragon - At the end of the sub-boss battle, Kayak the Shadow Shaman, summons the Ancient Bone Dragon which will breathe flame at the center of the stage immediately after it's summoned. (Though this is a cutscene, the flame can still injure you substantially.) The Ancient Bone Dragon then flies to the right of the screen and the fight starts. |
|
Dialogue
- Elsword
- Aisha
- Rena
- Raven
- Eve
- Chung
- Ara
- Elesis
- Add
- Lu/Ciel
- Rose
- Ain
- Elsword: This maze is a mess! Good thing we've got Chacha Buch's map.
- Elsword: Whoa, is that a bone dragon?! Cool - in a gross kinda way. Get lost, you!
Secret Set
- Dragonic-Breath
- (Old) Dragonic-Fear
- (Old) Dragonic-Force
- (Old) Dragonic-Origin
- (Old) Dragonic-Caligo
- (Old) Dragonic
| Icon | Name | Stats | Set Bonus |
|---|---|---|---|
 |
Dragonic-Breath Top Piece | Lv. 80 Top Piece: [Unidentified * ?] |
2-Piece Effect:
3-Piece Effect:
4-Piece Effect:
|
 |
Dragonic-Breath Bottom Piece | Lv. 80 Bottom Piece: [Unidentified * ?] | |
 |
Dragonic-Breath Gloves | Lv. 80 Gloves: [Unidentified * ?] | |
 |
Dragonic-Breath Shoes | Lv. 80 Shoes: [Unidentified * ?] | |
 |
Dragonic-Breath Stinger | Lv. 80 Accessory (Arm): [Unidentified * ?] |
3-Piece Effect:
|
 |
Dragonic-Breath Weapon | Lv. 80 Weapon: [Unidentified * ?] |


{{
Luto Mode
Gallery
-
Dragon Nest: Abyss exterior.
-
Ancient Bone Dragon
-
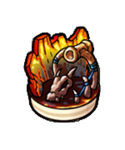
Old Dungeon Button of Dragon Nest: Abyss, it share the same button with 3-4.
-
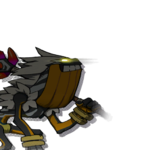
Kayak the Shadow Shaman's Skill Cut in (Unused)


Videos
Trivia
- This is the only Secret Dungeon to feature different music in Luto Mode. The song used in Luto Mode is also exclusive to this dungeon.
Alternative Names
{{
}}
| Server | Name | Translation |
|---|---|---|
| 용의 둥지: 나락 | Dragon Nest: Abyss | |
| 竜の巣:奈落 | Dragon Nest: Abyss | |
| 巨龍祭壇 | Dragon Altar | |
| 巨龙祭坛 | Dragon Altar | |
| Unterwelt | Underworld | |
| Inframundo | Underworld | |
| Les abîmes | The Abysses | |
| Abisso | Abyss | |
| Podziemia | Underworld | |
| Underworld | ||
| Ninho de Dragões: Abismo | Dragon Nest: Abyss | |
- Region 13~18
- Region 1~6
- Region 7~12
- Region 19~20
- Laby
- Noah
- Lithia
- Other
- Miscellaneous
| Rigomor | Master Road | Pruinaum Outskirts | |||
|---|---|---|---|---|---|
| {{ }} | {{ }} | {{ }} | {{ }} | {{ }} | {{ }} |
- Region 13~18
- Region 1~6
- Region 7~12
- Region 19~20
- Other
