Thousand Star: Difference between revisions
From Elwiki
No edit summary |
m (Text replacement - "==[\s]*?Updates[\s]*?==↵{\| cellpadding="5" border="1" style="border-collapse: collapse; text-align: center" class="colortable-([a-zA-Z\/]+)"" to "==Updates== {| cellpadding="5" border="1" style="border-collapse: collapse; text-align: center" class="colortable-$1 updates-table"") |
||
| (29 intermediate revisions by 5 users not shown) | |||
| Line 4: | Line 4: | ||
|Skill=Thousand Star | |Skill=Thousand Star | ||
}} | }} | ||
<div style="float: right;">{{#ev:youtube|aW0cc2esnK8| | <div style="float: right;">{{#ev:youtube|aW0cc2esnK8|400}}</div> | ||
{| cellpadding="5" style="border: 0px solid rgb(0, 0, 0); border-collapse: collapse;" | {| cellpadding="5" style="border: 0px solid rgb(0, 0, 0); border-collapse: collapse;" | ||
|- | |- | ||
| Line 19: | Line 19: | ||
== Requirements == | == Requirements == | ||
{{ | {{ADSquareSkill}} | ||
{| cellpadding="5" border="1" style="border-collapse: collapse; text-align: center" | {| cellpadding="5" border="1" style="border-collapse: collapse; text-align: center" class="colortable-Eve" | ||
|- | |||
! Class | ! Class !! Level Required !! Skill Requirement | ||
|- | |- | ||
| [[Code: Battle Seraph]] || 45 || {{SkillText|SkillQuest|3}} | | [[Code: Battle Seraph]] || 45 || {{SkillText|SkillQuest|3}} | ||
| Line 29: | Line 29: | ||
== Skill Information == | == Skill Information == | ||
{| cellpadding="5" border="1" style="border-collapse: collapse; text-align: center" class="colortable-Eve" | |||
{| cellpadding="5" border="1" style="border-collapse: collapse; text-align: center" | |- | ||
! rowspan="3" | Mode !! rowspan=3 | Shock Ball<br>(Magical) !! colspan=5 | Thousand Star !! colspan=5 | Max Hits<br>(Per Shock Ball) !! rowspan="3" | MP Usage !! rowspan="3" | Cooldown !! rowspan="3" | Mass Release<br>Cooldown | |||
! rowspan="3" | | |- | ||
|- | |||
! rowspan="2" | Shock Ball Count !! colspan=2 | Mass Release !! rowspan="2" | Duration !! rowspan=2 | MP Recovery<br>(Upon expiring) !! rowspan="2" | Normal / Amplify !! rowspan="2" | Spectrum !! rowspan="2" | Reactive !! rowspan="2" | Fusion !! rowspan="2" | Mass Release | ! rowspan="2" | Shock Ball Count !! colspan=2 | Mass Release !! rowspan="2" | Duration !! rowspan=2 | MP Recovery<br>(Upon expiring) !! rowspan="2" | Normal / Amplify !! rowspan="2" | Spectrum !! rowspan="2" | Reactive !! rowspan="2" | Fusion !! rowspan="2" | Mass Release | ||
|- | |- | ||
! Damage !! Shock Ball Count | ! Damage !! Shock Ball Count | ||
|- | |||
| colspan=15 | '''Normal''' | |||
|- | |- | ||
| | | '''{{PvE}}''' || 75% || rowspan=2 | 100 || rowspan=2 | x2 || rowspan=2 | [Remaining Shock Ball] / 2 || rowspan=2 | 60 Seconds || rowspan=2 | [Remaining Shock Ball] x 1.25 MP || rowspan=2 | 1 || rowspan="2" | 3 || rowspan="2" | 2 || rowspan="2" | 6 || rowspan=2 | 1 || rowspan=2 | 200 MP || rowspan=2 | 20 Seconds || rowspan=2 | 5 Seconds | ||
|- | |- | ||
| | | '''{{PvP}}''' || 26% | ||
|- | |||
| colspan=15 | '''[Enhanced]''' | |||
| | |||
|- | |- | ||
| | | '''{{PvE}}''' || 75% || rowspan=2 | 100 || rowspan=2 | x2 || rowspan=2 | [Remaining Shock Ball] / 2 || rowspan=2 | 60 Seconds || rowspan=2 | [Remaining Shock Ball] x 1.25 MP || rowspan=2 | 1 || rowspan="2" | 3 || rowspan="2" | 2 || rowspan="2" | 6 || rowspan=2 | 2 || rowspan=2 | 200 MP || rowspan=2 | 20 Seconds || rowspan=2 | 5 Seconds | ||
|- | |- | ||
| | | '''{{PvP}}''' || 26% | ||
|} | |} | ||
<br> | <br> | ||
== [[Skill Traits]]== | == [[Skill Traits]]== | ||
{| cellpadding="5" border="1" style="border-collapse: collapse; text-align: center" | {| cellpadding="5" border="1" style="border-collapse: collapse; text-align: center" class="colortable-Eve" | ||
|- | |||
! colspan=2 | Light Thousand Star !! Empowered Thousand Star | ! colspan=2 | Light Thousand Star !! Empowered Thousand Star | ||
|- | |- | ||
! rowspan=2 | Attribute Effect !! Details !! rowspan=2 | Attribute Effect | ! rowspan=2 | Attribute Effect !! Details !! rowspan=2 | Attribute Effect | ||
|- | |- | ||
! MP Usage | ! MP Usage | ||
|- | |- | ||
| {{SkillText|Light|80}} || 160 MP || {{SkillText|Empowered|120}} | | {{SkillText|Light|80}} || 160 MP || {{SkillText|Empowered|120}} | ||
|} | |} | ||
<br> | |||
== Total Damage == | |||
{| cellpadding="5" border="1" style="border-collapse: collapse; text-align: center" class="colortable-Eve" | |||
|- | |||
! rowspan=4 | Mode !! colspan=12 | Base | |||
|- | |||
! colspan=6 | Normal !! colspan=6 | Empowered | |||
|- | |||
! colspan=5 |Shock Ball !! rowspan=2 | Mass Release !! colspan=5 |Shock Ball !! rowspan=2 | Mass Release | |||
|- | |||
! Normal !! Amplify !! Spectrum !! Reactive !! Fusion !! Normal !! Amplify !! Spectrum !! Reactive !! Fusion | |||
|- | |||
| {{PvE}} | |||
| {{formatnum:{{#expr: 75*100}}}}% || {{formatnum:{{#expr: 75*100*1.2}}}}% || {{formatnum:{{#expr: 75*100*0.45*3}}}}% || {{formatnum:{{#expr: 75*0.55*100*2}}}}% || {{formatnum:{{#expr: 75*0.25*100*2*3}}}}% || {{formatnum:{{#expr: 75*2*50}}}}% | |||
| {{formatnum:{{#expr: 75*100*1.2}}}}% || {{formatnum:{{#expr: 75*100*1.2*1.2}}}}% || {{formatnum:{{#expr: 75*100*0.45*3*1.2}}}}% || {{formatnum:{{#expr: 75*0.55*100*2*1.2}}}}% || {{formatnum:{{#expr: 75*0.25*100*2*3*1.2}}}}% || {{formatnum:{{#expr: 75*2*50*1.2}}}}% | |||
|- | |||
| {{PvP}} | |||
| {{formatnum:{{#expr: 26*100}}}}% || {{formatnum:{{#expr: 26*100*1.2}}}}% || {{formatnum:{{#expr: 26*0.45*100*3}}}}% || {{formatnum:{{#expr: 26*0.55*100*2}}}}% || {{formatnum:{{#expr: 26*0.25*100*2*3}}}}% || {{formatnum:{{#expr: 26*2*50}}}}% | |||
| {{formatnum:{{#expr: 26*100*1.2}}}}% || {{formatnum:{{#expr: 26*100*1.2*1.2}}}}% || {{formatnum:{{#expr: 26*0.45*100*3*1.2}}}}% || {{formatnum:{{#expr: 26*0.55*100*2*1.2}}}}% || {{formatnum:{{#expr: 26*0.25*100*2*3*1.2}}}}% || {{formatnum:{{#expr: 26*2*50*1.2}}}}% | |||
|} | |||
*'''Mass Release''' is based on a single target. | |||
<br> | <br> | ||
== Related Skills == | == Related Skills == | ||
{| style="border-collapse: collapse;" border="1" cellpadding="1" | {| class="related-skills" style="border-collapse: collapse;" border="1" cellpadding="1" | ||
|- | |- | ||
| width="40" | [[Image:SpectroElCrystal.png]] | | width="40" | [[Image:SpectroElCrystal.png]] | ||
| Line 78: | Line 97: | ||
== Tips and Details == | == Tips and Details == | ||
*When [[El Crystal Spectrum]] or [[Energetic Heart]] is active, '''Mass Release''' will always use the '''Amplify''' mode to do damage. | *When [[El Crystal Spectrum]] or [[Energetic Heart]] is active, '''Mass Release''' will always use the '''Amplify''' mode to do damage. | ||
**Additionally, when either is active, all hits of the skill will be affected by [[Code: Recovery - Breaker]] as long as the buff lasts. | **Additionally, when either is active, all hits of the skill will be affected by [[Code: Recovery - Breaker]] as long as the buff lasts. | ||
* | *While the [Enhanced] effect increases its piercing count, the shock balls cannot hit the same target twice. | ||
*'''Thousand Star''''s skill freeze lasts until you can move again, and nearby enemies will receive hitstun. | *'''Thousand Star''''s skill freeze lasts until you can move again, and nearby enemies will receive hitstun. | ||
*The gear will also fire shock balls when an enemy is hit by items picked up by the player, such as [[Power-ups|Raul's Fury, Dryad's Fury, and Oryed's Fury]]. | *The gear will also fire shock balls when an enemy is hit by items picked up by the player, such as [[Power-ups|Raul's Fury, Dryad's Fury, and Oryed's Fury]]. | ||
| Line 94: | Line 109: | ||
**The target lock will be lost if the enemy moves beyond a certain distance. (Roughly out of sight range) | **The target lock will be lost if the enemy moves beyond a certain distance. (Roughly out of sight range) | ||
**After '''Mass Release''', there will be a minimum period of 5 seconds where the skill is on cooldown even if its normal cooldown would have already elapsed since the initial activation. | **After '''Mass Release''', there will be a minimum period of 5 seconds where the skill is on cooldown even if its normal cooldown would have already elapsed since the initial activation. | ||
*Shock balls are fired at the center of an enemy's hitbox, which may not always be where its hurtbox is, such as [[Temple of Frozen Water|Avalanche]] or [[Volcanic Flame Entrance|Ignia]] when they hover during certain attacks, or [[Southern Gate|Dark Nephilim]] and [[Magmanta's Cave|Magmanta]] who's hurtboxes are in entirely different places on their body than their hitbox, sometimes causing the shock balls to expire harmlessly in the air. | |||
*Shock balls are fired at the center of an enemy's hitbox, which may not always be where its hurtbox is, such as [[ | |||
**The shock balls can also hit enemies that are off the map (such as Crow Rider when he summons prototypes) as long as their hitbox is still there. | **The shock balls can also hit enemies that are off the map (such as Crow Rider when he summons prototypes) as long as their hitbox is still there. | ||
*When a [[Power-ups|Dwarf Potion or Giant Potion]] is obtained, only the size of the shock balls will change. The gear itself does not grow or shrink. | *When a [[Power-ups|Dwarf Potion or Giant Potion]] is obtained, only the size of the shock balls will change. The gear itself does not grow or shrink. | ||
*The gear glows White, Red, Blue, and Green in Normal Mode, Amplify Mode, Spectrum Mode, and Reactive Mode, respectively. | *The gear glows White, Red, Blue, and Green in Normal Mode, Amplify Mode, Spectrum Mode, and Reactive Mode, respectively. | ||
**In Fusion Mode, the color cycles between Red, Blue, and Green quite fast. | **In Fusion Mode, the color cycles between Red, Blue, and Green quite fast. | ||
<br> | |||
== Gallery == | |||
<gallery> | |||
File:TS.png|The different appearances of the gear. | |||
</gallery> | |||
<br> | <br> | ||
| Line 108: | Line 128: | ||
==Updates== | ==Updates== | ||
{| cellpadding="5" border="1" style="border-collapse: collapse; text-align: center" | {| cellpadding="5" border="1" style="border-collapse: collapse; text-align: center" class="colortable-Eve updates-table" | ||
|- | |||
! colspan=2 | Date !! colspan=2 | Changes | ! colspan=2 | Date !! colspan=2 | Changes | ||
|- | |- | ||
! KR !! NA !! PvE !! PvP | ! KR !! NA !! PvE !! PvP | ||
|- | |||
| 01/26/2012 || 04/03/2013 || colspan=2 align="left" | | |||
*'''Thousand Star''' added. | |||
|- | |- | ||
| 02/02/2012 || - || colspan=2 align="left" | | | 02/02/2012 || - || colspan=2 align="left" | | ||
| Line 118: | Line 141: | ||
|- | |- | ||
| 03/29/2012 || - || colspan=2 align="left" | | | 03/29/2012 || - || colspan=2 align="left" | | ||
{{buff|MP consumed from 300MP to 250MP.}} | *{{buff|MP consumed from 300MP to 250MP.}} | ||
{{nerf|Gear changed from infinite to 60 seconds.}} | *{{nerf|Gear changed from infinite to 60 seconds.}} | ||
**MP will be recovered based on the number of sock balls not used. Regaining 1.25 MP per shock ball. | **MP will be recovered based on the number of sock balls not used. Regaining 1.25 MP per shock ball. | ||
{{nerf|Shock Ball damage decreased from 116% to 57%}} | *{{nerf|Shock Ball damage decreased from 116% to 57%}} | ||
**Mass Release damage unchanged (116% damage). | **Mass Release damage unchanged (116% damage). | ||
|- | |- | ||
| 06/27/2013 || | | 06/27/2013 || 11/06/2013 || colspan=2 align="left" | | ||
{{buff|MP Usage decreased to 200 MP.}} | *{{buff|MP Usage decreased to 200 MP.}} | ||
{{nerf|Damage greatly decreased.}} | *{{nerf|Damage greatly decreased.}} | ||
*Changed from '''Bravery''' to '''Strength''' tier. | *Changed from '''Bravery''' to '''Strength''' tier. | ||
|- | |- | ||
| Line 132: | Line 155: | ||
*None | *None | ||
| align="left" | | | align="left" | | ||
{{nerf|Doesn't lock on to targets that are certain distance away.}} | *{{nerf|Doesn't lock on to targets that are certain distance away.}} | ||
|- | |- | ||
| 10/20/2016 || - || colspan=2 align="left" | | | 10/20/2016 || - || colspan=2 align="left" | | ||
| Line 143: | Line 166: | ||
*Fixed issue where skill icon sometimes not change when using the skill. | *Fixed issue where skill icon sometimes not change when using the skill. | ||
|- | |- | ||
| rowspan=2 | 04/27/2017 || rowspan=2 | | | rowspan=2 | 04/27/2017 || rowspan=2 | 05/10/2017 || colspan=2 align="left" | | ||
{{nerf|Speed decreased.}} | *{{nerf|Speed decreased.}} | ||
{{nerf|Range decreased.}} | *{{nerf|Range decreased.}} | ||
|- | |- | ||
| align="left" | | | align="left" | | ||
{{buff|Damage increased.}} | *{{buff|'''Damage''' increased.}} | ||
| align="left" | | | align="left" | | ||
*None | *None | ||
| Line 156: | Line 179: | ||
*'''Awakened''' trait changed to '''Empowered'''. | *'''Awakened''' trait changed to '''Empowered'''. | ||
|- | |- | ||
| 07/27/2017 || | | 07/27/2017 || 08/09/2017 || colspan=2 align="left" | | ||
{{nerf|Freeze Frames decreased.}} | *{{nerf|Freeze Frames decreased.}} | ||
|- | |- | ||
| 04/05/2018 || 04/18/2018 || colspan=2 align="left" | | | 04/05/2018 || 04/18/2018 || colspan=2 align="left" | | ||
{{buff|Damage increased.}} | *{{buff|'''Damage''' increased.}} | ||
|- | |- | ||
| 01/17/2019 || 02/20/2019 || colspan=2 align="left" | | | 01/17/2019 || 02/20/2019 || colspan=2 align="left" | | ||
{{buff|Invincibility frames increased.}} | *{{buff|Invincibility frames increased.}} | ||
|- | |||
| 03/27/2021 || - || colspan=2 align="left" | | |||
*{{buff|Skill cast speed increased by 50%.}} | |||
|} | |} | ||
<br> | <br> | ||
| Line 181: | Line 207: | ||
}} | }} | ||
<br> | <br> | ||
{{SkillNav - Code: Battle Seraph}} | |||
{{ | |||
Revision as of 10:56, 31 August 2022
| File:ThousandsofStars.png File:ThousandsofStarsFire.png |
[Special Active: Strength] Summon a drone that fires shockballs when you attack enemies. Remaining shockballs can be fired by pressing the skill key. (Must have a locked target to release shockball) |
Force Field Skill
| |
Final Enhanced Skill
|
Requirements
| Class | Level Required | Skill Requirement |
|---|---|---|
| Code: Battle Seraph | 45 | Advanced Training Skill Quest |
Skill Information
| Mode | Shock Ball (Magical) |
Thousand Star | Max Hits (Per Shock Ball) |
MP Usage | Cooldown | Mass Release Cooldown | ||||||||
|---|---|---|---|---|---|---|---|---|---|---|---|---|---|---|
| Shock Ball Count | Mass Release | Duration | MP Recovery (Upon expiring) |
Normal / Amplify | Spectrum | Reactive | Fusion | Mass Release | ||||||
| Damage | Shock Ball Count | |||||||||||||
| Normal | ||||||||||||||
| PvE | 75% | 100 | x2 | [Remaining Shock Ball] / 2 | 60 Seconds | [Remaining Shock Ball] x 1.25 MP | 1 | 3 | 2 | 6 | 1 | 200 MP | 20 Seconds | 5 Seconds |
| PvP | 26% | |||||||||||||
| [Enhanced] | ||||||||||||||
| PvE | 75% | 100 | x2 | [Remaining Shock Ball] / 2 | 60 Seconds | [Remaining Shock Ball] x 1.25 MP | 1 | 3 | 2 | 6 | 2 | 200 MP | 20 Seconds | 5 Seconds |
| PvP | 26% | |||||||||||||
Skill Traits
| Light Thousand Star | Empowered Thousand Star | |
|---|---|---|
| Attribute Effect | Details | Attribute Effect |
| MP Usage | ||
| MP Usage decreased to 80% | 160 MP | Damage increased to 120% |
Total Damage
| Mode | Base | |||||||||||
|---|---|---|---|---|---|---|---|---|---|---|---|---|
| Normal | Empowered | |||||||||||
| Shock Ball | Mass Release | Shock Ball | Mass Release | |||||||||
| Normal | Amplify | Spectrum | Reactive | Fusion | Normal | Amplify | Spectrum | Reactive | Fusion | |||
| PvE | 7,500% | 9,000% | 10,125% | 8,250% | 11,250% | 7,500% | 9,000% | 10,800% | 12,150% | 9,900% | 13,500% | 9,000% |
| PvP | 2,600% | 3,120% | 3,510% | 2,860% | 3,900% | 2,600% | 3,120% | 3,744% | 4,212% | 3,432% | 4,680% | 3,120% |
- Mass Release is based on a single target.
Related Skills
| File:SpectroElCrystal.png | El Crystal Spectrum | File:CSPassive.png | Overload |
Tips and Details
- When El Crystal Spectrum or Energetic Heart is active, Mass Release will always use the Amplify mode to do damage.
- Additionally, when either is active, all hits of the skill will be affected by Code: Recovery - Breaker as long as the buff lasts.
- While the [Enhanced] effect increases its piercing count, the shock balls cannot hit the same target twice.
- Thousand Star's skill freeze lasts until you can move again, and nearby enemies will receive hitstun.
- The gear will also fire shock balls when an enemy is hit by items picked up by the player, such as Raul's Fury, Dryad's Fury, and Oryed's Fury.
- There is a very short cooldown period between each shot where additional hits made during that period will not trigger the launch of additional shock balls.
- Shock balls cannot trigger elemental enchantments or most 'on hit' effect activations.
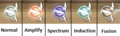
- The shock balls act much like normal Electron Balls under the effects of a force field mode. Amplify increases their size and damage, Spectrum decreases their damage but splits them into 3, Reactive decreases their damage and allows them to pierce enemies once, and Fusion decreases their damage, allows them to pierce once, and splits them into 3.
- Shock balls are not additionally affected by passing through a force field generated by a skill.
- An enemy is locked onto whenever you hit them. A locked on target is required to be able to use Mass Release.
- The target lock will be lost if the enemy moves beyond a certain distance. (Roughly out of sight range)
- After Mass Release, there will be a minimum period of 5 seconds where the skill is on cooldown even if its normal cooldown would have already elapsed since the initial activation.
- Shock balls are fired at the center of an enemy's hitbox, which may not always be where its hurtbox is, such as Avalanche or Ignia when they hover during certain attacks, or Dark Nephilim and Magmanta who's hurtboxes are in entirely different places on their body than their hitbox, sometimes causing the shock balls to expire harmlessly in the air.
- The shock balls can also hit enemies that are off the map (such as Crow Rider when he summons prototypes) as long as their hitbox is still there.
- When a Dwarf Potion or Giant Potion is obtained, only the size of the shock balls will change. The gear itself does not grow or shrink.
- The gear glows White, Red, Blue, and Green in Normal Mode, Amplify Mode, Spectrum Mode, and Reactive Mode, respectively.
- In Fusion Mode, the color cycles between Red, Blue, and Green quite fast.
Gallery
-
The different appearances of the gear.
Trivia
- Despite what the name suggests, there are only a hundred stars, not a thousand.
- The gear looks similar to that of the Queen's Core.
Updates
| Date | Changes | ||
|---|---|---|---|
| KR | NA | PvE | PvP |
| 01/26/2012 | 04/03/2013 |
| |
| 02/02/2012 | - |
| |
| 03/29/2012 | - |
| |
| 06/27/2013 | 11/06/2013 |
| |
| 02/04/2016 | 03/16/2016 |
|
|
| 10/20/2016 | - |
| |
| 02/09/2017 | - |
| |
| 03/16/2017 | - |
| |
| 04/27/2017 | 05/10/2017 |
| |
|
| ||
| 07/13/2017 | 07/26/2017 |
| |
| 07/27/2017 | 08/09/2017 |
| |
| 04/05/2018 | 04/18/2018 |
| |
| 01/17/2019 | 02/20/2019 |
| |
| 03/27/2021 | - |
| |
Alternative Names
| Server | Name | Translation |
|---|---|---|
| 사우전드 스타 | Thousand Star | |
| サウザンドスター | Thousand Star | |
| 众星攻击 | Multiply Stars Attack | |
| Tausendstern | Thousand Star | |
| Mil estrellas | Thousand Star | |
| Milliers d'étoiles | Thousand Star | |
| Miriade di Stelle | Thousand Star | |
| Multi-Gwiazda | Multi Star | |
| Mil Estrelas | Thousand Star |

Hyper Active
Special Active
Active
Passive
