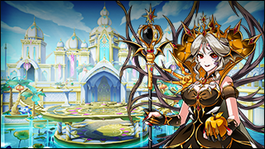
Palace of Gold Medovine

Revision as of 01:08, 24 September 2024 by Gameboy224 (talk | contribs) (Text replacement - "{{se|441|Enviromental Debuff - Demon Realm||ed}}" to "{{se|441|Enviromental Debuff - Demon Realm|tt=no}}")
(diff) ← Older revision | Latest revision (diff) | Newer revision → (diff)
  • English

Palace of Gold Medovine

The palace is full of precious treasures and magic. The display inside is like a small curated world.


Description
The El Search Party receives the Queen's invitation and step foot inside the Queen of Gold's palace on the east side of the Red Demon Territory.
Recommended Level
99
Required Combat Power
5,000,000
Dungeon Layout
Details
{{

  Enviromental Debuff - Demon Realm

  • The El's power does not reach into this realm, Attack and HP will be reduced by 90%.

Gameplay

Players must complete the Creatures Exhibit (right path) and/or the Artifact Exhibit (left path) in order to progress to the boss room. Additionally, there is the optional Plant Exhibit (bottom path) which is not necessary to complete in order to progress.

The Creatures Exhibit and Plant Exhibit consist of multiple rooms of monsters which need to be defeated.
The Artifact Exhibit consists of two platforming rooms with Dark Elf Traps behind indestructible barriers. Two platforms will emit a golden light, and players must step on the correct platform in order to remove the barrier and disable the trap. Stepping on the wrong platform will either cause the platform to disappear, causing players to fall into a pit, or will teleport the player back to the start of the room.

}}
Mobs
{{ {{
Monster Image Monster Description Monster Moves
  Attacks highlighted in red bypass invincibility frames.
  Sea Chameleon - A large chameleon creature transported from the depths of Rigomor. It is more vibrantly colored compared to its common counterpart, and kept in the Creatures Exhibit.
  • Camouflage: Turns itself invisible, partially blending into the environment. This attack deals no damage but can make it more difficult to spot the chameleon.
  • Tongue Attack: Shoots out its long tongue. It can angle this attack straight forwards or upwards.
  • Charge: Instantly charges forward, tackling targets in its path.
  Armadulla - A large mollusk hiding inside a golden shell. It was specially transported from the depths of Rigomor, and kept in the Creatures Exhibit.
  • Charge: Retreats into its shell, drastically raising its defense before rushing forwards, dealing damage to whatever is in its way.
  • Shell Sprout: Flips itself over, causing a field of shells to sprout of the ground in front of it.
  Seren - A flying electrical jellyfish creature transported from the depths of Rigomor. It is more vibrantly colored compared to its common counterpart, and kept in the Creatures Exhibit.
  • Teleport: Disappears and reappears next to a target.
  • Zap: Rises up and releases an electric discharge from its tentacles.
  • Whirlpool Shock: Generates a whirlpool in front which sucks in players, dealing continuous damage. The attack prevents skill usage while being sucked in and inflicts no hitstun.
  Mata - A wolf-like creature that resides in the Demon Realm. It is kept in the Creatures Exhibit and has a more orange hue compared to its common counterpart.
  • Charge: Performs a quick charge forwards.
  • Jump Dive: Jumps forwards into the air then dives straight down, generating a shockwave upon landing.
  • Tail Whip: Spins in a circle, swiping targets with its tail.
  Njord - An anthropomorphic moth-like creature that resides in the Demon Realm. It is kept in the Creatures Exhibit and has a more greenish hue compared to its common counterpart.
  • Rushing Uppercut: Rushes forwards then performs a jab and uppercut.
  • Backwards Dive Kick: Blinks behind targets and perform a dive kick with a shockwave.
  Hati - A lion-like creature that resides in the Demon Realm. It is kept in the Creatures Exhibit and unlike its common counterpart, has a majestic white body and golden mane.
  • Ram: Dashes forwards into targets.
  • Pounce: Leaps forwards and pounces on targets.
  • Warp Pounce: Teleports and pounce on targets.
  • Howl Aura: Howls loudly, emitting a red field aura. This aura lingers for a few seconds and will inflict damage to any players who enter its area.
  Vine Plant - A flower native to the Dark Elves' Forest. It has been specially bred in the Plant Exhibit to be larger and more vibrantly colored compared to its common counterpart.
  • Vine Whip: Whips its vines on both sides of itself.
  • Poison Release: Continuously emits a poisonous gas. This attack does not inflict hitstun but deals great damage to players nearby.
  Venomous Plant - A flower native to the Dark Elves' Forest. It has been specially bred in the Plant Exhibit to be larger and more vibrantly colored compared to its common counterpart.
  • Vine Whip: Whips its vines on both sides of itself.
  • Poison Release: Continuously emits a poisonous gas. This attack does not inflict hitstun but deals great damage to players nearby.
  Drugger Plant - A plant native to the cold regions of Pruinaum. It has been specially bred in the Plant Exhibit to be larger and more colorful, even sprouting flowers, compared to its common counterpart.
  • Mana Leech: Continuously emits an aura that deals damage as well to players nearby, as well as drains their MP.
  Icy Anemone - A plant-like creature native to the cold regions of Rigomor. It has been specially bred in the Plant Exhibit to be larger and more vibrantly colored compared to its common counterpart.
  • Toxin Release: Releases a cloud of toxic mist around itself, damaging players nearby.
  • Surprise Attack: Reveals a large claw-like mass that injects itself into the ground. This will cause some type of growth to shoot out of the ground underneath a player.

}}

}}
Mini Boss
{{ {{
Monster Image Boss Description Boss Moves
  Attacks highlighted in red bypass invincibility frames.
  Plant Overlord (x3) - A mutant variation of the holy tree found in Feita. It has been specially bred in the Plant Exhibit to be more vibrantly colored, and more aggressive.
  • Barrier: Emits a barrier around its body. The Overlord can only be damaged when players are standing inside this barrier.
  • Double Swing: Swings its two appendages, inflicting heavy damage.
  • Bite: Swings its appendages in front and bites down, inflicting heavy damage.
  • Pollen Spray: Spews a auburn-pink mist from its mouth. This mist will linger on the field for a short duration, inflicting continuous damage without hitstun. Occasionally, all three Overlords will use this attack at the same time.
  • Transform: When two of the Overlords are killed and there is only one left, the remaining Overlord will transform into a stronger form, gaining increased power, speed, and defense.
  Plant Overlord (Transformed) - When two Plant Overlords have been defeated, the remaining Overlord will transform into a more aggressive state. It is capable of using all attacks from its pre-transformed state, along with new attacks.
  • Triple Bite: Chomps down three times, starting from the left and ending on the right.

Note:

  • As with the original Plant Overlord, it is recommended to bring one Overlord down to a few bars of HP, and then defeat the remaining two Overlords. This will allow players to deal with the first Overlord without having it spend too much time in its transformed state.
  Queen of Gold Copy - A weaker copy of the Queen of Gold that serves as the final security measure in the Artifact Exhibit.
  • Golden Spheres: Summons three large spheres that slowly home in on players, dealing moderate damage upon hit. They will not track players that are knocked down.
  • Teleport: Teleports to another location on the arena. She will often follow up with Spread!.
  • Spread!: Emits a golden aura that pushes players away from her, dealing heavy damage. This attack knocks players back rather far, often pushing them off the platform.
  • Golden Beams: Summons a large vertical beam to the left and right side of a random player. These beams reach well above and below the screen, and follow the player as they move around. The beams deal moderate damage to any other players who make contact with them, and disappear after a while.

}}

}}
Obstacles
{{ {{
Obstacles Image Obstacles Description
  Dark Elf Trap - A Dark Elf turret that has been remodeled and integrated into the Artifact Exhibit's security system. It is protected by a barrier and must be disabled. It will occasionally fire arrows in a spread shot, dealing damage to any players hit.
  Barrier - A defensive barrier that repels players who approach it. It must be disabled in order to progress.
  Exploding Plant - A spiked plant similar to the Frost Weeds of Rigomor. It has been specially bred in the Plant Exhibit to be more vibrantly colored compared to its common counterpart. It is harmless until a player enters its range, at which it will protrude its spikes, inflicting damage to players nearby, and then wilting.

}}

}}
Boss
{{ {{
Monster Image Boss Description Boss Moves
  Attacks highlighted in red bypass invincibility frames.
  Queen of Gold Medovine - The Queen of Gold in her true, disfigured form.
  • Clones: Medovine will begin the fight with three bodies on the stage, her true self inhabiting one of these bodies. The clones hold a golden apple in their hands whereas the real Medovine will hold a golden ornament. The three bodies each have their own health bars and while the clones can be defeated, only the real Medovine needs to be defeated to complete the dungeon.
    • Defeating a clone will increase the frequency of Medovine's ultimate attack. Furthermore, the clone will only remain dead for a limited amount of time, before reviving with full HP.
  • Swap: Swaps with one of the cloned bodies, inheriting the body's current HP.
  • Piercing Vine: Summons a giant, golden vine that protrudes from the ground and shoots upwards, dealing heavy damage. Its spawn zone is indicated by a beam of light, and it is capable of blocking players much like a wall.
  • Spread!: Emits a golden aura around her that deals heavy damage. Unlike the Miniboss variant, this does not push players away from her.
  • Tracking Vines: Summons multiple golden vines that protrude from the ground, chasing after a random player.
  • Expanding Vines: Summons a golden vine to her left and right. These vines will retreat into the ground before poking out again, slowly traveling away from Medovine as they do so.
  • Golden Chain: Generates a golden chain that tethers to a random player, dealing heavy non-hitstun damage. The chain can be broken by moving far away enough from Medovine.
  • Dust to Dust: Medovine's ultimate attack. She will become immune to all attacks and begin gathering energy around her. After some time, she will unleash a powerful attack that instantly kills all players who are not affected by   Self DebuffValuable.
    • During this attack, players who are not already in a   Self DebuffValuable state can use their Master Skill to instantly enter a   Self DebuffValuable state.

Note:

  • All of Medovine's attacks will inflict a stack of   Self DebuffGolden, reducing all speeds. Upon reaching 15 stacks, the debuff will be removed and the player will be inflicted with   Self DebuffValuable, turning the player a golden color and immobilizing them for a set duration.
  • If a clone is defeated, Medovine will be unable to swap with that body, until it is revived.
  • As Medovine takes on the current HP of the body she occupies, one strategy is to attack one body until it is almost dead, and then wait for her to swap into the body.

}}

}}
Dialogue
  • Mid Dungeon Dialogue
  • Boss Intro Cutscene
  • Mid Boss Dialogue
  • Dungeon Victory Quote
  •   Rena: It seems the Artifacts are on the left, the Creatures on the right, and the Plants below.
  •   Laby: Alright. Where should we go first?

Upon Entering the Artifact Exhibit:

  •   Ain: This is the Artifact exhibit. Let's read the introduction.
  •   Ain: 'The Artifact exhibit displays historic artifacts from Noctiluca...'
  •   Elsword: It's nice and quiet here. It won't take... Gah?!
  •   Eve: There are traps guarding the artifacts. Be.... Ah, never mind.

  •   Ara: Queen of Gold.... Here?
  •   Aisha: It's not actually her. It looks like the final security measure.

Upon Entering the Creatures Exhibit:

  •   Elesis: Here in the Creatures exhibit, you can admire the still beauty of the rare
  •   Elesis: 'Still' exhibition? You call this 'still'?
  •   Chung: They must have escaped once the preservation magic lifted. Let's subdue them!

Upon Entering the Plant Exhibit:

  •   Raven: Here's the introduction. 'The Plant exhibit ah, achoo, preserves endangered-
  •   Lu: Are you alright? You don't have to force yourself.
  •   Rena: These plants... Are they supposed to be this big?! Greenhouse plants are really different...

  •   Add: Oh? Now that's a familiar face.
  •   Noah: ...???

Upon Completing an Exhibit and Returning to the Main Lobby:

  •   Chung: One down. Shall we check out the others?
  •   Ciel: We've done enough, right? We can end it here and receive our reward.
{{
Image Name Boss Character Stats
 
Queen of Gold Wings
Queen of Gold Medovine
Common

Accessory (Top Piece):
Critical +4%
Maximize +4%

}}
Gallery
Trivia
{{
  • In the background of the Artifact Exhibit areas, various monsters from other Demon Realm dungeons can be seen enclosed in display cases.
    • Some of these cases are shattered and do not contain anything, alluding to the monsters fought in the dungeon.
}}
Updates
{{
Date Changes
KR NA
08/03/2023 08/30/2023
  • Palace of Gold Medovine added.
}}
Alternative Names
{{
Server Name Translation
  South Korea 황금성 메도바인 Golden Castle Medovine
}}


  • Region 19~21
  • Region 1~6
  • Region 7~12
  • Region 13~18
  • Laby
  • Noah
  • Lithia
  • Other
  • Miscellaneous