Savage White-Ghost's Castle: Difference between revisions
Shironsaki (talk | contribs) No edit summary |
Gameboy224 (talk | contribs) No edit summary |
||
| (10 intermediate revisions by 2 users not shown) | |||
| Line 14: | Line 14: | ||
| LvFitStory=750000 | | LvFitStory=750000 | ||
| Detail=<dfn>{{</dfn> | | Detail=<dfn>{{</dfn> | ||
*Up to 6 players can enter | <h3> Solo Mode</h3> | ||
:''Main Article: [[Raid Solo Mode]]'' | |||
---- | |||
*Up to 6 players can enter, requiring a minimum of at least 3 people. (Normal) | |||
**2~6 players. (Story) | |||
*Only three Resurrection Stones can be used to revive. | |||
*Players are given a 15 second penalty before they can resurrect themselves. | |||
*Bosses can only be frozen or petrified 3 times each (every hit is 1 count) at a time. When this limit is exceeded, they become invulnerable to that debuff for 60 seconds. | |||
**Freezing or petrifying can be attempted again after 30 seconds, but you will not be able to chain it further. This also resets the 3-step chain's cooldown to 60 seconds. | |||
*All enemy attacks in this dungeon ignore players' physical and magical defense. | *All enemy attacks in this dungeon ignore players' physical and magical defense. | ||
===={{se|441|Enviromental Debuff - Demon Realm|tt=no}}==== | ===={{se|441|Enviromental Debuff - Demon Realm|tt=no}}==== | ||
| Line 30: | Line 38: | ||
|+ [[File:Icon - Warning.png|20px]] Attacks highlighted in {{color|red|red}} bypass invincibility frames. | |+ [[File:Icon - Warning.png|20px]] Attacks highlighted in {{color|red|red}} bypass invincibility frames. | ||
|- | |- | ||
! colspan=3 | Hadron's Copy | ! colspan=3 | Hadron's Copy (Warrior) | ||
|- | |- | ||
| align=center width=5% | {{tt|[[File:Red Hadron Head.png|60px]]|[[File:Red hadron.png| | | align=center width=5% | {{tt|[[File:Red Hadron Head.png|60px]]|[[File:Red hadron.png|200px]]}} | ||
| colspan=2 align=center width=95% | A red spirit that guards the entrance to the White-Ghost Castle. Will guard one of two paths alongside its partner. | | colspan=2 align=center width=95% | A red spirit that guards the entrance to the White-Ghost Castle. Will guard one of two paths alongside its partner. | ||
|- | |- | ||
| Line 38: | Line 46: | ||
|- | |- | ||
| colspan=2 | | | colspan=2 | | ||
*'''<font color=red>Axe Swing:</font>''' | *'''<font color=red>Axe Swing:</font>''' Hadron's Copy (Warrior) swings his axe in front of him. If you get hit, you'll receive the {{se|593|Ember of Retribution||ed}} debuff for 5 seconds. | ||
| | | | ||
|- | |- | ||
| colspan=2 | | | colspan=2 | | ||
*'''Axe Wave:''' | *'''Axe Wave:''' Hadron's Copy (Warrior) creates a shockwave that goes forward by swinging his axe from the ground. | ||
| | | | ||
|- | |- | ||
| colspan=2 | | | colspan=2 | | ||
*'''Charge:''' | *'''Charge:''' Hadron's Copy (Warrior) charges forward, dealing damage as it moves. | ||
| | | | ||
|- | |- | ||
| colspan=2 | | | colspan=2 | | ||
*'''Devastating Charge:''' A random player is teleported to the right side of | *'''Devastating Charge:''' A random player is teleported to the right side of Hadron's Copy (Warrior)'s arena, and locked in place for 30 seconds. The copy then does a stronger version of '''Charge''', aiming for the stunned player. Every time the charge connects with a different player than the stunned target, the final hit on them will have its damage reduced. If no one else was hit, the stunned player will die when Hadron's Copy (Warrior) gets to them. Players must spread out between the boss and the stunned player to share the damage of the attack between them. Afterwards, the copy becomes exhausted for a short period of time, and '''Overwhelming Defense''' will not activate for this duration. Attack pattern can be seen [[Media:DevastatingCharge.gif|'''here''']] | ||
*{{color|#9F6811|'''Solo Mode Variation''':}} | |||
**Hadron's Copy (Warrior) will teleport you to his side of the arena, but you will not be placed in a stun state. Taking the portal to the other arena or jumping over him will avoid the attack entirely. | |||
| | | | ||
|- | |- | ||
| colspan=2 | | | colspan=2 | | ||
*'''<font color=red>Shockwave Swing:</font>''' | *'''<font color=red>Shockwave Swing:</font>''' Hadron's Copy (Warrior) charges up a deadly swing that sends out shockwaves across the entire map, killing all players regardless of where they are. The attack can only be nullified by gathering every player inside the red box-shaped area in front of the boss. Hadron's Copy (Warrior) is vulnerable to attacks while charging up the attack and '''Overwhelming Defense''' will not activate for this duration, allowing for high damage to be dealt to it. | ||
| | | | ||
*The boss will tend to do with attack if nobody is on his side of the arena. | |||
|- | |- | ||
! colspan=3 | Notes | ! colspan=3 | Notes | ||
|- | |- | ||
| colspan=3 | | | colspan=3 | | ||
*Dealing damage to ''' | *Dealing damage to '''Hadron's Copy (Warrior)''' will also deal the same damage to '''Hadron's Copy (Magician)'''. | ||
*{{se|593|Ember of Retribution||ed}} debuff burns 5% MP per second and attacks will heal the ''' | *{{se|593|Ember of Retribution||ed}} debuff burns 5% MP per second and attacks will heal the '''Hadron's Copy (Warrior)''' while no longer damaging the '''Hadron's Copy (Magician)'''. | ||
*The fight ends if either this or the Blue Copy are defeated. | *The fight ends if either this or the Blue Copy are defeated. | ||
|} | |} | ||
{| class="wikitable" border="1" cellpadding="5" style="border-spacing: 0; border: 1px #000 solid; border-collapse: collapse; width: 100%; vertical-align: top;" | {| class="wikitable" border="1" cellpadding="5" style="border-spacing: 0; border: 1px #000 solid; border-collapse: collapse; width: 100%; vertical-align: top;" | ||
! colspan=3 | Hadron's Copy | ! colspan=3 | Hadron's Copy (Magician) | ||
|- | |- | ||
| align=center width=5% | {{tt|[[File:Blue Hadron Head.png|60px]]|[[File:Blue hadron.png| | | align=center width=5% | {{tt|[[File:Blue Hadron Head.png|60px]]|[[File:Blue hadron.png|200px]]}} | ||
| colspan=2 align=center width=95% | A blue spirit that guards the entrance to the White-Ghost Castle. Will guard one of two paths alongside its partner. | | colspan=2 align=center width=95% | A blue spirit that guards the entrance to the White-Ghost Castle. Will guard one of two paths alongside its partner. | ||
|- | |- | ||
| Line 73: | Line 84: | ||
|- | |- | ||
| colspan=2 | | | colspan=2 | | ||
*'''<font color=red>Explosion:</font>''' | *'''<font color=red>Explosion:</font>''' Hadron's Copy (Magician) channels his energy, then quickly releases it as a blue explosion around him. If you get hit, you'll receive the {{se|593|Ember of Retribution||ed}} debuff for 5 seconds. | ||
| | | | ||
|- | |- | ||
| Line 82: | Line 93: | ||
| colspan=2 | | | colspan=2 | | ||
*'''<font color=red>Link:</font>''' Targets two players in the party with a mark. While these players are near each other, the mark will turn blue and create a link between the two players that inflicts damage to any other allies that come into contact with it. If these players are not near each other, the circle will turn red and after a period of time if these players are still not connected, both players will be immediately killed along with close by teammates. | *'''<font color=red>Link:</font>''' Targets two players in the party with a mark. While these players are near each other, the mark will turn blue and create a link between the two players that inflicts damage to any other allies that come into contact with it. If these players are not near each other, the circle will turn red and after a period of time if these players are still not connected, both players will be immediately killed along with close by teammates. | ||
*{{color|#9F6811|'''Solo Mode Variation''':}} | |||
**The player will be linked to a random platform in Hadron's Copy (Magician)'s arena. | |||
| | | | ||
|- | |- | ||
| colspan=2 | | | colspan=2 | | ||
*'''<font color=red>Ultimate:</font>''' The boss charges up a devastating attack that | *'''<font color=red>Ultimate:</font>''' The boss charges up a devastating attack that will send magic chains across the arena, killing all players regardless of where they are. This attack can only be nullified by having players occupy all of the blue marked areas on its side of the arena. | ||
| | | | ||
*The boss will tend to do this attack if nobody is on his side of the area. | |||
|- | |- | ||
! colspan=3 | Notes | ! colspan=3 | Notes | ||
|- | |- | ||
| colspan=3 | | | colspan=3 | | ||
*Dealing damage to ''' | *Dealing damage to '''Hadron's Copy (Magician)''' will also deal the same damage to '''Hadron's Copy (Warrior)'''. | ||
*{{se|593|Ember of Retribution||ed}} debuff burns 5% MP per second and attacks will heal ''' | *{{se|593|Ember of Retribution||ed}} debuff burns 5% MP per second and attacks will heal '''Hadron's Copy (Magician)''' while no longer damaging the '''Hadron's Copy (Warrior)'''. | ||
*The fight ends if either this or the Red Copy are defeated. | *The fight ends if either this or the Red Copy are defeated. | ||
|} | |} | ||
| Line 125: | Line 139: | ||
| | | | ||
|- | |- | ||
| align=center | {{tt|[[File:Hadron Phase 2 Head.png|60px]]|[[File:Hadron P2(Front).png| | | align=center | {{tt|[[File:Hadron Phase 2 Head.png|60px]]|[[File:Hadron P2(Front).png|300px]]}} | ||
| colspan=2 align=center | | | colspan=2 align=center | | ||
After reaching 150 HP bars, Hadron will send playing into the rafters, Hadron takes flight. | After reaching 150 HP bars, Hadron will send playing into the rafters, Hadron takes flight. | ||
| Line 167: | Line 181: | ||
|Phase3Name=Haivan | |Phase3Name=Haivan | ||
|Phase3=<span style="display:none">{{</span> | |Phase3=<span style="display:none">{{</span> | ||
== Boss == | == Boss == | ||
{| class="wikitable" border="1" cellpadding="5" style="border-spacing: 0; border: 1px #000 solid; border-collapse: collapse; width: 100%; vertical-align: top;" | {| class="wikitable" border="1" cellpadding="5" style="border-spacing: 0; border: 1px #000 solid; border-collapse: collapse; width: 100%; vertical-align: top;" | ||
| Line 195: | Line 206: | ||
|- | |- | ||
| colspan=2 | | | colspan=2 | | ||
*''' | *'''Land Mine:''' Hiavan install multiple landmines on the ground. They explode upon being stepped on. | ||
| | | | ||
|- | |- | ||
| colspan=2 | | | colspan=2 | | ||
*''' | *'''<font color=red>Side Lasers: </font>'''Haivan shoots yellow lasers horizontally, starting from the top platform and then descending them one by one. | ||
| | | | ||
|- | |- | ||
| colspan=2 | | | colspan=2 | | ||
*'''<font color=red>Head Bomb:</font>''' Haivan will send out a small flying drone will attach to a player appearing over the person's head, where [[Titles]] are. This drone explodes after a while without dealing damage, but if the person with the drone is too near other people, it will kill everyone in range but not the person who has it. If the affected players are still alive, it additionally inflicts a debuff that disables them from using potions and puts them on cooldown. | *'''<font color=red>Head Bomb:</font>''' Haivan will send out a small flying drone will attach to a player appearing over the person's head, where [[Titles]] are. This drone explodes after a while without dealing damage, but if the person with the drone is too near other people, it will kill everyone in range but not the person who has it. If the affected players are still alive, it additionally inflicts a debuff that disables them from using potions and puts them on cooldown. | ||
*{{color|#9F6811|'''Solo Mode Variation''':}} | |||
**Haivan will send out a bomb which will track onto your location before activating when you are in close proximity. They will then explode after a period of time. | |||
| | | | ||
|- | |- | ||
| Line 209: | Line 222: | ||
*'''<font color=red>Carpet Bomb:</font>''' Haivan marks the entire map but a single spot. Move into this spot to avoid the missile attack, which instantly kills you. Haivan does this attack twice in a row, but the safe spot doesn't change. | *'''<font color=red>Carpet Bomb:</font>''' Haivan marks the entire map but a single spot. Move into this spot to avoid the missile attack, which instantly kills you. Haivan does this attack twice in a row, but the safe spot doesn't change. | ||
| | | | ||
|} | |} | ||
| Line 237: | Line 230: | ||
! width=60px | Monster Image !! width=33% | Monster Description !! width=66% | Monster Moves | ! width=60px | Monster Image !! width=33% | Monster Description !! width=66% | Monster Moves | ||
|- | |- | ||
|[[File: | |{{tt|[[File:Mob Icon - Flying Machine.jpg|60px]]|[[File:Mob - Flying Machine.jpg|100px]]}} | ||
| ''' | | '''Flying Machines''' - A flying Iserlohn unit that assist Haivan. They are completely invincible. | ||
| | | | ||
*''' | *'''Laser''': Fire a horizontal laser beam. | ||
*'''Land Mine:''' Flying machines can sometimes install landmines on the ground. They explode upon being stepped on. | |||
|} | |} | ||
<span style="display:none">}}</span> | <span style="display:none">}}</span> | ||
| Line 395: | Line 389: | ||
| 04/24/2025 || 05/22/2025 || colspan=2 align="left" | | | 04/24/2025 || 05/22/2025 || colspan=2 align="left" | | ||
*[[Raid Solo Mode]] added. | *[[Raid Solo Mode]] added. | ||
*Phase 3 shortened. Upon entering the stage, players will immediately battle Haivan. | |||
|} | |} | ||
<dfn>}}</dfn> | <dfn>}}</dfn> | ||
Latest revision as of 04:59, 16 June 2025
- For the series of Challenge Mode raid dungeons, see Savage White-Ghost's Castle (Challenge Mode)


Savage White-Ghost's Castle
| “ | The White-Ghost Castle that was once glorious, is now filled with chilling silence.
|
” |

Description
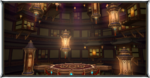
In front of the White-Ghost Castle, a mysterious shadow blocks the El Search Party.
Recommended Level
99
Required Combat Power
- Story Mode
750,000
- Normal Mode
Details
{{
Solo Mode
- Main Article: Raid Solo Mode
- Up to 6 players can enter, requiring a minimum of at least 3 people. (Normal)
- 2~6 players. (Story)
- Only three Resurrection Stones can be used to revive.
- Players are given a 15 second penalty before they can resurrect themselves.
- Bosses can only be frozen or petrified 3 times each (every hit is 1 count) at a time. When this limit is exceeded, they become invulnerable to that debuff for 60 seconds.
- Freezing or petrifying can be attempted again after 30 seconds, but you will not be able to chain it further. This also resets the 3-step chain's cooldown to 60 seconds.
- All enemy attacks in this dungeon ignore players' physical and magical defense.
 Enviromental Debuff - Demon Realm
- The El's power does not reach into this realm, Attack and HP will be reduced by 80%.
- Phase 1
- 1 stack: Damage Dealt +20%, Damage Received -10%
- 2 stacks: Damage Dealt +40%, Damage Received -30%
- 3 stacks: Damage Dealt +80%, Damage Received -50%
- Axe Swing: Hadron's Copy (Warrior) swings his axe in front of him. If you get hit, you'll receive the
 Enemy DebuffEmber of Retribution debuff for 5 seconds.
 - Axe Wave: Hadron's Copy (Warrior) creates a shockwave that goes forward by swinging his axe from the ground.
- Charge: Hadron's Copy (Warrior) charges forward, dealing damage as it moves.
- Devastating Charge: A random player is teleported to the right side of Hadron's Copy (Warrior)'s arena, and locked in place for 30 seconds. The copy then does a stronger version of Charge, aiming for the stunned player. Every time the charge connects with a different player than the stunned target, the final hit on them will have its damage reduced. If no one else was hit, the stunned player will die when Hadron's Copy (Warrior) gets to them. Players must spread out between the boss and the stunned player to share the damage of the attack between them. Afterwards, the copy becomes exhausted for a short period of time, and Overwhelming Defense will not activate for this duration. Attack pattern can be seen here
- Solo Mode Variation:
- Hadron's Copy (Warrior) will teleport you to his side of the arena, but you will not be placed in a stun state. Taking the portal to the other arena or jumping over him will avoid the attack entirely.
- Shockwave Swing: Hadron's Copy (Warrior) charges up a deadly swing that sends out shockwaves across the entire map, killing all players regardless of where they are. The attack can only be nullified by gathering every player inside the red box-shaped area in front of the boss. Hadron's Copy (Warrior) is vulnerable to attacks while charging up the attack and Overwhelming Defense will not activate for this duration, allowing for high damage to be dealt to it.
- The boss will tend to do with attack if nobody is on his side of the arena.
- Dealing damage to Hadron's Copy (Warrior) will also deal the same damage to Hadron's Copy (Magician).
- Enemy DebuffEmber of Retribution debuff burns 5% MP per second and attacks will heal the Hadron's Copy (Warrior) while no longer damaging the Hadron's Copy (Magician).
- The fight ends if either this or the Blue Copy are defeated.
- Explosion: Hadron's Copy (Magician) channels his energy, then quickly releases it as a blue explosion around him. If you get hit, you'll receive the Enemy DebuffEmber of Retribution debuff for 5 seconds.
- Blue Flame: Magic circles will appear on the ground and cause a burst of flames after a few seconds. If you get hit, you'll receive the Ember of Retribution debuff for 5 seconds.
- Link: Targets two players in the party with a mark. While these players are near each other, the mark will turn blue and create a link between the two players that inflicts damage to any other allies that come into contact with it. If these players are not near each other, the circle will turn red and after a period of time if these players are still not connected, both players will be immediately killed along with close by teammates.
- Solo Mode Variation:
- The player will be linked to a random platform in Hadron's Copy (Magician)'s arena.
- Ultimate: The boss charges up a devastating attack that will send magic chains across the arena, killing all players regardless of where they are. This attack can only be nullified by having players occupy all of the blue marked areas on its side of the arena.
- The boss will tend to do this attack if nobody is on his side of the area.
- Dealing damage to Hadron's Copy (Magician) will also deal the same damage to Hadron's Copy (Warrior).
- Enemy DebuffEmber of Retribution debuff burns 5% MP per second and attacks will heal Hadron's Copy (Magician) while no longer damaging the Hadron's Copy (Warrior).
- The fight ends if either this or the Red Copy are defeated.
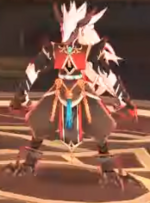
Phase 1 - Hadron's Copy
Phase Gimmick
Hadron's Copies will take significantly less damage if all players in the party are in its arena, and whenever any player in the party dies.
Boss
| Hadron's Copy (Warrior) | ||
|---|---|---|
  |
A red spirit that guards the entrance to the White-Ghost Castle. Will guard one of two paths alongside its partner. | |
| Boss Attacks | Tips | |
|
|
||
|
|
||
|
|
||
|
|
||
|
|
| |
| Notes | ||
|
| ||
| Hadron's Copy (Magician) | ||
|---|---|---|
  |
A blue spirit that guards the entrance to the White-Ghost Castle. Will guard one of two paths alongside its partner. | |
| Boss Attacks | Tips | |
|
|
||
|
|
||
|
|
||
|
|
| |
| Notes | ||
|
| ||
- Phase 2


- Phase 3


Dialogue
 Aisha: Are those the gatekeepers to the White-Ghost Castle? ... Twins?
 Rena: No, an illusion. There must be someone controlling them somewhere.
 Elsword: We must face them both at the same time to enter. Let's split up!
{{
}}
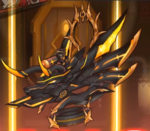
| Image | Name | Boss | Character | Stats |
|---|---|---|---|---|
 |
Lv99 Accessory (Earring): |
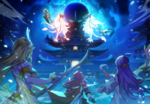
Gallery
-
-
-
-

-
-
-
-

Pruinaum raid poster.
-

-

-

-
-

-

-
-
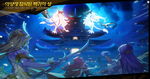
Old loading image.


.png)


Trivia
{{
- The characters featured on the loading screen are the original trio: Knight Emperor, Aether Sage, and Daybreaker.
Updates
{{
}}
| Date | Changes | ||
|---|---|---|---|
| KR | NA | ||
| 08/13/2020 | 09/09/2020 |
| |
| 08/27/2020 |
| ||
| 09/24/2020 | 09/23/2020 |
| |
| 01/28/2020 | 02/24/2020 |
| |
| 03/25/2021 | 04/28/2021 |
| |
| - | 05/12/2021 |
| |
| 08/05/2021 | 09/01/2021 |
| |
| 03/17/2022 | 04/13/2022 |
| |
| 07/20/2023 | 08/16/2023 |
| |
| 04/24/2025 | 05/22/2025 |
| |
Alternative Names
{{
}}
| Server | Name | Translation |
|---|---|---|
| 야성에 잠식된 백귀의 성 | Savage White-Ghost's Castle | |
| 野性に蚕食された白鬼の城 | Wild White-Ghost's Castle | |
| 蝕獸之城 | ? | |
| 野性蚕食的白鬼之城 | ? | |
| Grausiges Geisterkönigschloss | Ghastly Spirit King's Castle | |
| Castillo espeluznante del rey de los espíritus | Ghastly Spirit King's Castle | |
| Château funeste du Grand Spectre | Ghastly Great Specter's Castle | |
| Castello Macabro del Re degli spiriti | Ghastly Spirit King's Castle | |
| Upiorny Zamek Króla Duchów | Ghastly Spirit King's Castle | |
| Ghastly Spirit King's Castle | ||
| Castelo dos Fantasmas-Brancos Selvagem | Savage White-Ghost's Castle | |
Regions
- Region 13~18
| Rigomor | Master Road | Pruinaum Outskirts | |||
|---|---|---|---|---|---|
| {{ }} | {{ }} | {{ }} | {{ }} | {{ }} | {{ }} |
- Region 1~6
- Region 7~12
- Region 19~22
- Laby
- Noah
- Lithia
- Other
- Miscellaneous