Ereda Island/Season 1/fr: Difference between revisions
(Created page with "{{Languages|Ereda Island}} right =Ereda Island= <center>{{quotation|A new PvP dungeon based mode!}}</center> <div style="border: 2px {{ColorSelNA|Misc}} so...") |
m (Text replacement - "<span style="display:none">{{</span>" to "<dfn>{{</dfn>") |
||
| (19 intermediate revisions by 8 users not shown) | |||
| Line 1: | Line 1: | ||
{{Languages|Ereda Island}} | {{Languages|Ereda Island/Season 1}} | ||
[[File: | {{DISPLAYTITLE:Île d'Ereda}} | ||
[[File:EredaFR.png|right]] | |||
=Ereda | =Île d'Ereda= | ||
<center>{{quotation|A new PvP dungeon based mode!}}</center> | <center>{{quotation|A new PvP dungeon based mode!}}</center> | ||
<div style="border: | <div style="border-color: {{ColorSel|Misc}}; padding: 0.5em;" class="section-border"> | ||
{{Section | {{Section | ||
| SectionSty=text-align: center; | | SectionSty=text-align: center; | ||
| Color0={{ | | Color0={{ColorSel|Misc}} | ||
| Title0=Description: | | Title0=Description: | ||
| Content0=A place where the 'Red Knights' of Velder and 'Guardian Knights' of Hamel fight till their heart's content. | | Content0=A place where the 'Red Knights' of Velder and 'Guardian Knights' of Hamel fight till their heart's content. | ||
| Line 15: | Line 16: | ||
A strategic battle mode where you win by destroying enemy's base quicker than your opponents. | A strategic battle mode where you win by destroying enemy's base quicker than your opponents. | ||
}} | }} | ||
{| | {| class="section-side-column" | ||
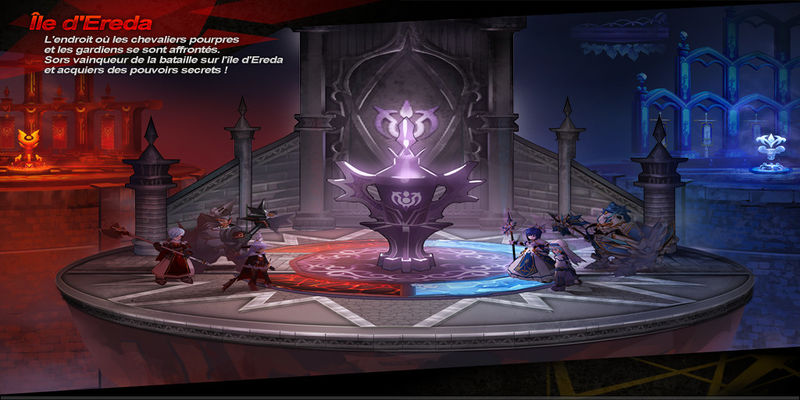
| [[File:Loading-Ereda-IslandFR.jpg|800px]] | |||
| | |||
{{Section | {{Section | ||
| SectionSty | | SectionSty=height: 50%; | ||
| Color0={{ColorSel|Misc}} | |||
| Title0=Niveau recommandé: | |||
| Color0={{ | |||
| Title0= | |||
| Content0=40 - 70 | | Content0=40 - 70 | ||
}} | }} | ||
{{Section | {{Section | ||
| SectionSty | | SectionSty=height: 50%; | ||
| Color0={{ColorSel|Misc}} | |||
| Color0={{ | |||
| Title0=Appropriate Item Level: | | Title0=Appropriate Item Level: | ||
| Content0=30 | | Content0=30 | ||
| Line 37: | Line 34: | ||
{{Section | {{Section | ||
| SectionSty=text-align: center; | | SectionSty=text-align: center; | ||
| Color0={{ | | Color0={{ColorSel|Misc}} | ||
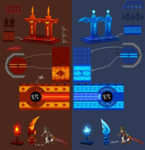
| Title0=Map Layout: | | Title0=Map Layout: | ||
| Content0=[[File:Eredalayout.jpg]] | | Content0=[[File:Eredalayout.jpg]] | ||
| Line 43: | Line 40: | ||
{{Section | {{Section | ||
| SectionSty=text-align: left; | | SectionSty=text-align: left; | ||
| Color0={{ | | Color0={{ColorSel|Misc}} | ||
| Title0=Entry Requirements: | | Title0=Entry Requirements: | ||
| Content0=< | | Content0=<dfn>{{</dfn> | ||
*Feita needs to be unlocked. | *Feita needs to be unlocked. | ||
**Accessible from dungeon maps (Feita to Sander) | **Accessible from dungeon maps (Feita to Sander) | ||
*Waiting time for entry needs at least 8 people to be queuing. | *Waiting time for entry needs at least 8 people to be queuing. | ||
< | <dfn>}}</dfn> | ||
}} | }} | ||
{{Section | {{Section | ||
| SectionSty=text-align: leftr; | | SectionSty=text-align: leftr; | ||
| Color0={{ | | Color0={{ColorSel|Misc}} | ||
| Title0=Gameplay Guide: | | Title0=Gameplay Guide: | ||
| Content0=< | | Content0=<dfn>{{</dfn> | ||
Upon spawning, players must fight monster units to advance further to the next map. Each map has 2 guardian leader which you must defeat to advance. When destroying the enemies' crystal, there will be a large defending tower at the back and it will fire explosive magic towards you, so watch out for that.<br> | Upon spawning, players must fight monster units to advance further to the next map. Each map has 2 guardian leader which you must defeat to advance. When destroying the enemies' crystal, there will be a large defending tower at the back and it will fire explosive magic towards you, so watch out for that.<br> | ||
The team which destroys the other team crystal and defending tower will be automatically declared the winner. Upon winning/losing, players will be awarded '''EXP/AP'''. | The team which destroys the other team crystal and defending tower will be automatically declared the winner. Upon winning/losing, players will be awarded '''EXP/AP'''. | ||
< | <dfn>}}</dfn> | ||
}} | }} | ||
{{Section | {{Section | ||
| Color0=#f00000 | | Color0=#f00000 | ||
| Title0=Velder Team: | | Title0=Velder Team: | ||
| Content0=< | | Content0=<dfn>{{</dfn> | ||
{| cellspacing="0" cellpadding="5" border="1" width="100%" style="border-collapse: collapse;" | {| cellspacing="0" cellpadding="5" border="1" width="100%" style="border-collapse: collapse;" | ||
|- | |- | ||
| Line 123: | Line 120: | ||
|- | |- | ||
|[[File:Velder_Spear1.jpg|60px]] | |[[File:Velder_Spear1.jpg|60px]] | ||
| '''Vanessa''' - | | '''Vanessa''' - Lancier des chefs de la garde de Belder. | ||
| | | | ||
-Spear Swing: Vanessa | -Spear Swing: Vanessa balaie sa lance plusieurs fois en état de Super Armure, faisant tomber les personnes attaquées. | ||
-Spinning Cut: Vanessa spins around, hitting anyone who goes near her with her spear, also KDs. | -Spinning Cut: Vanessa spins around, hitting anyone who goes near her with her spear, also KDs. | ||
| Line 141: | Line 138: | ||
<br> | <br> | ||
|} | |} | ||
< | <dfn>}}</dfn> | ||
}} | }} | ||
{{Section | {{Section | ||
| Color0=#007be4 | | Color0=#007be4 | ||
| Title0=Hamel Team: | | Title0=Hamel Team: | ||
| Content0=< | | Content0=<dfn>{{</dfn> | ||
{| cellspacing="0" cellpadding="5" border="1" width="100%" style="border-collapse: collapse;" | {| cellspacing="0" cellpadding="5" border="1" width="100%" style="border-collapse: collapse;" | ||
|- | |- | ||
| Line 179: | Line 176: | ||
|- | |- | ||
|[[File:HamelKnightFace.jpg|60px]] | |[[File:HamelKnightFace.jpg|60px]] | ||
| '''Sig''' - | | '''Sig, le beau''' - L'Epéiste des chefs de la garde d'Hamel. | ||
| | | | ||
- | -Combo à l'épée: Sig frappe avec son épée trois fois, en faisant tomber les ennemis touchés au troisième coup. | ||
- | -Attaque chargée: Sig prépare un coup en état de Super Armure, avant de lancer une puissante attaque. | ||
- | -Geyser de glace: Le [[Triple_Geyser/fr|Triple Geyser]] d'Elsword en version glace.<br> | ||
|- | |- | ||
|[[File:Hamel_Mage1.jpg|60px]] | |[[File:Hamel_Mage1.jpg|60px]] | ||
| Line 224: | Line 221: | ||
<br> | <br> | ||
|} | |} | ||
< | <dfn>}}</dfn> | ||
}} | }} | ||
{{Section | {{Section | ||
| Color0=#a349a4 | | Color0=#a349a4 | ||
| Title0=Ereda Mobs: | | Title0=Ereda Mobs: | ||
| Content0=< | | Content0=<dfn>{{</dfn> | ||
{| cellspacing="0" cellpadding="5" border="1" width="100%" style="border-collapse: collapse;" | {| cellspacing="0" cellpadding="5" border="1" width="100%" style="border-collapse: collapse;" | ||
|- | |- | ||
| Line 249: | Line 246: | ||
'''Tower Guardians:''' The El Tower has several ghost-like guardians who fight off players and serve as obstacles. | '''Tower Guardians:''' The El Tower has several ghost-like guardians who fight off players and serve as obstacles. | ||
|} | |} | ||
< | <dfn>}}</dfn> | ||
}} | }} | ||
{{Section | {{Section | ||
| SectionSty=text-align: center; | | SectionSty=text-align: center; | ||
| Color0={{ | | Color0={{ColorSel|Misc}} | ||
| Title0=BGM: | | Title0=BGM: | ||
| Content0=Ereda Island - [http://www.youtube.com/watch?v=obWVOrqhc-U '''''pve_stage01'''''] | | Content0=Ereda Island - [http://www.youtube.com/watch?v=obWVOrqhc-U '''''pve_stage01'''''] | ||
}} | }} | ||
{{Section | {{Section | ||
| Color0={{ColorSel|Misc}} | |||
| Color0={{ | |||
| Title0=Gallery: | | Title0=Gallery: | ||
| Content0= | | Content0= | ||
<br><gallery widths=150px heights=150px> | <br><gallery widths=150px heights=150px> | ||
File:BackgroundObjectsConcept.png|Concept art of background objects in Ereda Island. | File:BackgroundObjectsConcept.png|Concept art of background objects in Ereda Island. Concept art des objets de décor de l''''Île d'Ereda''' | ||
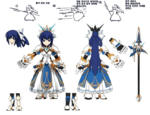
File:VelderSheilderConcept.png|Concept art | File:VelderSheilderConcept.png|Concept art du miniboss au Bouclier de Belder. | ||
File:HamalSheilderConcept.png|Concept art | File:HamalSheilderConcept.png|Concept art du miniboss au Bouclier de Hamel. | ||
File:HamalLancerConcept.png|Concept art | File:HamalLancerConcept.png|Concept art du miniboss Lancier de Hamel. | ||
File:InitialConcept.png| | File:InitialConcept.png|Design de base de la zone. | ||
File:FinalizedConcept.png| | File:FinalizedConcept.png|Design final de la zone. | ||
File:LoadingScreenWithoutWords.png|'''Ereda | File:LoadingScreenWithoutWords.png| Ecran de chargement de l''''Île d'Ereda''' | ||
</gallery> | </gallery> | ||
}} | }} | ||
Latest revision as of 18:22, 3 May 2022

Île d'Ereda
| “ | A new PvP dungeon based mode!
|
” |
| Description: |
|---|
| A place where the 'Red Knights' of Velder and 'Guardian Knights' of Hamel fight till their heart's content.
It was said that they both compete to promote unity and development, but in actual fact they compete because of the hidden artifacts in the island and both kingdoms fight for it.
The island battle was hidden with a mysterious force but now the mysterious land known as Ereda Island has appeared in the eyes of everyone. |

|
|
| Map Layout: |
|---|
 |
| Entry Requirements: |
|---|
{{
|
| Gameplay Guide: |
|---|
| {{
Upon spawning, players must fight monster units to advance further to the next map. Each map has 2 guardian leader which you must defeat to advance. When destroying the enemies' crystal, there will be a large defending tower at the back and it will fire explosive magic towards you, so watch out for that. |
| Velder Team: | ||||||||||||||||||||||||||||||||||||
|---|---|---|---|---|---|---|---|---|---|---|---|---|---|---|---|---|---|---|---|---|---|---|---|---|---|---|---|---|---|---|---|---|---|---|---|---|
{{
|
| Hamel Team: | ||||||||||||||||||||||||||||||||||||
|---|---|---|---|---|---|---|---|---|---|---|---|---|---|---|---|---|---|---|---|---|---|---|---|---|---|---|---|---|---|---|---|---|---|---|---|---|
{{
|
| Ereda Mobs: | |||||||||
|---|---|---|---|---|---|---|---|---|---|
{{
|
| BGM: |
|---|
| Ereda Island - pve_stage01 |
| Gallery: |
|---|
|


