UI Guide/ko: Difference between revisions
m (Removed current context > copy+pasted NA version for translation) |
Shironsaki (talk | contribs) m (Text replacement - "File:Pvp 7.jpg" to "File:PvPUI.png") |
||
| (3 intermediate revisions by one other user not shown) | |||
| Line 1: | Line 1: | ||
{{Languages|UI Guide}} | {{Languages|UI Guide}} | ||
'''유저 인터페이스(UI)'''는 다양한 정보와 메뉴를 편하게 정리해놓은 시스템 입니다. '''[Delete]''' 키를 누르면 유저 인터페이스가 전부 숨김으로 바뀝니다. | |||
== UI | == UI 가이드 == | ||
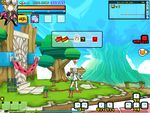
[[File:UI2016.png|thumb|600px| | [[File:UI2016.png|thumb|600px|유저 인터페이스 요약]] | ||
=== | ===캐릭터 정보=== | ||
캐릭터 닉네임, 레벨(공명도), 부활석 갯수, HP, MP, 각성 구슬 등은 화면 왼쪽 위에 표시됩니다. 일부 캐릭터는 [[Character Systems|캐릭터 시스템]]에 의해 추가로 다른 것들이 보이기도 합니다. [[Pet Guide|펫]]이 소환중인 경우, 배고픔, MP 그리고 펫 전용 퀵 슬롯 수치가 캐릭터 포트레이트 밑에 보입니다. | |||
=== | ==='''채널/위치'''=== | ||
화면의 오른쪽 위에는 지금 캐릭터가 접속중인 채널과 위치가 표시됩니다. 채널 표기 옆에 있는 화살표를 누르면 채널 목록 UI가 활성화 되며 캐릭터 선택 창으로 갈 필요 없이다른 채널로 빠르게 이동할 수 있습니다 (마을에서만 사용 가능). | |||
=== | ===버프 및 디버프=== | ||
:'' | :''상위 문서: [[Status Effects]]'' | ||
현재 가지고 있는 버프와 디버프는 채널/위치 밑에 표기됩니다. 캐릭터가 버프나 디버프를 받을 때마다 작은 아이콘이 생기며, 마우스를 갖다 대면 상세정보를 확인할 수 있습니다. 또한, 지속시간이 있는 버프/디버프일 경우 남은 지속시간이 표기됩니다. 플레이어에게 도움이 되는 버프는 위에 표기되며, 디버프는 밑에 생깁니다. 해당 UI는 위치를 조정할 수 있으며, 다른 방향으로 반전도 가능합니다. | |||
=== | ===진행중인 퀘스트=== | ||
:'' | :''상위 문서: [[Quests]]'' | ||
퀘스트 진행도를 확인하기 쉽게 최대 7개의 진행중인 퀘스트가 표기됩니다. 퀘스트 클리어 시 [[File:QuickClear.png]]버튼이 생기며, 마을이나 필드에서 클릭 한번으로 퀘스트를 클리어 할 수 있습니다. 퀘스트를 클릭할 시, 퀘스트 창이 열리며 상세정보를 보여줍니다. 진행중인 퀘스트를 숨기고 싶을땐 '''[TAB]'''키를 눌러 퀘스트 숨김을 활성화 할 수 있습니다. | |||
=== | ===이벤트=== | ||
이벤트는 정해진 기간 내에 다양한 보상을 얻을 수 있습니다. 현재 진행중인 이벤트를 확인하려면 마우스를 갖다 대거나, 이벤트 아이콘을 클릭해서 확인 할 수 있습니다. | |||
=== | ===미니맵=== | ||
==== | ==== 공용 ==== | ||
{| cellspacing="0" cellpadding="5" border="1" align="center" style="border-collapse: collapse; text-align: center" | {| cellspacing="0" cellpadding="5" border="1" align="center" style="border-collapse: collapse; text-align: center" | ||
| [[File:Minimap Icon - Character.png]] || [[File:Minimap Icon - Party Member.png]] || [[File:Minimap Icon - Summon Unit.png]] || [[File:Minimap Icon - Door.png]] | | [[File:Minimap Icon - Character.png]] || [[File:Minimap Icon - Party Member.png]] || [[File:Minimap Icon - Summon Unit.png]] || [[File:Minimap Icon - Door.png]] | ||
|- | |- | ||
| | | 내 캐릭터 || 파티 멤버 || 소환수 || 포탈 | ||
|} | |} | ||
==== | ==== 마을 & 집결지 ==== | ||
{| cellspacing="0" cellpadding="5" border="1" align="center" style="border-collapse: collapse; text-align: center" | {| cellspacing="0" cellpadding="5" border="1" align="center" style="border-collapse: collapse; text-align: center" | ||
| [[File:Minimap Icon - Ariel.png]] || [[File:Minimap Icon - Camilla.png]] || [[File:Minimap Icon - Luriel.png]] || [[File:Minimap Icon - Adams.png]] || [[File:Minimap Icon - Myu.png]] || [[File:Minimap Icon - Board.png]] || [[File:Minimap Icon - Mailbox.png]] || [[File:Minimap Icon - Blacksmith.png]] || [[File:Minimap Icon - Alchemist.png]] || [[File:Minimap Icon - Accessory Shop.png]] || [[File:Minimap Icon - Glave.png]] || [[File:Minimap Icon - Helen.png]] || [[File:Minimap Icon - Buff.png]] | | [[File:Minimap Icon - Ariel.png]] || [[File:Minimap Icon - Camilla.png]] || [[File:Minimap Icon - Luriel.png]] || [[File:Minimap Icon - Adams.png]] || [[File:Minimap Icon - Myu.png]] || [[File:Minimap Icon - Board.png]] || [[File:Minimap Icon - Mailbox.png]] || [[File:Minimap Icon - Blacksmith.png]] || [[File:Minimap Icon - Alchemist.png]] || [[File:Minimap Icon - Accessory Shop.png]] || [[File:Minimap Icon - Glave.png]] || [[File:Minimap Icon - Helen.png]] || [[File:Minimap Icon - Buff.png]] | ||
|- | |- | ||
| [[Ariel]] || [[Camilla]] || [[Luriel]] || [[Adams]] || [[Myu]] || | | [[Ariel|아리엘]]|| [[Camilla|카밀라]] || [[Luriel|루리엘]]|| [[Adams|아담스]]|| [[Myu|뮤]]|| 게시판 || 우편함 || [[Blacksmith|대장장이]]|| [[Alchemist|연금술사]]|| 악세서리 || [[Glave|글레이브]]|| [[Helen|헬렌]] | ||
[[Helen|(엘리오스 낚시터)]] | |||
| [[Purified Spirit & Shy Spirit|수줍은 정령]], [[Sirena|세이레나]]<br>[[Tiny Spirit|작은 정령]], [[Asella|아셀라]] | |||
|} | |} | ||
==== | ==== 던전 & 필드 ==== | ||
{| cellspacing="0" cellpadding="5" border="1" align="center" style="border-collapse: collapse; text-align: center" | {| cellspacing="0" cellpadding="5" border="1" align="center" style="border-collapse: collapse; text-align: center" | ||
| [[File:Minimap Icon - Mini Boss.png]] || [[File:Minimap Icon - Boss.png]] || [[File:Minimap Icon - Dungeon Door.png]] | | [[File:Minimap Icon - Mini Boss.png]] || [[File:Minimap Icon - Boss.png]] || [[File:Minimap Icon - Dungeon Door.png]] | ||
|- | |- | ||
| | | 중간/필드 보스 || 보스 || 문 | ||
|} | |} | ||
미니맵은 현재 있는 장소 주변 NPC와 파티 멤버를 보여줍니다. 또한, 던전에서는 현재 스테이지에 남은 몹 수를 표시해주기도 합니다. 미니맵 오른쪽 상단에 있는 'M' 버튼을 눌러 마을/월드 맵을 볼 수 있습니다. 던전 안에서 누를 시 던전 맵을 대신 표시합니다. 우편 정보, 온타임 이벤트 (이벤트가 있을 시), 장비 내구도 경고는 미니맵 옆에 표기됩니다. 장비 내구도가 낮을 시 즉시 수리 옵션이 뜨며 던전 중에 수리 할 수 있게 됩니다. 허나, 던전 중 장비를 수리할 시 대장장이보다 더 비쌉니다. | |||
=== | ===메뉴=== | ||
{| cellspacing="0" cellpadding="5" border="1" align="center" style="border-collapse: collapse; text-align: center" | {| cellspacing="0" cellpadding="5" border="1" align="center" style="border-collapse: collapse; text-align: center" | ||
| [[File:Cobo Express Icon.png]] || [[File:Character Icon.png]] || [[File:Inventory Icon.png]] || [[File:Profession Icon.png]] || [[File:Pet Icon.png]] || [[File:Skill Icon.png]] || [[File:Quest Icon.png]] || [[File:Life Icon.png]] || [[File:Guild Icon.png]] || [[File:Community Icon.png]] || [[File:Options Icon.png]] || [[File:Events Icon.png]] || [[File:Cash Shop Icon.png]] | | [[File:Cobo Express Icon.png]] || [[File:Character Icon.png]] || [[File:Inventory Icon.png]] || [[File:Profession Icon.png]] || [[File:Pet Icon.png]] || [[File:Skill Icon.png]] || [[File:Quest Icon.png]] || [[File:Life Icon.png]] || [[File:Guild Icon.png]] || [[File:Community Icon.png]] || [[File:Options Icon.png]] || [[File:Events Icon.png]] || [[File:Cash Shop Icon.png]] | ||
|- | |- | ||
| | | 코보 익스프레스<br>'''[']''' || 캐릭터<br>'''[U]''' || 인벤토리<br>'''[I]''' || [[Profession System|전문 직업]]<br>'''[J]''' || [[Pet_Guide|펫]]<br>'''[P]''' || [[Skills|스킬]]<br>'''[K]''' || [[Story|퀘스트]]<br>'''[L]''' || [[Life Content|생활]]<br>'''{{tt|[ ]|No default keybind. Individual keybinds for [[Fishing]] and [[Pet Expedition]] can be set manually from the 'Set Custom Keyboard' menu.}}''' || [[Guild|길드]]<br>'''[,]''' || 커뮤니티<br>'''[0] [Y] [H]''' || 옵션<br>'''[O] [ESC]''' || 이벤트 || [[Item Mall|캐시샵]] | ||
|} | |} | ||
==== | ==== 이벤트 / 구 메뉴 ==== | ||
{| cellspacing="0" cellpadding="5" border="1" align="center" style="border-collapse: collapse; text-align: center" | {| cellspacing="0" cellpadding="5" border="1" align="center" style="border-collapse: collapse; text-align: center" | ||
| [[File:Jump Event Icon.png|30px]] || [[File:Album Icon CN.png|30px]] || [[File:El Mission Icon.png|30px]] || [[File:Friend Invitation Icon.png|30px]] || [[File:Friend Invitation2 Icon.png|30px]] || [[File:Elrios Aim Icon.png]] || [[File:Bingo Icon.png|30px]] || [[File:Elrios Guide Icon.png|30px]] || [[File:Story Icon.png]] | | [[File:Jump Event Icon.png|30px]] || [[File:Album Icon CN.png|30px]] || [[File:El Mission Icon.png|30px]] || [[File:Friend Invitation Icon.png|30px]] || [[File:Friend Invitation2 Icon.png|30px]] || [[File:Elrios Aim Icon.png]] || [[File:Bingo Icon.png|30px]] || [[File:Elrios Guide Icon.png|30px]] || [[File:Story Icon.png]] | ||
|- | |- | ||
| | | 점핑 이벤트 || 앨범 || 엘 미션 || 친구 초대 || 친구 초대 || Elrios Aim || [[Bingo|빙고]] || 엘리오스 가이드<br>'''[F12]''' || [[Story/Side Story|스토리]] | ||
|} | |} | ||
== | ==캐릭터== | ||
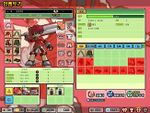
[[File:UI - Character.png|270px|right|thumb| | [[File:UI - Character.png|270px|right|thumb|캐릭터 정보 UI]] | ||
'''캐릭터''' 스크린은 캐릭터의 정보를 표기합니다. 이곳에서 장비를 드래그하거나 마우스 오른쪽 버튼을 눌러 장비/아바타/악세서리를 교체 할 수 있습니다. 더 나아가 캐릭터를 커스터마이징 하거나 일반/[[El Resonance|공명도]] 레벨, 소속된 길드 또한 확인 할 수 있습니다. | |||
현재 장착중인 [[Titles|타이틀]]은 오른쪽 상단에 표기되며, 타이틀을 교체하는 버튼도 있습니다. 장비 슬롯 밑에 있는 버튼은 [[Preset System|프리셋 시스템]]이 있으며, 전구 모양 버튼을 눌러 다크 모드/ 밝은 모드를 바꿀 수 있습니다. | |||
캐릭터의 전투력, 수비력과 [[Attributing Equipment|속성 저항]]은 UI 밑에 표기됩니다. 캐릭터의 자세한 스텟은 수비력 옆에 위치한 돋보기 아이콘을 눌러 펼칠 수 있습니다. 또한, 에르다 및 PvP 승률 정보도 간단하게 표기됩니다. | |||
{{clearfix}} | {{clearfix}} | ||
== | ==스킬/아이템 슬롯== | ||
:'' | :''상위 문서: [[Skills]]''<br> | ||
스킬 슬롯은 전투에 사용할 스킬을 배치하는 곳입니다. 초반에는 8개의 슬롯으로 시작하며, [[Transcendence|초월]]을 달성 할 시 추가로 2개의 슬롯을 열게 됩니다. 하이퍼 액티브 스킬을 열 시 하이퍼 액티브 슬롯이 열리며, 이 슬롯은 하이퍼 액티브 스킬만 배치가 가능합니다. | |||
3차 전직을 달성할 시 5개의 슬롯이 추가로 생기며, 스페이스바를 눌러 활성화 할 수 있습니다. 이 슬롯은 주로 [[Force Skills|포스 스킬]]을 배치하는데 사용되나, 일반 스킬 또한 장착할 수 있습니다. 그러나. 최종적으로는 최대 10개의 일반 스킬과 5개의 포스 스킬로 제한됩니다. [[Master Class|마스터 클래스]] 달성 시 마스터 스킬 슬롯이 생기며, 이 슬롯은 마스터 스킬만 장착할 수 있습니다. | |||
===퀵슬롯=== | |||
'''퀵슬롯'''은 포션, 음식, 음료, [[Monster Card System|몬스터 카드]] 등 소비 아이템을 배치하는 슬롯입니다. 이 슬롯은 필드나 던전 중에서만 사용할 수 있으며, 아이템을 사용할 시 각 쿨타임이 활성화됩니다. 던전이나 필드에서 슬롯을 바꿀 시 쿨타임이 걸리며, 마을에서는 교체 시 쿨타임이 없습니다. | |||
=== | ===커스터마이징=== | ||
캐릭터의 스킬 슬롯, 퀵슬롯, [[Character Systems|특수 슬롯]]과 버프 리스트의 크기는 조정이 가능하며 자유롭게 이동 할 수 있습니다. 옵션 메뉴에서 리셋 버튼을 누르면 원래대로 돌릴 수 있습니다. | |||
=== | ==채팅== | ||
[[Image:HQ Shop Item 212360.png|thumb|고성능 나소드 메가폰]] | |||
===메가폰 채팅=== | |||
'''나소드 메가폰'''을 사용하면 해당 채널의 모두에게 메시지가 보입니다. '''고성능 나소드 메가폰'''도 같은 방식이나, 해당 채널 뿐만이 아닌 서버의 모든 채널에 메시지가 보입니다. 메가폰을 사용한 메시지는 메가폰 채팅에 올라오며, 덩달아 유저의 닉네임도 메시지 옆에 표기됩니다. 메가폰은 '''캐시샵''', [[Ariel|아리엘]], 유저 간 거래 및 이벤트로 획득 할 수 있습니다. | |||
== | ===채팅=== | ||
[[Image: | [[Image:UICHATOPTIONS.png|thumb|채팅 설정 UI]]채팅은 채팅 메시지, 공지, 시스템 메시지, 귓속말, [[Quick Voice|퀵보이스]], EXP/ED 정보, [[Mentor-Pupil System|사제]] 알림, 레이드 클리어 알림, 아이템 획득/소비 메시지와 결혼/커플 메시지가 올라옵니다. 여러 탭을 통해 보고 싶은 채팅을 필터링 할 수 있습니다. | ||
* '''전체''': 모든 채팅과 알림 | |||
* '''파티''': 파티 채팅만 표시 | |||
*''' | * '''길드''': 길드 채팅만 표시 | ||
*''' | * '''귓속말''': 보내거나 받은 귓속말만 표시 | ||
*''' | * '''커스텀''': 플레이어가 정한 메시지만 표기 (설정을 안했을 경우 모두 표기) | ||
*''' | |||
*''' | |||
=== | ===커스터마이징=== | ||
채팅 탭의 톱니바퀴 아이콘을 눌러 보고 싶은 메시지/알림만 보이게 바꿀 수 있습니다. 채팅 박스의 사이즈는 바꾸거나 자유롭게 움직일 수 있습니다. | |||
== | ==게임 시작하기== | ||
=== | ===던전 시작=== | ||
:'' | :''상위 문서: [[Dungeons]]'' | ||
던전 시작 버튼을 누르면 열려있는 던전/지역에 한에서 자유롭게 선택 할 수 있습니다. 회색으로 칠해진 던전은 현재 플레이가 불가능한 던전입니다. 이는 최소 조건이 미달이거나, 이전 던전을 클리어해서 열어야 합니다. 비밀 던전 (매주 2일)과 거대 보스 (매 2시간)는 특정 시간에만 입장이 가능합니다. | |||
[[File:DungeonSelect.png|center]] | [[File:DungeonSelect.png|center]] | ||
<br> | <br> | ||
대부분의 던전은 '''던전 신청 (F8)'''을 눌러 랜덤 매칭으로 자동으로 파티를 맺는 것과, 현재 있는 인원으로 던전을 바로 시작하는 '''바로 시작''' 버튼이 있습니다. 던전 매칭 중에는 던전의 최소 레벨과 전투력이 요구됩니다. 던전에 입장하기 위해선 요구치의 95%만 채우면 입장이 가능합니다. 그러나, 알아둬야 할 점은 최소 전투력은 던전을 쉽고 빠르게 진행하는 최소 조건이 아닙니다. | |||
=== | ===표기=== | ||
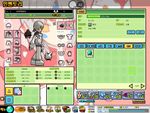
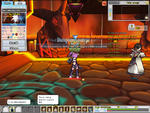
[[File: | [[File:PvPUI.png|thumb|200px|대전 인터페이스 (구)]] | ||
일부 던전이나 지역 탭에는 특정 아이콘이 표기되어 있을 수 있습니다. | |||
* | *(Q) 아이콘으로 표기된 던전/지역은 클리어가 가능한 퀘스트가 있다는 걸 보여줍니다. | ||
* | *입장 제한 시간 타이머가 있는 던전은 던전이 열리기까지 남은 시간 및 남은 열린 시간을 보여줍니다. | ||
* | *레이드 던전 밑에 있는 작은 구슬은 레이드 클리어 여부를 알려줍니다. | ||
=== | ===PvP 매칭=== | ||
:'' | :''상위 문서: [[PvP]]'' | ||
PvP 입장은 던전 입장 방식과 거의 동일합니다. '''대전 시작''' 버튼을 눌러 선호하는 옵션 (인원, 맵 제한)을 선택할 수 있습니다. 또한, 다음 랭크까지 남은 수치도 표기됩니다. | |||
== | ==커뮤니티== | ||
커뮤니티 탭은 다른 플레이어 및 친구들을 쉽게 찾거나 캐릭터 정보를 열람할 수 있게 도와주는 탭 입니다. [[Wedding System|결혼을 하거나 커플]]인 플레이어들인 경우, 커플 탭도 확인 할 수 있습니다. [[Mentor-Pupil System|사제 시스템]] 옵션 또한 커뮤니티 탭에서 볼 수 있습니다. | |||
=== | ===전체=== | ||
전체 탭은 현재 위치한 장소에 있는 플레이어들의 닉네임, 캐릭터 아이콘과 레벨을 표시합니다. 이 메뉴를 통해 다른 플레이어들의 장비 정보를 보거나, 친구 추가 및 대전을 신청 할 수 있습니다. 일부 시스템은 캐릭터 근처에 있어야만 활성화가 됩니다. | |||
=== | ===친구=== | ||
친구 탭에는 친구 추가를 한 플레이어나 친구 목록을 보여주고, 온라인/오프라인 여부도 함께 표시됩니다. 이곳에서는 친구들과 1:1 채팅을 할 수 있습니다. 1:1 채팅 중에는 별다른 UI가 열리며, 닫거나 줄일 수 있습니다. 메시지를 받았을 시 알림이 오며, 커뮤니티 버튼을 눌러 확인 할 수 있습니다. | |||
=== | ===인연=== | ||
:'' | :''상위 문서: [[Wedding System]]'' | ||
인연 탭은 캐릭터와 파트너 캐릭터가 보이며, 파트너의 현재 위치와 접속 정보도 표기됩니다. 결혼한 커플인 경우 파트너에게 자신의 위치를 무료로 텔레포트 할 수 있게 해주는 시스템도 생깁니다. 인연을 끊고 싶을 때의 옵션도 이 곳에 있으며, 수수료가 부과됩니다. | |||
=== | ===파티 만들기=== | ||
파티를 만들면 다른 플레이어들과 함께 게임을 플레이할 수 있으며, 다양한 방법으로 만들 수 있습니다. | |||
* | *캐릭터 포트레이트를 우클릭한 뒤, "파티원 추가" 버튼을 누르고 초대하고자 하는 캐릭터의 닉네임 입력 | ||
* | *커뮤니티 [0], 친구 [Y], 길드 탭을 이용해 플레이어 리스트에서 초대 | ||
* | *마을이나 필드에서 초대하고자 하는 캐릭터를 우클릭 한 뒤, "파티 초대" 클릭 | ||
* | *[[Party List System|파티 리스트]] 시스템 사용 | ||
== | ==갤러리== | ||
<gallery widths=150px heights=150px> | <gallery widths="150px" heights="150px"> | ||
File:RubenVillageMenu.jpg|Example of the KR beta village UI circa 2007. | File:RubenVillageMenu.jpg|Example of the KR beta village UI circa 2007. | ||
File:OldDungeonUI.jpg|Old dungeon UI used between 2007 ~ 2009 (KR) | File:OldDungeonUI.jpg|Old dungeon UI used between 2007 ~ 2009 (KR) | ||
| Line 139: | Line 143: | ||
File:OldCharacterUI.jpg|Old character UI used between 2008 ~ 2009 (KR) | File:OldCharacterUI.jpg|Old character UI used between 2008 ~ 2009 (KR) | ||
File:OldUIExample.png|Old UI used between 2009 ~ 2012 (KR) and 2011 ~ 2013 (NA) | File:OldUIExample.png|Old UI used between 2009 ~ 2012 (KR) and 2011 ~ 2013 (NA) | ||
</ | </gallery> | ||
== | ==기타== | ||
* | *얼리 베타 당시 모든 게임은 메뉴 Ui를 통해 이루어졌습니다. 마을은 그저 버튼으로 이루어져 있었고, 주위를 걸어다닐 수 있는 완전히 구현된 상태가 아니었습니다. | ||
<br/> | <br/> | ||
== | ==업데이트== | ||
{| cellpadding="5" border="1" style="border-collapse: collapse; text-align: center" | {| cellpadding="5" border="1" style="border-collapse: collapse; text-align: center" | ||
|- style="background-color: {{ColorSel|Misc}}" | |- style="background-color: {{ColorSel|Misc}}" | ||
| Line 152: | Line 156: | ||
! KR !! NA | ! KR !! NA | ||
|- | |- | ||
| 08/11/2012 || 06/04/2013 || align="left" | | | 08/11/2012 || 06/04/2013 || align="left" | | ||
*UI | *UI 개편 | ||
|- | |||
| 12/06/2018 || - || align="left" | | |||
*캐릭터 정보 UI 개편 | |||
|- | |- | ||
| | | 11/25/2021 || - || align="left" | | ||
* | *던전/매칭/퀘스트/마을 입장 이미지/채팅/코보 서비스 등 여러가지 UI 개편 | ||
|- | |- | ||
| | |12/22/2022 | ||
* | | | ||
| | |||
* 던전 UI 개편 | |||
|} | |} | ||
<br> | <br> | ||
{{Guides}} | {{Guides}} | ||
Latest revision as of 11:46, 6 February 2023
유저 인터페이스(UI)는 다양한 정보와 메뉴를 편하게 정리해놓은 시스템 입니다. [Delete] 키를 누르면 유저 인터페이스가 전부 숨김으로 바뀝니다.
UI 가이드

캐릭터 정보
캐릭터 닉네임, 레벨(공명도), 부활석 갯수, HP, MP, 각성 구슬 등은 화면 왼쪽 위에 표시됩니다. 일부 캐릭터는 캐릭터 시스템에 의해 추가로 다른 것들이 보이기도 합니다. 펫이 소환중인 경우, 배고픔, MP 그리고 펫 전용 퀵 슬롯 수치가 캐릭터 포트레이트 밑에 보입니다.
채널/위치
화면의 오른쪽 위에는 지금 캐릭터가 접속중인 채널과 위치가 표시됩니다. 채널 표기 옆에 있는 화살표를 누르면 채널 목록 UI가 활성화 되며 캐릭터 선택 창으로 갈 필요 없이다른 채널로 빠르게 이동할 수 있습니다 (마을에서만 사용 가능).
버프 및 디버프
- 상위 문서: Status Effects
현재 가지고 있는 버프와 디버프는 채널/위치 밑에 표기됩니다. 캐릭터가 버프나 디버프를 받을 때마다 작은 아이콘이 생기며, 마우스를 갖다 대면 상세정보를 확인할 수 있습니다. 또한, 지속시간이 있는 버프/디버프일 경우 남은 지속시간이 표기됩니다. 플레이어에게 도움이 되는 버프는 위에 표기되며, 디버프는 밑에 생깁니다. 해당 UI는 위치를 조정할 수 있으며, 다른 방향으로 반전도 가능합니다.
진행중인 퀘스트
- 상위 문서: Quests
퀘스트 진행도를 확인하기 쉽게 최대 7개의 진행중인 퀘스트가 표기됩니다. 퀘스트 클리어 시 ![]() 버튼이 생기며, 마을이나 필드에서 클릭 한번으로 퀘스트를 클리어 할 수 있습니다. 퀘스트를 클릭할 시, 퀘스트 창이 열리며 상세정보를 보여줍니다. 진행중인 퀘스트를 숨기고 싶을땐 [TAB]키를 눌러 퀘스트 숨김을 활성화 할 수 있습니다.
버튼이 생기며, 마을이나 필드에서 클릭 한번으로 퀘스트를 클리어 할 수 있습니다. 퀘스트를 클릭할 시, 퀘스트 창이 열리며 상세정보를 보여줍니다. 진행중인 퀘스트를 숨기고 싶을땐 [TAB]키를 눌러 퀘스트 숨김을 활성화 할 수 있습니다.
이벤트
이벤트는 정해진 기간 내에 다양한 보상을 얻을 수 있습니다. 현재 진행중인 이벤트를 확인하려면 마우스를 갖다 대거나, 이벤트 아이콘을 클릭해서 확인 할 수 있습니다.
미니맵
공용
| 내 캐릭터 | 파티 멤버 | 소환수 | 포탈 |
마을 & 집결지
| 아리엘 | 카밀라 | 루리엘 | 아담스 | 뮤 | 게시판 | 우편함 | 대장장이 | 연금술사 | 악세서리 | 글레이브 | 헬렌 | 수줍은 정령, 세이레나 작은 정령, 아셀라 |
던전 & 필드
| 중간/필드 보스 | 보스 | 문 |
미니맵은 현재 있는 장소 주변 NPC와 파티 멤버를 보여줍니다. 또한, 던전에서는 현재 스테이지에 남은 몹 수를 표시해주기도 합니다. 미니맵 오른쪽 상단에 있는 'M' 버튼을 눌러 마을/월드 맵을 볼 수 있습니다. 던전 안에서 누를 시 던전 맵을 대신 표시합니다. 우편 정보, 온타임 이벤트 (이벤트가 있을 시), 장비 내구도 경고는 미니맵 옆에 표기됩니다. 장비 내구도가 낮을 시 즉시 수리 옵션이 뜨며 던전 중에 수리 할 수 있게 됩니다. 허나, 던전 중 장비를 수리할 시 대장장이보다 더 비쌉니다.
메뉴
| 코보 익스프레스 ['] |
캐릭터 [U] |
인벤토리 [I] |
전문 직업 [J] |
펫 [P] |
스킬 [K] |
퀘스트 [L] |
생활 No default keybind. Individual keybinds for Fishing and Pet Expedition can be set manually from the 'Set Custom Keyboard' menu. [ ] |
길드 [,] |
커뮤니티 [0] [Y] [H] |
옵션 [O] [ESC] |
이벤트 | 캐시샵 |
이벤트 / 구 메뉴
| 점핑 이벤트 | 앨범 | 엘 미션 | 친구 초대 | 친구 초대 | Elrios Aim | 빙고 | 엘리오스 가이드 [F12] |
스토리 |
캐릭터

캐릭터 스크린은 캐릭터의 정보를 표기합니다. 이곳에서 장비를 드래그하거나 마우스 오른쪽 버튼을 눌러 장비/아바타/악세서리를 교체 할 수 있습니다. 더 나아가 캐릭터를 커스터마이징 하거나 일반/공명도 레벨, 소속된 길드 또한 확인 할 수 있습니다.
현재 장착중인 타이틀은 오른쪽 상단에 표기되며, 타이틀을 교체하는 버튼도 있습니다. 장비 슬롯 밑에 있는 버튼은 프리셋 시스템이 있으며, 전구 모양 버튼을 눌러 다크 모드/ 밝은 모드를 바꿀 수 있습니다.
캐릭터의 전투력, 수비력과 속성 저항은 UI 밑에 표기됩니다. 캐릭터의 자세한 스텟은 수비력 옆에 위치한 돋보기 아이콘을 눌러 펼칠 수 있습니다. 또한, 에르다 및 PvP 승률 정보도 간단하게 표기됩니다.
스킬/아이템 슬롯
- 상위 문서: Skills
스킬 슬롯은 전투에 사용할 스킬을 배치하는 곳입니다. 초반에는 8개의 슬롯으로 시작하며, 초월을 달성 할 시 추가로 2개의 슬롯을 열게 됩니다. 하이퍼 액티브 스킬을 열 시 하이퍼 액티브 슬롯이 열리며, 이 슬롯은 하이퍼 액티브 스킬만 배치가 가능합니다.
3차 전직을 달성할 시 5개의 슬롯이 추가로 생기며, 스페이스바를 눌러 활성화 할 수 있습니다. 이 슬롯은 주로 포스 스킬을 배치하는데 사용되나, 일반 스킬 또한 장착할 수 있습니다. 그러나. 최종적으로는 최대 10개의 일반 스킬과 5개의 포스 스킬로 제한됩니다. 마스터 클래스 달성 시 마스터 스킬 슬롯이 생기며, 이 슬롯은 마스터 스킬만 장착할 수 있습니다.
퀵슬롯
퀵슬롯은 포션, 음식, 음료, 몬스터 카드 등 소비 아이템을 배치하는 슬롯입니다. 이 슬롯은 필드나 던전 중에서만 사용할 수 있으며, 아이템을 사용할 시 각 쿨타임이 활성화됩니다. 던전이나 필드에서 슬롯을 바꿀 시 쿨타임이 걸리며, 마을에서는 교체 시 쿨타임이 없습니다.
커스터마이징
캐릭터의 스킬 슬롯, 퀵슬롯, 특수 슬롯과 버프 리스트의 크기는 조정이 가능하며 자유롭게 이동 할 수 있습니다. 옵션 메뉴에서 리셋 버튼을 누르면 원래대로 돌릴 수 있습니다.
채팅

메가폰 채팅
나소드 메가폰을 사용하면 해당 채널의 모두에게 메시지가 보입니다. 고성능 나소드 메가폰도 같은 방식이나, 해당 채널 뿐만이 아닌 서버의 모든 채널에 메시지가 보입니다. 메가폰을 사용한 메시지는 메가폰 채팅에 올라오며, 덩달아 유저의 닉네임도 메시지 옆에 표기됩니다. 메가폰은 캐시샵, 아리엘, 유저 간 거래 및 이벤트로 획득 할 수 있습니다.
채팅

채팅은 채팅 메시지, 공지, 시스템 메시지, 귓속말, 퀵보이스, EXP/ED 정보, 사제 알림, 레이드 클리어 알림, 아이템 획득/소비 메시지와 결혼/커플 메시지가 올라옵니다. 여러 탭을 통해 보고 싶은 채팅을 필터링 할 수 있습니다.
- 전체: 모든 채팅과 알림
- 파티: 파티 채팅만 표시
- 길드: 길드 채팅만 표시
- 귓속말: 보내거나 받은 귓속말만 표시
- 커스텀: 플레이어가 정한 메시지만 표기 (설정을 안했을 경우 모두 표기)
커스터마이징
채팅 탭의 톱니바퀴 아이콘을 눌러 보고 싶은 메시지/알림만 보이게 바꿀 수 있습니다. 채팅 박스의 사이즈는 바꾸거나 자유롭게 움직일 수 있습니다.
게임 시작하기
던전 시작
- 상위 문서: Dungeons
던전 시작 버튼을 누르면 열려있는 던전/지역에 한에서 자유롭게 선택 할 수 있습니다. 회색으로 칠해진 던전은 현재 플레이가 불가능한 던전입니다. 이는 최소 조건이 미달이거나, 이전 던전을 클리어해서 열어야 합니다. 비밀 던전 (매주 2일)과 거대 보스 (매 2시간)는 특정 시간에만 입장이 가능합니다.

대부분의 던전은 던전 신청 (F8)을 눌러 랜덤 매칭으로 자동으로 파티를 맺는 것과, 현재 있는 인원으로 던전을 바로 시작하는 바로 시작 버튼이 있습니다. 던전 매칭 중에는 던전의 최소 레벨과 전투력이 요구됩니다. 던전에 입장하기 위해선 요구치의 95%만 채우면 입장이 가능합니다. 그러나, 알아둬야 할 점은 최소 전투력은 던전을 쉽고 빠르게 진행하는 최소 조건이 아닙니다.
표기

일부 던전이나 지역 탭에는 특정 아이콘이 표기되어 있을 수 있습니다.
- (Q) 아이콘으로 표기된 던전/지역은 클리어가 가능한 퀘스트가 있다는 걸 보여줍니다.
- 입장 제한 시간 타이머가 있는 던전은 던전이 열리기까지 남은 시간 및 남은 열린 시간을 보여줍니다.
- 레이드 던전 밑에 있는 작은 구슬은 레이드 클리어 여부를 알려줍니다.
PvP 매칭
- 상위 문서: PvP
PvP 입장은 던전 입장 방식과 거의 동일합니다. 대전 시작 버튼을 눌러 선호하는 옵션 (인원, 맵 제한)을 선택할 수 있습니다. 또한, 다음 랭크까지 남은 수치도 표기됩니다.
커뮤니티
커뮤니티 탭은 다른 플레이어 및 친구들을 쉽게 찾거나 캐릭터 정보를 열람할 수 있게 도와주는 탭 입니다. 결혼을 하거나 커플인 플레이어들인 경우, 커플 탭도 확인 할 수 있습니다. 사제 시스템 옵션 또한 커뮤니티 탭에서 볼 수 있습니다.
전체
전체 탭은 현재 위치한 장소에 있는 플레이어들의 닉네임, 캐릭터 아이콘과 레벨을 표시합니다. 이 메뉴를 통해 다른 플레이어들의 장비 정보를 보거나, 친구 추가 및 대전을 신청 할 수 있습니다. 일부 시스템은 캐릭터 근처에 있어야만 활성화가 됩니다.
친구
친구 탭에는 친구 추가를 한 플레이어나 친구 목록을 보여주고, 온라인/오프라인 여부도 함께 표시됩니다. 이곳에서는 친구들과 1:1 채팅을 할 수 있습니다. 1:1 채팅 중에는 별다른 UI가 열리며, 닫거나 줄일 수 있습니다. 메시지를 받았을 시 알림이 오며, 커뮤니티 버튼을 눌러 확인 할 수 있습니다.
인연
- 상위 문서: Wedding System
인연 탭은 캐릭터와 파트너 캐릭터가 보이며, 파트너의 현재 위치와 접속 정보도 표기됩니다. 결혼한 커플인 경우 파트너에게 자신의 위치를 무료로 텔레포트 할 수 있게 해주는 시스템도 생깁니다. 인연을 끊고 싶을 때의 옵션도 이 곳에 있으며, 수수료가 부과됩니다.
파티 만들기
파티를 만들면 다른 플레이어들과 함께 게임을 플레이할 수 있으며, 다양한 방법으로 만들 수 있습니다.
- 캐릭터 포트레이트를 우클릭한 뒤, "파티원 추가" 버튼을 누르고 초대하고자 하는 캐릭터의 닉네임 입력
- 커뮤니티 [0], 친구 [Y], 길드 탭을 이용해 플레이어 리스트에서 초대
- 마을이나 필드에서 초대하고자 하는 캐릭터를 우클릭 한 뒤, "파티 초대" 클릭
- 파티 리스트 시스템 사용
갤러리
-
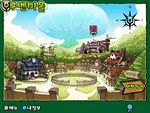
Example of the KR beta village UI circa 2007.
-
Old dungeon UI used between 2007 ~ 2009 (KR)
-
Old character UI used between 2007 ~ 2008 (KR)
-
Old character UI used between 2008 ~ 2009 (KR)
-
Old UI used between 2009 ~ 2012 (KR) and 2011 ~ 2013 (NA)


기타
- 얼리 베타 당시 모든 게임은 메뉴 Ui를 통해 이루어졌습니다. 마을은 그저 버튼으로 이루어져 있었고, 주위를 걸어다닐 수 있는 완전히 구현된 상태가 아니었습니다.
업데이트
| Date | Changes | |
|---|---|---|
| KR | NA | |
| 08/11/2012 | 06/04/2013 |
|
| 12/06/2018 | - |
|
| 11/25/2021 | - |
|
| 12/22/2022 |
| |