Dragon Nest: Abyss: Difference between revisions
From Elwiki
Gameboy224 (talk | contribs) No edit summary |
Gameboy224 (talk | contribs) No edit summary |
||
| (118 intermediate revisions by 23 users not shown) | |||
| Line 1: | Line 1: | ||
{{Languages|3 | :''For the previous iteration of this dungeon, see [[Dragon Nest: Abyss (Old)]].'' | ||
{{Languages|Dragon Nest: Abyss}} | |||
{{DungeonPage | |||
=Dragon Nest: Abyss | | Orient=Other | ||
| Color={{ColorSel|Village|3}} | |||
| DunButton=3-XButton.png | |||
| | | SmallPic=3-x_(Renewal).png | ||
| BigPic=3-Xnew2.png | |||
| | | DunName=Dragon Nest: Abyss | ||
| Quotation=Kayak's conspiracy isn't over yet. The gate to the accursed land has been opened. | |||
| Description=A sealed cursed place. A forbidden volcanic cave where Kayak escaped to. | |||
| LvNeed=99 | |||
| LvFit=500000 | |||
| XEntryReq=<dfn>{{</dfn> | |||
*5 weekly entries permitted. Entry count is shared with other Secret Dungeons. | |||
*Must be Level 99 or higher. | |||
<dfn>}}</dfn> | |||
| Mob=<dfn>{{</dfn> | |||
|[[File:SaurusGuardianFace.png|60px]] | |||
|'''Saurus Guardian''' - Similar to the '''Saurus Warriors''' in [[Bethma Lake (Night)]]. It also super armors itself frequently when attacking and possesses a stoic threshold. | |||
| | |||
*'''Overhead Smash:''' Draw its club and slam it with an overhead swing. | |||
*'''Uppercut Swing:''' Ready its club for few seconds, slides forwards, then does a twirl uppercut sending players flying. | |||
*'''Counter Swing:''' When knocked down, swing their club overhead. | |||
|- | |- | ||
| | |[[File:DNA2.jpg|60px]] | ||
|'''Shadow Shaman Lizardman''' - Similar to the Shaman Lizardmen seen in the Bethma Region. | |||
| | |||
*'''Staff Whack:''' Melees player with his staff. | |||
*'''[[Magic Missile]]:''' The Shaman can perform an attack identical to Aisha's [[Magic Missile]]. | |||
*'''Heal:''' He is able to heal himself and mobs around him. | |||
*'''Counter Smack:''' When knocked down, swing their club overhead. | |||
|- | |- | ||
|[[File:3-1-boss.jpg|60px]] | |||
| | |'''Lizardman Warrior''' - Similar to the [[Dragon Road|Lizardman Warriors]] in [[Dragon Road]]. | ||
| | |||
*'''Slash:''' A single slash attack. | |||
*'''Combo Attack:''' The Lizardman Warriors will do a spinning sword combo that sends you flying. | |||
*'''Dive Smash:''' Jumping up into the air, the Warriors will try to land on you, smashing the ground. | |||
*'''Counter Slash:''' When knocked down, swing their club overhead. | |||
|- | |- | ||
| | |[[File:DNA3.jpg|60px]] | ||
|'''Shadow Lizardman''' - Similar to the '''Shadow Lizardmen''', in [[Bethma Lake (Night)]]. | |||
| | |||
*'''[[Block]]:''' The Lizardman can sometimes hold up their spear to defend themselves against oncoming attacks. | |||
*'''Spear Combo:''' Stab players three times with its spear. | |||
*'''Spear Throw:''' Throws his spear in a parabolic arc while in super armor. | |||
*'''Counter Slash:''' When knocked down, swing their club overhead. | |||
|- | |- | ||
| | |[[File:3-3-1.jpg|60px]] | ||
|'''Fire Komodo''' - Similar to the Fire Komodos seen in the Bethma Region, except that it breathes fire faster and more often. It also super armors itself before & during it breathes fire and when struck. | |||
| | |||
*'''Tackle:''' The Komodo will rush at players. | |||
*'''Flamethrower:''' The Komodo can breath fire. | |||
|- | |- | ||
| | |[[File:BoneGargoyleFace.png|60px]] | ||
|'''Bone Gargoyle''' - Flying gargoyle skeletons that attack in a similar manner to [[Shrine of Dedication Entrance|Wyverns]]. | |||
| | |||
*'''Gargoyle Dive:''' Gargoyle will stall in the air then dive at an angle. | |||
*'''Meteor Breath:''' Gargoyle will fire mini-meteor fireballs out of their mouths. It is inadvisable to stand in front of a Gargoyle when he vomits meteors as it can juggle you, dealing very substantial damage. | |||
<dfn>}}</dfn> | |||
| General=<dfn>{{</dfn> | |||
|[[File:BrainwashedLizardmanSaurusFace.png|60px]] | |||
|'''Brainwished Lizardman Saurus''': This mob's attack is virtually similar to regular mobs but its stoic lasts longer. | |||
| | |||
*'''Overhead Smash:''' Draw its club and slam it with an overhead swing. | |||
*'''Uppercut Swing:''' Ready its club for few seconds, slides forwards, then does a twirl uppercut sending players flying. | |||
*'''Counter Swing:''' When knocked down, swing their club overhead. | |||
'''Notes:''' | |||
*Has a stoic threshold of 30 hits. | |||
|- | |- | ||
| | |[[File:BrainwashedLizardmanChieftainFace.png|60px]] | ||
|'''Brainwashed Lizardman Chieftain''': This mob's attack virtually similar to regular mobs but stoic last longer. This mob's attack virtually similar to the Capt. Vescoo field boss in [[Bethma]]. | |||
| | |||
*'''Overhead Smash:''' Draw its club and slam it with an overhead swing. | |||
*'''Uppercut Swing:''' Ready its club for few seconds, slides forwards, then does a twirl uppercut sending players flying. | |||
*'''Quake:''' He will violently swing his club to the ground, both in front and behind him. | |||
*'''Counter Swing:''' When knocked down, swing their club overhead. | |||
'''Notes:''' | |||
*Has a stoic threshold of 30 hits. | |||
|- | |- | ||
| | |[[File:GenDarkBeraukFace.png|60px]] | ||
|'''Dark Berauk''': This mob's attack is virtually similar when he appears as a miniboss in [[Dragon Nest|3-4]]. | |||
| | |||
*'''Energy Ball:''' Berauk fires a ball of energy at you. | |||
*'''Curse Lightning:''' Berauk will summon a smashing lightning in front of him. | |||
*'''Power Accelerator:''' Berauk will buff his attack power. | |||
*'''[[Magic Missile]]:''' Berauk will cast a flying '''[[Magic Missile]]''' from his hands that'll follow you! | |||
*'''[[Lightning Shower|Lightning Storm]]:''' Berauk's strongest skill: the boss will raise his staff high into the air when he has full MP and cast multiple '''Lightnings''' all around him. They are much more quicker and are harder to dodge. | |||
'''Notes:''' | |||
*Has a stoic threshold of 20 hits. | |||
|- | |- | ||
| | |[[File:BrainwashedLizardmanWarriorFace.png|60px]] | ||
|'''Brainwished Lizardman Warrior''': This mob's attack is virtually similar to '''Lizardman Warrior'''. | |||
| | |||
*'''Slash:''' A single slash attack. | |||
*'''Combo Attack:''' The Lizardman Warriors will do a spinning sword combo that sends you flying. | |||
*'''Dive Smash:''' Jumping up into the air, the Warriors will try to land on you, smashing the ground. | |||
*'''Counter Slash:''' When knocked down, swing their club overhead. | |||
'''Notes:''' | |||
*Has a stoic threshold of 30 hits. | |||
|- | |- | ||
| | |[[File:GenShadowWarriorFace.png|60px]] | ||
|'''Shadow Warrior''': This mob's attack is virtually similar to when it appears as a boss in [[Bethma Lake (Night)|3-3]]. | |||
| | |||
* | *'''Swipe:''' The Lizardman will run over to you and use its dual swords to repeatedly hit you. | ||
* | *'''Combo Attack:''' The Lizardman Warriors will do a spinning sword combo that sends you flying. | ||
* | *'''Boomerang:''' A very strong skill, the Shadow Lizardman will throw its swords across the field like a boomerang slashing anything that gets in its way. If you are behind it when their swords return, you will be hit. | ||
| | *'''Counter Slash:''' When knocked down, swing their club overhead. | ||
'''Notes:''' | |||
*Has a stoic threshold of 20 hits. | |||
<dfn>}}</dfn> | |||
| Obstacle=<dfn>{{</dfn> | |||
< | |[[File:3-2-trap.jpg|60px]] | ||
|'''Totem''' - An inert Totem that stands still. But don't get too close to it or else fire will come out of its mouth straight at you!<br> | |||
|- | |- | ||
| | |[[File:3-4-trap.jpg|60px]] | ||
|'''Geyser''' - A hole that spits fire at intervals and can cause burning damage. They are triggered by proximity<br> | |||
<dfn>}}</dfn> | |||
| MiniBoss=<dfn>{{</dfn> | |||
|[[File:3-4-boss.jpg|60px]] | |||
|'''[[Kayak|Kayak the Shadow Shaman]]''' - The boss from [[Dragon Nest|Dragon's Nest]] is back. His moves are exactly the same except he immediately summons a clone to aid in battle. | |||
| rowspan=2 | | |||
*'''Summon:''' Kayak will immediately summon a clone to aid in battle. | |||
*'''Whack:''' Whacks you with his staff. | |||
*'''[[Chain Fireball]]:''' Kayak puts his arm in front of himself and fires three fireballs. | |||
*'''[[Magic Missile]]:''' Like '''Berauk''', Kayak can also summon a weakened version of [[Magic Missile]] that follows you. | |||
*'''Fire Wall:''' Kayak will raise one of his hands and summon two fiery pillars that enables him for more space. If you touch one, you'll get burned, so watch out! | |||
*'''Quatro Geyser:''' Kayak is capable of using an enhanced version of [[Elsword]]'s [[Triple Geyser]] skill. Raising his staff, Kayak will summon four Geysers all around him, doing very heavy damage to all those near him. | |||
*'''Counter Smack:''' When knocked down, swing their club overhead. | |||
|- | |- | ||
| | |[[File:Kayak SHShman Clone.png|60px]] | ||
|'''Kayak the Shadow Shaman (Clone)''' - Identical to the boss in many ways, even the name is exactly the same. It has same abilities as the boss, the main difference being the clone has roughly half as much HP and is slightly darker in appearance. The clone will die automatically if its original is killed. | |||
''' | <dfn>}}</dfn> | ||
| Boss=<dfn>{{</dfn> | |||
'''Shadow Shaman | |[[File:Ancient_Bone_Dragon_Head.jpg|60px]] | ||
|'''Ancient Bone Dragon''' - At the end of the sub-boss battle, '''Kayak the Shadow Shaman''', summons the '''Ancient Bone Dragon''' which will breathe flame at the center of the stage immediately after it's summoned. (Though this is a cutscene, the flame can still injure you substantially.) The Ancient Bone Dragon then flies to the right of the screen and the fight starts. | |||
''' | | | ||
* | *'''Impaling Bone Spears:''' The dragon steps up with its front leg onto the platform, which will propel you upwards, then fires a few bones at you dealing high damage. | ||
''' | *'''Head-whack:''' The dragon steps back, then swings its head to the right, dealing moderate damage while propelling you upwards. | ||
*'''Dragon Fire''': The dragon breathes smoke momentarily, then steps up with its front leg onto the platform, which will propel you upwards, then breathes a long stretch of fire, continuously juggling you. This deals extremely high combo damage and the burning ailment will further intensify it. It will often use this move after a successful '''Head-whack'''. | |||
*'''Aerial Dragon Fire:''' The dragon will usually try to use this skill right at the start of the fight. It flies up and over to the other end of the cave and then back while breathing fire on the ground. If you get caught by the fire breath, you will be stun-locked due to the rapid hits. There is roughly a 30 second cool-down period after this skill where it will not be able to activate this skill again, it will also tend to not use this skill as often when being actively attacked. | |||
* | *'''Fire Rain:''' The dragon fires a bolt of fire up into the air, and flames rain onto the middle battleground. | ||
'''Fire | *'''Overheat:''' When you reduce the Ancient Bone Dragon's health to about 1/4, the dragon will start smoking. While it is in this state, you will receive damage, {{se||Burn}} status, and MP gain will be reduced to zero on each hit made on it, even with ranged attacks such as arrows, fireballs and electron balls (Special Actives are an exception). This effect can kill you if your HP is low enough.<br/> | ||
* | **Since you receive damage, you can trigger an effect that normally activates when attacked. | ||
* | **You will still gain 3 MP for each hit made on the dragon because of the damage taken from attacking it, this allows you to gain MP from attacks that do not normally generate MP as well. | ||
''' | <dfn>}}</dfn> | ||
* | | Reward=<dfn>{{</dfn> | ||
{| cellpadding="5" border="1" style="border-collapse: collapse;" width=100% | |||
== | |- | ||
! width="5%" | Image | |||
! width="15%" | Item Name | |||
! width="25%" | How to Obtain | |||
! width="55%" | Effect | |||
|- | |- | ||
| | | [[File:HQ_Shop_Item_154066.png]] | ||
| Barrier's Fragment | |||
| Obtained by playing the dungeon. | |||
| Quantity: 100 | |||
Throw at [[A tree imbued with the El energy]] to gain rewards. | |||
|- | |- | ||
| | | [[File:HQ_Shop_Item_154065.png]] | ||
| El Reward | |||
| Obtained by playing the dungeon. | |||
| Quantity: 5 | |||
Exchange for rewards at [[Ariel]]. | |||
|- | |- | ||
| | | [[File:Dunno.png]] | ||
| ED | |||
| Obtained by playing the dungeon. | |||
| ED Gain: 2,000,000 | |||
|- | |- | ||
| | | [[File:Dunno.png]] | ||
| EXP | |||
| Obtained by playing the dungeon. | |||
| EXP Gain: 200,000,000 | |||
|} | |} | ||
<dfn>}}</dfn> | |||
| SBGM=[http://www.youtube.com/watch?v=DwibAlaIZkk '''''music019_stage'''''] | |||
[http://www.youtube.com/watch?v=Ok9wfTaOg-o '''''music022_stage'''''] | |||
[http://www.youtube.com/watch?v= | |||
[http://www.youtube.com/watch?v=1sgY6ITB-Ho '''''music011_boss'''''] | |||
[http://www.youtube.com/watch?v= | | Gallery= | ||
| | <gallery widths=150px heights=150px> | ||
File:3-xExterior.jpg|Dragon Nest: Abyss exterior. | File:3-xExterior.jpg|Dragon Nest: Abyss exterior. | ||
File:3-xnew.jpg|Old loading image. | |||
File:Ancient_Bone_Dragon.jpg|Ancient Bone Dragon | File:Ancient_Bone_Dragon.jpg|Ancient Bone Dragon | ||
File:Old 3-XButton.png|Old Dungeon Button of '''Dragon Nest: Abyss''', it share the same button with [[Dragon Nest]]. | |||
File:HQ_Boss_Dark_Kayak.png|Kayak the Shadow Shaman's Skill Cut in (Unused) | |||
</gallery> | </gallery> | ||
| Trivia=<dfn>{{</dfn> | |||
*Before the 11/09/2023 KR Update, this was the only Secret Dungeon to feature different music in Luto Mode. The song used in Luto Mode was also exclusive to this dungeon. | |||
<dfn>}}</dfn> | |||
|Updates=<dfn>{{</dfn> | |||
{| cellpadding="5" border="1" style="border-collapse: collapse; text-align: center;" | |||
|- style="background:{{ColorSel|Village|3}}" class="textfloat" | |||
! colspan=2 | Date !! rowspan=2 | Changes | |||
|- style="background:{{ColorSel|Village|3}}" class="textfloat" | |||
! KR !! NA | |||
|- | |- | ||
| | | 11/09/2023 || 12/06/2023 || align="left" | | ||
| | *Level Requirement increased from 70-90 to 99. | ||
| | *CP Requirement increased from 15000 to 500000. | ||
*Dungeon shortened. | |||
|} | |} | ||
< | <dfn>}}</dfn> | ||
{{ | |AltLang= | ||
{{AlternateLanguages | |||
|Color={{ColorSel|Village|3}} | |||
|KR=용의 둥지: 나락 |KRName=Dragon Nest: Abyss | |||
|TW=巨龍祭壇 |TWName=Dragon Altar | |||
|JP=竜の巣:奈落 |JPName=Dragon Nest: Abyss | |||
|CN=巨龙巢穴:深渊 |CNName=Dragon Nest: Abyss | |||
|FR=Les abîmes |FRName=The Abysses | |||
|DE=Unterwelt |DEName=Underworld | |||
|IT=Abisso |ITName=Abyss | |||
|PL=Podziemia |PLName=Underworld | |||
|ES=Inframundo |ESName=Underworld | |||
|UK=Underworld | |||
|BR=Ninho de Dragões: Abismo |BRName=Dragon Nest: Abyss | |||
}} | |||
|Dialogue= | |||
{{Tabber | |||
|$divclass=tabber-vertical | |||
|Mid Boss Dialogue= | |||
*{{StoryIcon|Kayak}} '''Kayak''': ''Fools, my spell is already complete. The damage is done!'' | |||
|Dungeon Victory Quotes= | |||
{{CharsTabs | |||
|EL= | |||
*'''Elsword''': ''This maze is a mess! Good thing we've got Chacha Buch's map.'' | |||
*'''Elsword''': ''Whoa, is that a bone dragon?! Cool - in a gross kinda way. Get lost, you!'' | |||
*'''Elsword''': ''When a boulder's rolling down... A smart man gets the heck out of the way!'' | |||
*'''Elsword''': ''I get it--you're not gonna give up till it's over. But it's over already, 'cause there's no way you're gonna beat me! Now stop being a whiny baby, and say 'uncle' already!'' | |||
|AI= | |||
*'''Aisha''': ''Wow, that big boulder just rolled down out of nowhere! I bet smaller stones are gonna keep falling for a while – better stay out of the way.'' | |||
*'''Aisha''': ''I guess the rumors were right. The Lizardmen really are the descendants of a great, ancient tribe. I can't believe they actually resurrected an ancient dragon!'' | |||
*'''Aisha''': ''Ew–too many paths, too complicated! Now I'll have to waste time figuring out which way to go.'' | |||
*'''Aisha''': ''Okay, I get it now. Some bad guys just refuse to take a hint! Even when you beat them up to a pulp, they keep coming back for more. So I guess it's time to stop hinting and start hitting!'' | |||
*'''Aisha''': ''Hmph, you think you can win if you use ancient power? Nothing can go through genius magician Aisha!'' | |||
|RN= | |||
*'''Rena''': ''There are several places here where stones are likely to fall. One must simply be alert and agile; it is the nature of stones, after all.'' | |||
*'''Rena''': ''Ugh, I thought it was hot outside, but it's positively scorching in here! How can anyone appreciate such a place? The heat is terrible for the complexion, for one thing.'' | |||
*'''Rena''': ''You again?! You may think yourself better-prepared this time, but I doubt that will help you. Your kind simply never learns. Nevertheless, let me teach you a lesson!'' | |||
*'''Rena''': ''Quite the labyrinth, this place. Perhaps the simple answer is to take the path of least resistance.'' | |||
*'''Rena''': ''It's fine rolling boulders to stop us... But what's up with those that were caught by their own trick?'' | |||
*'''Rena''': ''Oh, I remember passing by a beach some time ago... How good it would be to dip my feet in the water! Oh, when am I to have time off?!'' | |||
|RA= | |||
*'''Raven''': ''-'' | |||
*'''Raven''': ''-'' | |||
*'''Raven''': ''-'' | |||
|EV= | |||
*'''Eve''': ''Is this really a dragon? It looks different from what I saw in the database. It's wounded, but it's still strong.'' | |||
*'''Eve''': ''Rolling rocks? Such primitive traps can't stop me, the Queen of the Nasods.'' | |||
*'''Eve''': ''...I don't want to see you. I refuse to see you. I don't want to use up my energy for you.'' | |||
|CS= | |||
*'''Chung''': ''Whoo~Hah~It's so hard to fight in this hot area with my armor on!! Hard to breath with my heavy armor!!'' | |||
*'''Chung''': ''Can't believe I'm really seeing a dragon!! It's different than what I expected!!'' | |||
*'''Chung''': ''Kayak!! This is it... in the name of Hamel's Protector Seiker clan, I will finish you once and for all!!!'' | |||
*'''Chung''': ''Kayak!! Don't know when to give up.. But no more dark spells for you!!!'' | |||
|AR= | |||
*'''Ara''': ''Dragons are breathing fire from above!! And volcanic flames are flaring underneath!! Hold yourself together!!'' | |||
*'''Ara''': ''Secretly preparing a ceremony at this place... Kayak the Shaman!! You can never let your guard down!!'' | |||
*'''Ara''': ''It can even awaken the ancient breathing dragon... the forbidden spellbook is a fearful thing.'' | |||
|ES= | |||
*'''Elesis''': ''I won't stand aside to become a victim... Kayak...I won't let my guard down till the end..'' | |||
*'''Elesis''': ''Are you attacking me with flames? Good, I'll defend myself! But you'll receive flame attacks from my end too!'' | |||
*'''Elesis''': ''-'' | |||
|AD= | |||
*'''Add''': ''Have these ancient creatures been invaded by spirits? Dark magic is never to be underestimated.'' | |||
*'''Add''': ''Oh... an ancient magical creature, the Dragon. It's intriguing to see creatures from ancient times. Ahaa, it's hard to even call these creatures now... keke'' | |||
*'''Add''': ''Kyaa... that villain uses attack skills like a book. Has he been formally trained? Puhaha!'' | |||
|LC= | |||
*'''Lu''': ''The ancient beings worship many things at the time. But using witchcraft to bring a person back is not the right way!'' | |||
*'''Lu''': ''Your majesty hates the heat. Then again I hate the cold too... Anyway! I hate the heat way more!'' | |||
*'''Ciel''': ''An ancient dragon... I thought those only existed in stories... What great power...'' | |||
*'''Ciel''': ''A high temperature area… It's not a terrible environment. I'll poach an egg here. Taste it, Lu.'' | |||
|RS= | |||
*'''Rose''': ''It's really hot. I refuse to battle any more in the volcanic region...!!'' | |||
*'''Rose''': ''Kayak... how long were you going to continue your evil deeds...? I won't let you get away!!'' | |||
*'''Rose''': ''The huge organism is called a dragon. If it were fully revived... I don't even want to image it.'' | |||
|AN= | |||
*'''Ain''': ''Destroyed by the dragon he summoned... It's truly a fitting ending.'' | |||
*'''Ain''': ''You are really persistent... Can you please disappear?'' | |||
*'''Ain''': ''How shallow. Who would fall for rolling boulders like... Wait Elsword! You'll be hurt there!'' | |||
}}}} | |||
}} | |||
Latest revision as of 15:43, 3 February 2024
- For the previous iteration of this dungeon, see Dragon Nest: Abyss (Old).

.png)
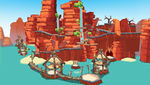
Dragon Nest: Abyss
| “ | Kayak's conspiracy isn't over yet. The gate to the accursed land has been opened.
|
” |

Description
A sealed cursed place. A forbidden volcanic cave where Kayak escaped to.
Recommended Level
99
Required Combat Power
500,000
Entry Requirements
{{
- 5 weekly entries permitted. Entry count is shared with other Secret Dungeons.
- Must be Level 99 or higher.
Mobs
{{
{{
}}
| Monster Image | Monster Description | Monster Moves |
|---|---|---|

|
Saurus Guardian - Similar to the Saurus Warriors in Bethma Lake (Night). It also super armors itself frequently when attacking and possesses a stoic threshold. |
|

|
Shadow Shaman Lizardman - Similar to the Shaman Lizardmen seen in the Bethma Region. |
|

|
Lizardman Warrior - Similar to the Lizardman Warriors in Dragon Road. |
|

|
Shadow Lizardman - Similar to the Shadow Lizardmen, in Bethma Lake (Night). |
|

|
Fire Komodo - Similar to the Fire Komodos seen in the Bethma Region, except that it breathes fire faster and more often. It also super armors itself before & during it breathes fire and when struck. |
|

|
Bone Gargoyle - Flying gargoyle skeletons that attack in a similar manner to Wyverns. |
}} |
General
{{
{{
}}
| Monster Image | General Description | General Moves |
|---|---|---|

|
Brainwished Lizardman Saurus: This mob's attack is virtually similar to regular mobs but its stoic lasts longer. |
Notes:
|

|
Brainwashed Lizardman Chieftain: This mob's attack virtually similar to regular mobs but stoic last longer. This mob's attack virtually similar to the Capt. Vescoo field boss in Bethma. |
Notes:
|

|
Dark Berauk: This mob's attack is virtually similar when he appears as a miniboss in 3-4. |
Notes:
|

|
Brainwished Lizardman Warrior: This mob's attack is virtually similar to Lizardman Warrior. |
Notes:
|

|
Shadow Warrior: This mob's attack is virtually similar to when it appears as a boss in 3-3. |
Notes:
}} |
Mini Boss
{{
{{
}}
| Monster Image | Boss Description | Boss Moves |
|---|---|---|

|
Kayak the Shadow Shaman - The boss from Dragon's Nest is back. His moves are exactly the same except he immediately summons a clone to aid in battle. |
|

|
Kayak the Shadow Shaman (Clone) - Identical to the boss in many ways, even the name is exactly the same. It has same abilities as the boss, the main difference being the clone has roughly half as much HP and is slightly darker in appearance. The clone will die automatically if its original is killed.
}} |
Obstacles
{{
{{
}}
| Obstacles Image | Obstacles Description |
|---|---|

|
Totem - An inert Totem that stands still. But don't get too close to it or else fire will come out of its mouth straight at you! |

|
Geyser - A hole that spits fire at intervals and can cause burning damage. They are triggered by proximity }} |
Boss
{{
{{
}}
| Monster Image | Boss Description | Boss Moves |
|---|---|---|

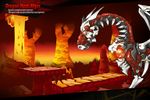
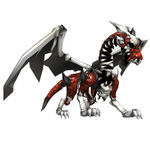
|
Ancient Bone Dragon - At the end of the sub-boss battle, Kayak the Shadow Shaman, summons the Ancient Bone Dragon which will breathe flame at the center of the stage immediately after it's summoned. (Though this is a cutscene, the flame can still injure you substantially.) The Ancient Bone Dragon then flies to the right of the screen and the fight starts. |
}} |
Dialogue
- Mid Boss Dialogue
- Dungeon Victory Quotes
 Kayak: Fools, my spell is already complete. The damage is done!
Reward
{{
}}
| Image | Item Name | How to Obtain | Effect |
|---|---|---|---|

|
Barrier's Fragment | Obtained by playing the dungeon. | Quantity: 100
Throw at A tree imbued with the El energy to gain rewards. |

|
El Reward | Obtained by playing the dungeon. | Quantity: 5
Exchange for rewards at Ariel. |

|
ED | Obtained by playing the dungeon. | ED Gain: 2,000,000 |
|
|
EXP | Obtained by playing the dungeon. | EXP Gain: 200,000,000 |
Gallery
-
Dragon Nest: Abyss exterior.
-
Old loading image.
-
Ancient Bone Dragon
-
Old Dungeon Button of Dragon Nest: Abyss, it share the same button with Dragon Nest.
-
Kayak the Shadow Shaman's Skill Cut in (Unused)


Trivia
{{
- Before the 11/09/2023 KR Update, this was the only Secret Dungeon to feature different music in Luto Mode. The song used in Luto Mode was also exclusive to this dungeon.
Updates
{{
}}
| Date | Changes | |
|---|---|---|
| KR | NA | |
| 11/09/2023 | 12/06/2023 |
|
Alternative Names
{{
}}
| Server | Name | Translation |
|---|---|---|
| 용의 둥지: 나락 | Dragon Nest: Abyss | |
| 竜の巣:奈落 | Dragon Nest: Abyss | |
| 巨龍祭壇 | Dragon Altar | |
| 巨龙巢穴:深渊 | Dragon Nest: Abyss | |
| Unterwelt | Underworld | |
| Inframundo | Underworld | |
| Les abîmes | The Abysses | |
| Abisso | Abyss | |
| Podziemia | Underworld | |
| Underworld | ||
| Ninho de Dragões: Abismo | Dragon Nest: Abyss | |
- Other
- Region 1~6
- Region 7~12
- Region 13~18
- Region 19~20
- Laby
- Noah
- Lithia
- Miscellaneous
| Event | Challenge Mode | Guild | ||
|---|---|---|---|---|
| {{ }} | {{ }} | {{ }} | {{ }} | {{ }} |
- Other
- Region 1~6
- Region 7~12
- Region 13~18
- Region 19~20
