Ereda Island/Season 3: Difference between revisions
Gameboy224 (talk | contribs) No edit summary |
No edit summary |
||
| (49 intermediate revisions by 6 users not shown) | |||
| Line 1: | Line 1: | ||
{{ | {{Languages|Ereda Island (Season 3)}} | ||
{{ | {{EredaTabs}} | ||
{{ | {{DungeonPage | ||
| Orient=other | |||
=Ereda Island (Season 3) | | Color={{ColorSel|Special}} | ||
| DunButton=EredaButton.png | |||
| SmallPic=Ereda.png | |||
| BigPic=S-3new2.png | |||
| DunName=Ereda Island (Season 3) | |||
| Quotation=A place where Red Knights and Guardian Knights fought. Win the battle in Ereda Island and obtain the secret power!!! | |||
| Description=A place where the 'Red Knights' of Velder and 'Guardian Knights' of Hamel fight till their heart's content. | |||
<p>It was said that they both compete to promote unity and development, but in actual fact they compete because of the hidden artifacts in the island and both kingdoms fight for it. | |||
It was said that they both compete to promote unity and development, but in actual fact they compete because of the hidden artifacts in the island and both kingdoms fight for it. | The island battle was hidden with a mysterious force but now the mysterious land known as Ereda Island has appeared in the eyes of everyone.<br> | ||
The island battle was hidden with a mysterious force but now the mysterious land known as Ereda Island has appeared in the eyes of everyone.<br/> | </p> | ||
A strategic battle mode where you win by destroying enemy's base quicker than your opponents. | A strategic battle mode where you win by destroying enemy's base quicker than your opponents. | ||
| LvNeed=99 | |||
| LvFit=- | |||
| | | DunMap=<br><gallery widths=300px heights=200px> | ||
File:Ereda S3 Fresh Map.png|Default map layout. | |||
File:Ereda S3 Map Tower Spawned.png|An Ereda map when Ereda Mana Source spawned with the Player and their 2 teammates from Hamel Team inside Tower Area. | |||
</gallery> | |||
| XEntryReq=<dfn>{{</dfn> | |||
*Must be at least 3rd Job or higher. | |||
*Accessible from the Special Dungeon tab menu. | |||
*The dungeon opens everyday. | |||
*Waiting time for entry needs at least 6 people with desirable rank gap to make a match up. | |||
| | *No pre-made parties allowed. | ||
<dfn>}}</dfn> | |||
| Guide=<dfn>{{</dfn> | |||
| | |||
| | |||
| | |||
* | |||
*Accessible from the Special Dungeon menu. | |||
* | |||
*Waiting time for entry needs at least 6 people to | |||
*No pre-made parties. | |||
< | |||
| | |||
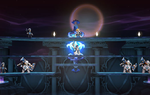
'''Arena:''' Each Team will start from their team's Starting Room and will exit into the battlefield which consists of three different rooms. | '''Arena:''' Each Team will start from their team's Starting Room and will exit into the battlefield which consists of three different rooms. | ||
*Each team's Starting Room has two portals. One will take you to the upper Base Room and one will take you to the lower Base Room. | *Each team's Starting Room has two portals. One will take you to the upper Base Room and one will take you to the lower Base Room. | ||
*The upper Base Room will start under the control of Hamel. The lower Base Room will start under the control of Velder. | *The upper Base Room will start under the control of Hamel. The lower Base Room will start under the control of Velder. | ||
**In each base room there will be two portals which will take you the the Monster Room. | **In each base room there will be two portals which will take you the the Monster Room. | ||
**All Ereda Monsters will always spawn facing right. | |||
*The Monster Room acts as the bridge between the lower and upper Base Rooms. | *The Monster Room acts as the bridge between the lower and upper Base Rooms. | ||
**In this room you will occasionally find various | **In this room you will occasionally find various Pedestal Buffs or Ereda's Magic Source Tower. | ||
'''Objective:''' The objective of the match is to have control of both Base Rooms at any given time. | '''Objective:''' The objective of the match is to have control of both Base Rooms at any given time. | ||
*A Base Room can be taken over if you have defeated all the opposing team's monsters in the room. | *A Base Room can be taken over if you have defeated all of the opposing team's monsters in the room. | ||
*Once a Base Room has been taken over, the color of the room will change and a squad of your team's monsters will fill the room. | *Once a Base Room has been taken over, the color of the room will change and a squad of your team's monsters will fill the room. | ||
*When you are in control, a gauge will show how long you've been in control. The meter will increase by 1% per second. | *When you are in control, a gauge will show how long you've been in control. The meter will increase by 1% per second. | ||
*If you are in control, it is your job to prevent the opposing team from reclaiming control through PvP combat. | *If you are in control, it is your job to prevent the opposing team from reclaiming control through PvP combat. | ||
'''Goal:''' In order to be victorious you must fill your team's gauge to 100% or have the higher score at the end of the 10 minute match. | '''Goal:''' In order to be victorious you must fill your team's gauge to 100% or have the higher score at the end of the 10 minute match.<BR> | ||
< | '''Training:''' You can practice Ereda Island in Training Mode. | ||
*You can to freely recover HP, MP, and Special Gauge. | |||
*you also have access to various other options score reset, and changing base. | |||
*You can also Queue for Ereda Island while in training. | |||
'''Tutorial:''' Tutorial teach you how Ereda Island works step-by-step. | |||
<dfn>}}</dfn> | |||
| Rewards=<dfn>{{</dfn> | |||
{{#css: | |||
.center-list{text-align: center;} .center-list li {list-style-position: inside;} | |||
}} | }} | ||
<div class="center-list"> | |||
You'll gain [[File:WarriorAccessory.png|50px]] '''Warrior's Medal''' when clear Ereda Island:<br> | You'll gain [[File:WarriorAccessory.png|50px]] '''Warrior's Medal''' when clear Ereda Island:<br> | ||
# Gain a Medal when win the battlefield.<br> | |||
# Gain a Medal per minute (Max: 6 Medals) when win the battlefield.<br> | |||
# Gain a Medal when more than 4 minutes.<br> | |||
# Gain a Medal every 2 kills when more than 4 minutes.<br> | |||
< | The maximum amount of '''Warrior's Medal''' you can get in a match is 12. | ||
</div> | |||
<dfn>}}</dfn> | |||
| Rules=<dfn>{{</dfn> | |||
{| class="article-table" style="width: 100%;" border="1" class="wikitable" style="border-collapse: collapse;" | |||
|- | |||
! Disabled Effects !! Other Rules | |||
{| class="article-table" style="width: 100%;" | |- | ||
| | | | ||
*Attribute | *Attribute | ||
*Socket | *Socket | ||
| Line 95: | Line 71: | ||
*Enhancement Level | *Enhancement Level | ||
*El Resonance | *El Resonance | ||
*Elixirs | |||
*Affinity | *Affinity | ||
*Resurrection Stones | *Resurrection Stones | ||
*Usable Items | *Usable Items | ||
*Mounts and Pets | *Mounts and Pets | ||
*Gate of Darkness's Buff | |||
*[[Elrios Hot Springs|Denif's Blessing]] Buff (Excluding EXP) | |||
*Raid Party's Resolve Buff | |||
*[[El House|Furniture Blessing]] (Including Enhanced) | |||
| | | | ||
''' | *All Skills will use their PvP tooltips (includes Force Abilities, Force Passives, and Guild Skills). | ||
* | *Suction Skills will not Suck Players in, it's never been stated from the game however. But, anyone who got hit by the said skill at least once will unable to uses Skills or Awakening Mode until the said skill is over. | ||
*If the score difference is | *Guild Skills effect works based on the invested Guild Skill Points. | ||
**A Player will have 104.5 seconds Awakening time instead 90 seconds when having a Guild with a Guild Skill: Awakened Spirit at Level 5. | |||
*Once a player death, they can respawn with '''full HP and MP''' without the usage of Resurrection Stone. The time needed for player to respawn is '''depends on their team's gauge vs opposing team's gauge'''. | |||
**If the player team's gauge is '''higher than opposing team's gauge''', the player's time needed to respawn is '''10 seconds'''. | |||
**If the player team's gauge is '''lower than opposing team's gauge''', the player's time needed to respawn is '''2 seconds'''. | |||
**Becareful, even if the score shown in the map is the same, if the score difference is around 0.5%, those condition apply. | |||
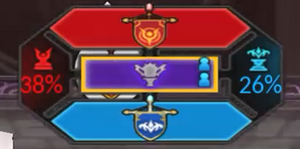
*If the score difference is 16% or more, the trailing team gains the "Devotion to Victory" buff. | |||
**Damage to monsters will increase by 100%. | **Damage to monsters will increase by 100%. | ||
**Once the difference goes below | **Once the difference goes below 16%, the buff disappears. | ||
*All players will have 10% All Speeds as a base stats during the game. | |||
|} | |} | ||
< | <dfn>}}</dfn> | ||
| VelderTeam=<dfn>{{</dfn> | |||
{| class="wikitable" cellspacing="0" cellpadding="5" border="1" width="100%" style="border-collapse: collapse;" | |||
| | |||
{| cellspacing="0" cellpadding="5" border="1" width="100%" style="border-collapse: collapse;" | |||
|- | |- | ||
! width=60 | Image | ! width=60 | Image | ||
| Line 120: | Line 103: | ||
|- | |- | ||
|[[File:VelderSword.png|60px]] | |[[File:VelderSword.png|60px]] | ||
|'''Velder Swordsman''' - A warrior who fights for Velder, use swift and simple slash attacks to damage players. | |'''Velder Swordsman''' - A warrior who fights for Velder, use swift and simple slash attacks to damage players. | ||
Has 10,000 HP. | |||
| | | | ||
*'''Slash:''' Can do a simple 2 slash attack that can knockdown players. | *'''Slash:''' Can do a simple 2 slash attack that can knockdown players. | ||
| Line 126: | Line 110: | ||
|[[File:VelderMagician.png|60px]] | |[[File:VelderMagician.png|60px]] | ||
| '''Velder Mage''' - A magician who fights for Velder, uses various fire blast attacks to damage players. | | '''Velder Mage''' - A magician who fights for Velder, uses various fire blast attacks to damage players. | ||
Has 10,000 HP. | |||
| | | | ||
*'''Fireball:''' Can fire a fireball that explode contact which can burn and push players back. | *'''Fireball:''' Can fire a fireball that explode contact which can burn and push players back. | ||
*'''Fire Eruption:''' Cast a fire eruption at the ground of the targeted player. | |||
|- | |- | ||
|[[File:VelderRusher.png|60px]] | |[[File:VelderRusher.png|60px]] | ||
| '''Velder Charger''' - A lancer who fights for Velder, uses mid-range technique to push players back. | | '''Velder Charger''' - A lancer who fights for Velder, uses mid-range technique to push players back. | ||
Has 10,000 HP. | |||
| | | | ||
*'''Pierce:''' Can perform piercing attacks that can knock player back and down. | *'''Pierce:''' Can perform piercing attacks that can knock player back and down. | ||
|- | |- | ||
|[[File:VelderGuardian.png|60px]] | |[[File:VelderGuardian.png|60px]] | ||
| '''Velder Defender''' - A defender who fights for Velder, uses defensive move to prevent players from breaking through. | | '''Velder Defender''' - A defender who fights for Velder, uses defensive move to prevent players from breaking through. | ||
Has 12,000 HP. | |||
| | | | ||
*'''Guard:''' Can guards against attacks to lower damage. | *'''Guard:''' Can guards against attacks to lower damage. | ||
| Line 142: | Line 130: | ||
|[[File:Vern1.jpg|60px]] | |[[File:Vern1.jpg|60px]] | ||
| '''Giant Vern''' - The swordsman of Velder's Chief Gatekeepers. | | '''Giant Vern''' - The swordsman of Velder's Chief Gatekeepers. | ||
Has 40,000 HP. | |||
| | | | ||
*'''Sword Combo:''' Vern swings his sword three times, with the third strike knocking down. | *'''Sword Combo:''' Vern swings his sword three times, with the third strike knocking down. | ||
| Line 149: | Line 138: | ||
|[[File:Velder_Mage1.jpg|60px]] | |[[File:Velder_Mage1.jpg|60px]] | ||
| '''Mysterious Cain''' - The mage of Velder's Chief Gatekeepers. | | '''Mysterious Cain''' - The mage of Velder's Chief Gatekeepers. | ||
Has 36,000 HP. | |||
| | | | ||
*'''Fire Blast:''' Cain swings her staff, releasing a blast of fire that quickly travels forward. | *'''Fire Blast:''' Cain swings her staff, releasing a blast of fire that quickly travels forward. | ||
| Line 157: | Line 147: | ||
|[[File:Lard1.jpg|60px]] | |[[File:Lard1.jpg|60px]] | ||
| '''Impregnable Rod''' - The defender of Velder's Chief Gatekeepers. | | '''Impregnable Rod''' - The defender of Velder's Chief Gatekeepers. | ||
Has 43,000 HP. | |||
| | | | ||
*'''Guard:''' Can guards against attacks to lower damage. | *'''Guard:''' Can guards against attacks to lower damage. | ||
| Line 165: | Line 156: | ||
|[[File:Velder_Spear1.jpg|60px]] | |[[File:Velder_Spear1.jpg|60px]] | ||
| '''Velder Garrison Centurion Vanessa''' - The spearman of Velder's Chief Gatekeepers. | | '''Velder Garrison Centurion Vanessa''' - The spearman of Velder's Chief Gatekeepers. | ||
Has 40,000 HP. | |||
| | | | ||
*'''Spear Swing:''' Vanessa swings her spear a few times in super armor, knocking down. | *'''Spear Swing:''' Vanessa swings her spear a few times in super armor, knocking down. | ||
| Line 170: | Line 162: | ||
*'''Energy Burst:''' Vanessa gains super armor and slams her spear into the ground, causing a large, red burst of energy, which launches players unfortunate enough to get hit by it. | *'''Energy Burst:''' Vanessa gains super armor and slams her spear into the ground, causing a large, red burst of energy, which launches players unfortunate enough to get hit by it. | ||
|} | |} | ||
< | <dfn>}}</dfn> | ||
| HamelTeam=<dfn>{{</dfn> | |||
{| class="wikitable" cellspacing="0" cellpadding="5" border="1" width="100%" style="border-collapse: collapse;" | |||
| | |||
{| cellspacing="0" cellpadding="5" border="1" width="100%" style="border-collapse: collapse;" | |||
|- | |- | ||
! width=60 | Image | ! width=60 | Image | ||
| Line 184: | Line 172: | ||
|[[File:HamelSword.png|60px]] | |[[File:HamelSword.png|60px]] | ||
| '''Hamel Swordsman''' - A warrior who fights for Hamel, use swift and simple slash attacks to damage players. | | '''Hamel Swordsman''' - A warrior who fights for Hamel, use swift and simple slash attacks to damage players. | ||
Has 10,000 HP. | |||
| | | | ||
*'''Slash:''' Can do a simple 2 slash attack that can knockdown players. | *'''Slash:''' Can do a simple 2 slash attack that can knockdown players. | ||
| Line 189: | Line 178: | ||
|[[File:HamelMagician.png|60px]] | |[[File:HamelMagician.png|60px]] | ||
| '''Hamel Mage''' - A magician who fights for Hamel, and uses various ice blast attacks to attack players. | | '''Hamel Mage''' - A magician who fights for Hamel, and uses various ice blast attacks to attack players. | ||
Has 10,000 HP. | |||
| | | | ||
*'''Ice Ball:''' Can fire an ice ball that explode contact which can chill and push players back. | *'''Ice Ball:''' Can fire an ice ball that explode contact which can chill and push players back. | ||
*'''Ice Eruption:''' Cast an ice eruption at the ground of the targeted player. | |||
|- | |- | ||
|[[File:HamelRusher.png|60px]] | |[[File:HamelRusher.png|60px]] | ||
| '''Hamel Charger''' - A lancer who fights for Hamel, uses mid-range technique to push players back. | | '''Hamel Charger''' - A lancer who fights for Hamel, uses mid-range technique to push players back. | ||
Has 10,000 HP. | |||
| | | | ||
*'''Pierce:''' Can perform piercing attacks that can knock player back and down. | *'''Pierce:''' Can perform piercing attacks that can knock player back and down. | ||
| Line 199: | Line 191: | ||
|[[File:HamelGuardian.png|60px]] | |[[File:HamelGuardian.png|60px]] | ||
| '''Hamel Defender''' - A defender who fights for Hamel, uses defensive move to prevent players from breaking through. | | '''Hamel Defender''' - A defender who fights for Hamel, uses defensive move to prevent players from breaking through. | ||
Has 12,000 HP. | |||
| | | | ||
*'''Guard:''' Can guards against attacks to lower damage. | *'''Guard:''' Can guards against attacks to lower damage. | ||
| Line 205: | Line 198: | ||
|[[File:HamelKnightFace.jpg|60px]] | |[[File:HamelKnightFace.jpg|60px]] | ||
| '''Huge Sig''' - The swordsman of Hamel's Chief Gatekeepers. | | '''Huge Sig''' - The swordsman of Hamel's Chief Gatekeepers. | ||
Has 40,000 HP. | |||
| | | | ||
*'''Sword Combo:''' Sig swings his sword three times, with the third strike knocking down. | *'''Sword Combo:''' Sig swings his sword three times, with the third strike knocking down. | ||
| Line 212: | Line 206: | ||
|[[File:Hamel_Mage1.jpg|60px]] | |[[File:Hamel_Mage1.jpg|60px]] | ||
| '''Head Magician Leonne''' - The mage of Hamel's Chief Gatekeepers. | | '''Head Magician Leonne''' - The mage of Hamel's Chief Gatekeepers. | ||
Has 36,000 HP. | |||
| | | | ||
*'''Ice Blast:''' Leonne swings her staff, releasing a blast of ice that quickly travels forward. | *'''Ice Blast:''' Leonne swings her staff, releasing a blast of ice that quickly travels forward. | ||
| Line 220: | Line 215: | ||
|[[File:Net1.png|60px]] | |[[File:Net1.png|60px]] | ||
| '''Barrier''' - The defender of Hamel's Chief Gatekeepers. | | '''Barrier''' - The defender of Hamel's Chief Gatekeepers. | ||
Has 43,000 HP. | |||
| | | | ||
*'''Guard:''' Can guards against attacks to lower damage. | *'''Guard:''' Can guards against attacks to lower damage. | ||
| Line 228: | Line 224: | ||
|[[File:Hamel_Spear1.jpg|60px]] | |[[File:Hamel_Spear1.jpg|60px]] | ||
| '''Head Guardian Lexter''' - The spearman of Hamel's Chief Gatekeepers. | | '''Head Guardian Lexter''' - The spearman of Hamel's Chief Gatekeepers. | ||
Has 40,000 HP. | |||
| | | | ||
*'''Spear Swing:''' Lexter swings her spear a few times in super armor, knocking down. | *'''Spear Swing:''' Lexter swings her spear a few times in super armor, knocking down. | ||
| Line 233: | Line 230: | ||
*'''Energy Burst:''' Lexter gains super armor and slams her spear into the ground, causing a large blue burst of energy, which launches players unfortunate enough to get hit by it. | *'''Energy Burst:''' Lexter gains super armor and slams her spear into the ground, causing a large blue burst of energy, which launches players unfortunate enough to get hit by it. | ||
|} | |} | ||
< | <dfn>}}</dfn> | ||
| Tower=<dfn>{{</dfn> | |||
{| class="wikitable" cellspacing="0" cellpadding="5" border="1" width="100%" style="border-collapse: collapse;" | |||
| | |||
{| cellspacing="0" cellpadding="5" border="1" width="100%" style="border-collapse: collapse;" | |||
|- | |- | ||
! width=60 | Image | ! width=60 | Image | ||
| Line 248: | Line 241: | ||
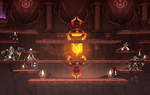
| '''Ereda's Magic Source''' - At the center of the battlefield is a large tower. Landing the final hit on the tower will restore the HP/MP as well as give the following buffs for 30 seconds for all members of the winner's team. | | '''Ereda's Magic Source''' - At the center of the battlefield is a large tower. Landing the final hit on the tower will restore the HP/MP as well as give the following buffs for 30 seconds for all members of the winner's team. | ||
*Super Armor. | *Super Armor. | ||
* | *Complete HP/MP recovery after 1 second once (does '''NOT''' recover if the player's HP reached 0). | ||
* | *MP recovered by 15% per second. | ||
* | *+130% damage against players. | ||
*30% | *+130% damage against monsters. | ||
*Movement Speed +30%. | |||
*Jump Speed +30%. | |||
Has 180,000 HP. | |||
'''Tips:''' | |||
*Ereda's Magic Source will always spawn 3 minutes after the start of the game and it will spawn again every 1 minute, timer start counting after the Ereda's Magic Source entity disappear. | |||
*Ereda's Magic Source usually spawn at '''00:59''' after the timer in the middle of the map reaches 00:00. Note: the tower can spawn late, as it is heavily affected by lag. | |||
*When Ereda's Magic Source spawns, it has 3 seconds invincible frame before it can be hit. | |||
*It is very recommended to save MP before Ereda's Magic Source spawn either to Nuke, Steal, or Stall opponents. | |||
| | | | ||
*'''Tower Aura:''' Standing near the tower will give all players within range super armor. | *'''Tower Aura:''' Standing near the tower will give all players within range super armor. | ||
*'''Energy Blast:''' The Guardian Tower releases a blast that does heavy damage. | *'''Energy Blast:''' The Guardian Tower releases a blast that does heavy damage and stun the target when hit. | ||
*'''Energy Lightning:''' The Guardian Tower will release multiple strikes of lightning which gradually get closer to the tower. | *'''Energy Lightning:''' The Guardian Tower will release multiple strikes of lightning which gradually get closer to the tower. | ||
|} | |} | ||
< | <dfn>}}</dfn> | ||
| Buffs=<dfn>{{</dfn> | |||
| | |||
|[[File:EredaBuff1.png|60px]] | |[[File:EredaBuff1.png|60px]] | ||
|''' | |'''Battle Mana Assembly''' - Increase damage against players by 100%. | ||
|- | |- | ||
|[[File:EredaBuff2.png|60px]] | |[[File:EredaBuff2.png|60px]] | ||
|'''Recovery | |'''Recovery Mana Assembly''' - Complete HP/MP recovery after 1 second (does '''NOT''' recover if the player's HP reached 0). | ||
|- | |- | ||
|[[File:EredaBuff3.png|60px]] | |[[File:EredaBuff3.png|60px]] | ||
|''' | |'''Speed Mana Assembly''' - Increase Movement Speed by 30% and Jump Speed by 15%. | ||
|- | |- | ||
|[[File:EredaBuff4.png|60px]] | |[[File:EredaBuff4.png|60px]] | ||
|'''Destruction | |'''Destruction Mana Assembly''' - Increase damage against monsters by 100%. | ||
<dfn>}}</dfn> | |||
< | | Rank=<dfn>{{</dfn> | ||
You can acquire Battlefield ranking by Winning/Losing in Ereda Island(E ~ SSS Rank).<BR> | |||
The amount of Rank points gained and lost per match increases for more frequent change in rank. | |||
| | {{{!}} border="1" cellpadding="5" style="border-collapse: collapse;" | ||
! style="background-color: {{ColorSel|Special}};" class="textfloat" colspan="12" | '''Ereda Rank''' | |||
You can acquire Battlefield ranking by Winning/Losing in Ereda Island(E ~ SSS Rank). | |||
{{{!}} | |||
! style="background-color: {{ColorSel| | |||
{{!}}- | {{!}}- | ||
{{!}} [[File:RankE2.png]] | {{!}} [[File:RankE2.png]] | ||
| Line 305: | Line 295: | ||
In Conquest, there is a highest rank called the "Star Rank". | In Conquest, there is a highest rank called the "Star Rank". | ||
{{{!}} cellspacing="0" cellpadding="5" border="1" width="0" style="border-collapse: collapse;" | {{{!}} class="wikitable" cellspacing="0" cellpadding="5" border="1" width="0" style="border-collapse: collapse;" | ||
{{!}}- | {{!}}- | ||
! Rank !! Detail | ! Rank !! Detail | ||
| Line 311: | Line 301: | ||
{{!}} [[File:RankStar2.png|center]] {{!}}{{!}} Awarded weekly to top 100 ranks.<br/>Star Rank characters can use 1 week timed title called the "Absolute of Ereda". | {{!}} [[File:RankStar2.png|center]] {{!}}{{!}} Awarded weekly to top 100 ranks.<br/>Star Rank characters can use 1 week timed title called the "Absolute of Ereda". | ||
{{!}}} | {{!}}} | ||
< | <dfn>}}</dfn> | ||
| SBGM=[http://www.youtube.com/watch?v=kKQteK1nFns '''''pve_stage01'''''] | |||
|Gallery= | |||
| | |||
<br><gallery widths=150px heights=150px> | <br><gallery widths=150px heights=150px> | ||
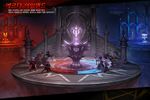
File:EredaS3Poster.png|Poster of '''Ereda Island (Season 3)'''. | File:EredaS3Poster.png|Poster of '''Ereda Island (Season 3)'''. | ||
| Line 329: | Line 310: | ||
File:Ereda3-3.PNG|Monster Room. | File:Ereda3-3.PNG|Monster Room. | ||
File:Ereda3-4.PNG|Hamel Base Room. | File:Ereda3-4.PNG|Hamel Base Room. | ||
File:Ereda3-5.PNG|Hamel | File:Ereda3-5.PNG|Hamel Starting Room. | ||
File:BackgroundObjectsConcept.png|Concept art of background objects in Ereda Island. | File:BackgroundObjectsConcept.png|Concept art of background objects in Ereda Island. | ||
File:VelderSheilderConcept.png|Concept art of Velder Shielder miniboss. | File:VelderSheilderConcept.png|Concept art of Velder Shielder miniboss. | ||
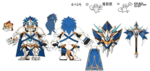
| Line 335: | Line 316: | ||
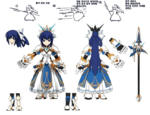
File:HamalLancerConcept.png|Concept art of Hamel Lancer miniboss. | File:HamalLancerConcept.png|Concept art of Hamel Lancer miniboss. | ||
File:LoadingScreenWithoutWords.png|'''Ereda Island''' loading screen. | File:LoadingScreenWithoutWords.png|'''Ereda Island''' loading screen. | ||
File:Loading-Ereda-Island.jpg|Old loading image. | |||
</gallery> | </gallery> | ||
| Dialogue= | |||
{{Tabber | |||
|$divclass=tabber-vertical fancy | |||
|Velder='''Dungeon Start:''' | |||
*{{StoryIcon|Vanessa}} '''Vanessa:''' ''Thank you for joining Ereda Island Base Capture Battle.'' | |||
*{{StoryIcon|Vanessa}} '''Vanessa:''' ''We need to capture 2 bases and extract Mana.'' | |||
*{{StoryIcon|Vanessa}} '''Vanessa:''' ''It's the time. To arms!! Capture the upper base!'' | |||
'''Conquer Base:''' | |||
*{{StoryIcon|Vanessa}} '''Vanessa:''' ''Hamel Knights are removed from the base. Velder Knights are defending the base.'' | |||
'''Lose Base:''' | |||
*{{StoryIcon|Vanessa}} '''Vanessa:''' ''Argh... All Knights have retreated! We lost Mana Extract Zone.'' | |||
'''Ereda's Magic Source Appears:''' | |||
*{{StoryIcon|Vanessa}} '''Vanessa:''' ''A stone statue with enormous power has appeared in Center Zone. Destroy it to become stronger!'' | |||
'''Victory:''' | |||
*{{StoryIcon|Vanessa}} '''Vanessa:''' ''Mana Extration Successful! Clasped Velder can now be restored.'' | |||
'''Lose:''' | |||
*{{StoryIcon|Vanessa}} '''Vanessa:''' ''Argh... I'll devote myself to the next battle to win.'' | |||
|Hamel='''Dungeon Start:''' | |||
*{{StoryIcon|Lexter}} '''Lexter:''' ''Thank you for supporting Hamel and participating in the battle.'' | |||
*{{StoryIcon|Lexter}} '''Lexter:''' ''Our goal is to capture the base and take Ereda's Mana.'' | |||
*{{StoryIcon|Lexter}} '''Lexter:''' ''It's the time... Let's begin the battle! Capture the lower base!'' | |||
'''Conquer Base:''' | |||
*{{StoryIcon|Lexter}} '''Lexter:''' ''We have driven the enemies from Mana Extract Zone. Ally knights are defending the base.'' | |||
'''Lose Base:''' | |||
*{{StoryIcon|Lexter}} '''Lexter:''' ''Our goal is to capture the base and take Ereda's Mana.'' | |||
'''Ereda's Magic Source Appears:''' | |||
*{{StoryIcon|Lexter}} '''Lexter:''' ''A stone statue with enormous power has appeared in Center Zone. Destroy it to become stronger!'' | |||
'''Victory:''' | |||
*{{StoryIcon|Lexter}} '''Lexter:''' ''We won the battle. Destroyed Hamel can now be restored.'' | |||
'''Lose:''' | |||
*{{StoryIcon|Lexter}} '''Lexter:''' ''... Guess we lost. Victory will be ours next time.'' | |||
}} | |||
|Updates=<dfn>{{</dfn> | |||
{| cellpadding="5" border="1" style="border-collapse: collapse; text-align: center;" | |||
|- style="background:{{ColorSel|Special}}" class="textfloat" | |||
! colspan=2 | Date !! rowspan=2 | Changes | |||
|- style="background:{{ColorSel|Special}}" class="textfloat" | |||
! KR !! NA | |||
|- | |||
| 03/16/2017 || 04/26/2017 || align="left" | | |||
*'''Ereda Island (Season 3)''' added. | |||
|} | |||
<dfn>}}</dfn> | |||
|AltLang= | |||
{{AlternateLanguages | |||
|Color={{ColorSel|Special}} | |||
|KR=에르다 아일랜드 |KRName=Ereda Island | |||
|TW=艾特島 |TWName=Ereda Island | |||
|CN=艾达岛 |CNName=Ereda Island | |||
|FR=Siège d'Ereda |FRName=Ereda Siege | |||
|DE=Insel Ereda |DEName=Ereda Island | |||
|IT=Isola di Ereda |ITName=Ereda Island | |||
|PL=Wyspa Ereda |PLName=Ereda Island | |||
|ES=Isla de Ereda |ESName=Ereda Island | |||
|BR=Ilha de Ereda |BRName=Ereda Island | |||
}} | |||
}} | }} | ||
Latest revision as of 07:50, 1 July 2023


Ereda Island (Season 3)
| “ | A place where Red Knights and Guardian Knights fought. Win the battle in Ereda Island and obtain the secret power!!!
|
” |

It was said that they both compete to promote unity and development, but in actual fact they compete because of the hidden artifacts in the island and both kingdoms fight for it.
The island battle was hidden with a mysterious force but now the mysterious land known as Ereda Island has appeared in the eyes of everyone.
- Must be at least 3rd Job or higher.
- Accessible from the Special Dungeon tab menu.
- The dungeon opens everyday.
- Waiting time for entry needs at least 6 people with desirable rank gap to make a match up.
- No pre-made parties allowed.
-
Default map layout.
-
An Ereda map when Ereda Mana Source spawned with the Player and their 2 teammates from Hamel Team inside Tower Area.


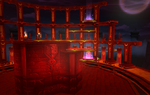
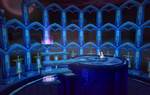
Arena: Each Team will start from their team's Starting Room and will exit into the battlefield which consists of three different rooms.
- Each team's Starting Room has two portals. One will take you to the upper Base Room and one will take you to the lower Base Room.
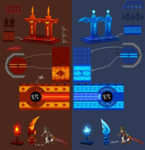
- The upper Base Room will start under the control of Hamel. The lower Base Room will start under the control of Velder.
- In each base room there will be two portals which will take you the the Monster Room.
- All Ereda Monsters will always spawn facing right.
- The Monster Room acts as the bridge between the lower and upper Base Rooms.
- In this room you will occasionally find various Pedestal Buffs or Ereda's Magic Source Tower.
Objective: The objective of the match is to have control of both Base Rooms at any given time.
- A Base Room can be taken over if you have defeated all of the opposing team's monsters in the room.
- Once a Base Room has been taken over, the color of the room will change and a squad of your team's monsters will fill the room.
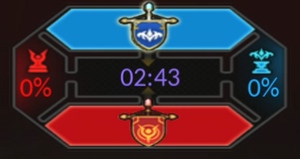
- When you are in control, a gauge will show how long you've been in control. The meter will increase by 1% per second.
- If you are in control, it is your job to prevent the opposing team from reclaiming control through PvP combat.
Goal: In order to be victorious you must fill your team's gauge to 100% or have the higher score at the end of the 10 minute match.
Training: You can practice Ereda Island in Training Mode.
- You can to freely recover HP, MP, and Special Gauge.
- you also have access to various other options score reset, and changing base.
- You can also Queue for Ereda Island while in training.
Tutorial: Tutorial teach you how Ereda Island works step-by-step.
}}You'll gain  Warrior's Medal when clear Ereda Island:
- Gain a Medal when win the battlefield.
- Gain a Medal per minute (Max: 6 Medals) when win the battlefield.
- Gain a Medal when more than 4 minutes.
- Gain a Medal every 2 kills when more than 4 minutes.
The maximum amount of Warrior's Medal you can get in a match is 12.
| Disabled Effects | Other Rules |
|---|---|
|
|
| Image | Description | Moves |
|---|---|---|

|
Velder Swordsman - A warrior who fights for Velder, use swift and simple slash attacks to damage players.
Has 10,000 HP. |
|

|
Velder Mage - A magician who fights for Velder, uses various fire blast attacks to damage players.
Has 10,000 HP. |
|

|
Velder Charger - A lancer who fights for Velder, uses mid-range technique to push players back.
Has 10,000 HP. |
|

|
Velder Defender - A defender who fights for Velder, uses defensive move to prevent players from breaking through.
Has 12,000 HP. |
|

|
Giant Vern - The swordsman of Velder's Chief Gatekeepers.
Has 40,000 HP. |
|

|
Mysterious Cain - The mage of Velder's Chief Gatekeepers.
Has 36,000 HP. |
|

|
Impregnable Rod - The defender of Velder's Chief Gatekeepers.
Has 43,000 HP. |
|

|
Velder Garrison Centurion Vanessa - The spearman of Velder's Chief Gatekeepers.
Has 40,000 HP. |
|
| Image | Description | Moves |
|---|---|---|

|
Hamel Swordsman - A warrior who fights for Hamel, use swift and simple slash attacks to damage players.
Has 10,000 HP. |
|

|
Hamel Mage - A magician who fights for Hamel, and uses various ice blast attacks to attack players.
Has 10,000 HP. |
|

|
Hamel Charger - A lancer who fights for Hamel, uses mid-range technique to push players back.
Has 10,000 HP. |
|

|
Hamel Defender - A defender who fights for Hamel, uses defensive move to prevent players from breaking through.
Has 12,000 HP. |
|

|
Huge Sig - The swordsman of Hamel's Chief Gatekeepers.
Has 40,000 HP. |
|

|
Head Magician Leonne - The mage of Hamel's Chief Gatekeepers.
Has 36,000 HP. |
|

|
Barrier - The defender of Hamel's Chief Gatekeepers.
Has 43,000 HP. |
|

|
Head Guardian Lexter - The spearman of Hamel's Chief Gatekeepers.
Has 40,000 HP. |
|
| Image | Description | Moves |
|---|---|---|

|
Ereda's Magic Source - At the center of the battlefield is a large tower. Landing the final hit on the tower will restore the HP/MP as well as give the following buffs for 30 seconds for all members of the winner's team.
Has 180,000 HP. Tips:
|
|
| Buffs Image | Buffs Description |
|---|---|

|
Battle Mana Assembly - Increase damage against players by 100%. |

|
Recovery Mana Assembly - Complete HP/MP recovery after 1 second (does NOT recover if the player's HP reached 0). |

|
Speed Mana Assembly - Increase Movement Speed by 30% and Jump Speed by 15%. |

|
Destruction Mana Assembly - Increase damage against monsters by 100%.
}} |
You can acquire Battlefield ranking by Winning/Losing in Ereda Island(E ~ SSS Rank).
The amount of Rank points gained and lost per match increases for more frequent change in rank.
| Ereda Rank | |||||||||||
|---|---|---|---|---|---|---|---|---|---|---|---|
Conquest page added in Boards > [Ranking]

In Conquest, there is a highest rank called the "Star Rank".
| Rank | Detail |
|---|---|
 |
Awarded weekly to top 100 ranks. Star Rank characters can use 1 week timed title called the "Absolute of Ereda". |
- Velder
- Hamel
Dungeon Start:
 Vanessa: Thank you for joining Ereda Island Base Capture Battle.
- Vanessa: We need to capture 2 bases and extract Mana.
- Vanessa: It's the time. To arms!! Capture the upper base!
Conquer Base:
- Vanessa: Hamel Knights are removed from the base. Velder Knights are defending the base.
Lose Base:
- Vanessa: Argh... All Knights have retreated! We lost Mana Extract Zone.
Ereda's Magic Source Appears:
- Vanessa: A stone statue with enormous power has appeared in Center Zone. Destroy it to become stronger!
Victory:
- Vanessa: Mana Extration Successful! Clasped Velder can now be restored.
Lose:
- Vanessa: Argh... I'll devote myself to the next battle to win.
-
Poster of Ereda Island (Season 3).
-
Velder Starting Room.
-
Velder Base Room.
-

Monster Room.
-
Hamel Base Room.
-
Hamel Starting Room.
-
Concept art of background objects in Ereda Island.
-
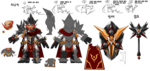
Concept art of Velder Shielder miniboss.
-
Concept art of Hamel Shielder miniboss.
-
Concept art of Hamel Lancer miniboss.
-

Ereda Island loading screen.
-
Old loading image.


| Date | Changes | |
|---|---|---|
| KR | NA | |
| 03/16/2017 | 04/26/2017 |
|
| Server | Name | Translation |
|---|---|---|
| 에르다 아일랜드 | Ereda Island | |
| 艾特島 | Ereda Island | |
| 艾达岛 | Ereda Island | |
| Insel Ereda | Ereda Island | |
| Isla de Ereda | Ereda Island | |
| Siège d'Ereda | Ereda Siege | |
| Isola di Ereda | Ereda Island | |
| Wyspa Ereda | Ereda Island | |
| Ilha de Ereda | Ereda Island |
