Master Class: Difference between revisions
Shironsaki (talk | contribs) m (Text replacement - "File:Icon - Revenant (Master Class).png" to "{{MasterOverlay|Icon - Revenant.png|Solace}}") |
Shironsaki (talk | contribs) |
||
| Line 288: | Line 288: | ||
! colspan=2 |[[Elsword]] | ! colspan=2 |[[Elsword]] | ||
|- | |- | ||
| width="40" | {{MasterOverlay|Icon - Knight Emperor.png|Solace}} | | width="40" | {{MasterOverlay|Icon - Knight Emperor.png|Solace}} | ||
| width="150" | [[Knight Emperor]] | | width="150" | [[Knight Emperor]] | ||
|- | |- | ||
| width="40" | {{MasterOverlay|Icon - Rune Master.png|Solace}} | | width="40" | {{MasterOverlay|Icon - Rune Master.png|Solace}} | ||
| width="150" | [[Rune Master]] | | width="150" | [[Rune Master]] | ||
|- | |- | ||
| width="40" | {{MasterOverlay|Icon - Rune Master.png|Solace}} | | width="40" | {{MasterOverlay|Icon - Rune Master.png|Solace}} | ||
| width="150" | [[Immortal]] | | width="150" | [[Immortal]] | ||
|- | |- | ||
| width="40" | {{MasterOverlay|Icon - Genesis.png|Solace}} | | width="40" | {{MasterOverlay|Icon - Genesis.png|Solace}} | ||
| width="150" | [[Genesis]] | | width="150" | [[Genesis]] | ||
|} | |} | ||
| Line 306: | Line 306: | ||
! colspan=2 |[[Aisha]] | ! colspan=2 |[[Aisha]] | ||
|- | |- | ||
| width="40" | {{MasterOverlay|Icon - Aether Sage.png|Denif}} | | width="40" | {{MasterOverlay|Icon - Aether Sage.png|Denif}} | ||
| width="150" | [[Aether Sage]] | | width="150" | [[Aether Sage]] | ||
|- | |- | ||
| width="40" | {{MasterOverlay|Icon - Oz Sorcerer.png|Denif}} | | width="40" | {{MasterOverlay|Icon - Oz Sorcerer.png|Denif}} | ||
| width="150" | [[Oz Sorcerer]] | | width="150" | [[Oz Sorcerer]] | ||
|- | |- | ||
| width="40" | {{MasterOverlay|Icon - Metamorphy.png|Denif}} | | width="40" | {{MasterOverlay|Icon - Metamorphy.png|Denif}} | ||
| width="150" | [[Metamorphy]] | | width="150" | [[Metamorphy]] | ||
|- | |- | ||
| width="40" | {{MasterOverlay|Icon - Lord Azoth.png|Denif}} | | width="40" | {{MasterOverlay|Icon - Lord Azoth.png|Denif}} | ||
| width="150" | [[Lord Azoth]] | | width="150" | [[Lord Azoth]] | ||
|} | |} | ||
| Line 323: | Line 323: | ||
! colspan=2 |[[Rena]] | ! colspan=2 |[[Rena]] | ||
|- | |- | ||
| width="40" | | | width="40" | {{MasterOverlay|Icon - Anemos.png|Ventus}} | ||
| width="150" | [[Anemos]] | | width="150" | [[Anemos]] | ||
|- | |- | ||
| width="40" | | | width="40" | {{MasterOverlay|Icon - Daybreaker.png|Ventus}} | ||
| width="150" | [[Daybreaker]] | | width="150" | [[Daybreaker]] | ||
|- | |- | ||
| width="40" | | | width="40" | {{MasterOverlay|Icon - Twilight.png|Ventus}} | ||
| width="150" | [[Twilight]] | | width="150" | [[Twilight]] | ||
|- | |- | ||
| width="40" | | | width="40" | {{MasterOverlay|Dunno.png|Ventus}} | ||
| width="150" | ??? | | width="150" | ??? | ||
|} | |} | ||
| Line 340: | Line 340: | ||
! colspan=2 |[[Raven]] | ! colspan=2 |[[Raven]] | ||
|- | |- | ||
| width="40" | {{MasterOverlay|Icon - Furious Blade.png|Solace}} | | width="40" | {{MasterOverlay|Icon - Furious Blade.png|Solace}} | ||
| width="150" | [[Furious Blade]] | | width="150" | [[Furious Blade]] | ||
|- | |- | ||
| width="40" | {{MasterOverlay|Icon - Rage Hearts.png|Solace}} | | width="40" | {{MasterOverlay|Icon - Rage Hearts.png|Solace}} | ||
| width="150" | [[Rage Hearts]] | | width="150" | [[Rage Hearts]] | ||
|- | |- | ||
| width="40" | {{MasterOverlay|Icon - Nova Imperator.png|Solace}} | | width="40" | {{MasterOverlay|Icon - Nova Imperator.png|Solace}} | ||
| width="150" | [[Nova Imperator]] | | width="150" | [[Nova Imperator]] | ||
|- | |- | ||
| width="40" | {{MasterOverlay|Icon - Revenant.png|Solace}} | | width="40" | {{MasterOverlay|Icon - Revenant.png|Solace}} | ||
| width="150" | [[Revenant]] | | width="150" | [[Revenant]] | ||
|} | |} | ||
| Line 358: | Line 358: | ||
! colspan=2 |[[Eve]] | ! colspan=2 |[[Eve]] | ||
|- | |- | ||
| width="40" | | | width="40" | {{MasterOverlay|Icon - Code Ultimate.png|Adrian}} | ||
| width="150" | [[Code: Ultimate]] | | width="150" | [[Code: Ultimate]] | ||
|- | |- | ||
| width="40" | | | width="40" | {{MasterOverlay|Icon - Code Esencia.png|Adrian}} | ||
| width="150" | [[Code: Esencia]] | | width="150" | [[Code: Esencia]] | ||
|- | |- | ||
| width="40" | | | width="40" | {{MasterOverlay|Icon - Code Sariel.png|Adrian}} | ||
| width="150" | [[Code: Sariel]] | | width="150" | [[Code: Sariel]] | ||
|- | |- | ||
| width="40" | | | width="40" | {{MasterOverlay|Icon - Code Antithese.png|Adrian}} | ||
| width="150" | [[Code: Antithese]] | | width="150" | [[Code: Antithese]] | ||
|} | |} | ||
| Line 375: | Line 375: | ||
! colspan=2 |[[Chung]] | ! colspan=2 |[[Chung]] | ||
|- | |- | ||
| width="40" | | | width="40" | {{MasterOverlay|Icon - Comet Crusader.png|Denif}} | ||
| width="150" | [[Comet Crusader]] | | width="150" | [[Comet Crusader]] | ||
|- | |- | ||
| width="40" | | | width="40" | {{MasterOverlay|Icon - Fatal Phantom.png|Denif}} | ||
| width="150" | [[Fatal Phantom]] | | width="150" | [[Fatal Phantom]] | ||
|- | |- | ||
| width="40" | | | width="40" | {{MasterOverlay|Icon - Centurion.png|Denif}} | ||
| width="150" | [[Centurion]] | | width="150" | [[Centurion]] | ||
|- | |- | ||
| width="40" | | | width="40" | {{MasterOverlay|Dunno.png|Denif}} | ||
| width="150" | ??? | | width="150" | ??? | ||
|} | |} | ||
| Line 392: | Line 392: | ||
! colspan=2 |[[Ara]] | ! colspan=2 |[[Ara]] | ||
|- | |- | ||
| width="40" | | | width="40" | {{MasterOverlay|Icon - Apsara.png|Gaia}} | ||
| width="150" | [[Apsara]] | | width="150" | [[Apsara]] | ||
|- | |- | ||
| width="40" | | | width="40" | {{MasterOverlay|Icon - Devi.png|Gaia}} | ||
| width="150" | [[Devi]] | | width="150" | [[Devi]] | ||
|- | |- | ||
| width="40" | | | width="40" | {{MasterOverlay|Icon - Shakti.png|Gaia}} | ||
| width="150" | [[Shakti]] | | width="150" | [[Shakti]] | ||
|- | |- | ||
| width="40" | | | width="40" | {{MasterOverlay|Icon - Surya.png|Gaia}} | ||
| width="150" | [[Surya]] | | width="150" | [[Surya]] | ||
|} | |} | ||
| Line 409: | Line 409: | ||
! colspan=2 |[[Elesis]] | ! colspan=2 |[[Elesis]] | ||
|- | |- | ||
| width="40" | | | width="40" | {{MasterOverlay|Icon - Empire Sword.png|Rosso}} | ||
| width="150" | [[Empire Sword]] | | width="150" | [[Empire Sword]] | ||
|- | |- | ||
| width="40" | | | width="40" | {{MasterOverlay|Icon - Flame Lord.png|Rosso}} | ||
| width="150" | [[Flame Lord]] | | width="150" | [[Flame Lord]] | ||
|- | |- | ||
| width="40" | | | width="40" | {{MasterOverlay|Icon - Bloody Queen.png|Rosso}} | ||
| width="150" | [[Bloody Queen]] | | width="150" | [[Bloody Queen]] | ||
|- | |- | ||
| width="40" | | | width="40" | {{MasterOverlay|Dunno.png|Rosso}} | ||
| width="150" | ??? | | width="150" | ??? | ||
|} | |} | ||
| Line 427: | Line 427: | ||
! colspan=2 |[[Add]] | ! colspan=2 |[[Add]] | ||
|- | |- | ||
| width="40" | | | width="40" | {{MasterOverlay|Icon - Doom Bringer.png|Adrian}} | ||
| width="150" | [[Doom Bringer]] | | width="150" | [[Doom Bringer]] | ||
|- | |- | ||
| width="40" | | | width="40" | {{MasterOverlay|Icon - Dominator.png|Adrian}} | ||
| width="150" | [[Dominator]] | | width="150" | [[Dominator]] | ||
|- | |- | ||
| width="40" | | | width="40" | {{MasterOverlay|Icon - Mad Paradox.png|Adrian}} | ||
| width="150" | [[Mad Paradox]] | | width="150" | [[Mad Paradox]] | ||
|- | |- | ||
| width="40" | | | width="40" | {{MasterOverlay|Dunno.png|Adrian}} | ||
| width="150" | ??? | | width="150" | ??? | ||
|} | |} | ||
| Line 444: | Line 444: | ||
! colspan=2 |[[Lu/Ciel]] | ! colspan=2 |[[Lu/Ciel]] | ||
|- | |- | ||
| width="40" | | | width="40" | {{MasterOverlay|Icon - Catastrophe (Timoria).png|Rosso}} | ||
| width="150" rowspan=2 | [[Catastrophe]]<br>(Timoria/Abysser) | | width="150" rowspan=2 | [[Catastrophe]]<br>(Timoria/Abysser) | ||
|- | |- | ||
| width="40" | | | width="40" | {{MasterOverlay|Icon - Catastrophe (Abysser).png|Rosso}} | ||
|- | |- | ||
| width="40" | | | width="40" | {{MasterOverlay|Icon - Innocent (Ishtar).png|Rosso}} | ||
| width="150" rowspan=2 | [[Innocent]]<br>(Ishtar/Chevalier) | | width="150" rowspan=2 | [[Innocent]]<br>(Ishtar/Chevalier) | ||
|- | |- | ||
| width="40" | | | width="40" | {{MasterOverlay|Icon - Innocent (Chevalier).png|Rosso}} | ||
|- | |- | ||
| width="40" | | | width="40" | {{MasterOverlay|Icon - Diangelion (Iblis).png|Rosso}} | ||
| width="150" rowspan=2 | [[Diangelion]]<br>(Iblis/Anular) | | width="150" rowspan=2 | [[Diangelion]]<br>(Iblis/Anular) | ||
|- | |- | ||
| width="40" | | | width="40" | {{MasterOverlay|Icon - Diangelion (Anular).png|Rosso}} | ||
|- | |- | ||
| width="40" | | | width="40" | {{MasterOverlay|Dunno.png|Rosso}} | ||
| width="150" rowspan=2 | ???<br>(???/???) | | width="150" rowspan=2 | ???<br>(???/???) | ||
|- | |- | ||
| width="40" | | | width="40" | {{MasterOverlay|Dunno.png|Rosso}} | ||
|} | |} | ||
| valign="top" | | | valign="top" | | ||
| Line 469: | Line 469: | ||
! colspan=2 |[[Rose]] | ! colspan=2 |[[Rose]] | ||
|- | |- | ||
| width="40" | | | width="40" | {{MasterOverlay|Icon - Tempest Burster.png|Ventus}} | ||
| width="150" | [[Tempest Burster]] | | width="150" | [[Tempest Burster]] | ||
|- | |- | ||
| width="40" | | | width="40" | {{MasterOverlay|Icon - Black Massacre.png|Ventus}} | ||
| width="150" | [[Black Massacre]] | | width="150" | [[Black Massacre]] | ||
|- | |- | ||
| width="40" | | | width="40" | {{MasterOverlay|Icon - Minerva.png|Ventus}} | ||
| width="150" | [[Minerva]] | | width="150" | [[Minerva]] | ||
|- | |- | ||
| width="40" | | | width="40" | {{MasterOverlay|Icon - Prime Operator.png|Ventus}} | ||
| width="150" | [[Prime Operator]] | | width="150" | [[Prime Operator]] | ||
|} | |} | ||
| Line 486: | Line 486: | ||
! colspan=2 |[[Ain]] | ! colspan=2 |[[Ain]] | ||
|- | |- | ||
| width="40" | | | width="40" | {{MasterOverlay|Icon - Richter.png|Hernia}} | ||
| width="150" | [[Richter]] | | width="150" | [[Richter]] | ||
|- | |- | ||
| width="40" | | | width="40" | {{MasterOverlay|Icon - Bluhen.png|Hernia}} | ||
| width="150" | [[Bluhen]] | | width="150" | [[Bluhen]] | ||
|- | |- | ||
| width="40" | | | width="40" | {{MasterOverlay|Icon - Herrscher.png|Hernia}} | ||
| width="150" | [[Herrscher]] | | width="150" | [[Herrscher]] | ||
|- | |- | ||
| width="40" | | | width="40" | {{MasterOverlay|Dunno.png|Hernia}} | ||
| width="150" | ??? | | width="150" | ??? | ||
|} | |} | ||
| Line 504: | Line 504: | ||
! colspan=2 |[[Laby]] | ! colspan=2 |[[Laby]] | ||
|- | |- | ||
| width="40" | | | width="40" | {{MasterOverlay|Icon - Eternity Winner.png|Gaia}} | ||
| width="150" | [[Eternity Winner]] | | width="150" | [[Eternity Winner]] | ||
|- | |- | ||
| width="40" | | | width="40" | {{MasterOverlay|Icon - Radiant Soul.png|Gaia}} | ||
| width="150" | [[Radiant Soul]] | | width="150" | [[Radiant Soul]] | ||
|- | |- | ||
| width="40" | | | width="40" | {{MasterOverlay|Icon - Nisha Labyrinth.png|Gaia}} | ||
| width="150" | [[Nisha Labyrinth]] | | width="150" | [[Nisha Labyrinth]] | ||
|- | |- | ||
| width="40" | | | width="40" | {{MasterOverlay|Dunno.png|Gaia}} | ||
| width="150" | ??? | | width="150" | ??? | ||
|} | |} | ||
| Line 521: | Line 521: | ||
! colspan=2 |[[Noah]] | ! colspan=2 |[[Noah]] | ||
|- | |- | ||
| width="40" | | | width="40" | {{MasterOverlay|Icon - Liberator.png|Ebalon}} | ||
| width="150" | [[Liberator]] | | width="150" | [[Liberator]] | ||
|- | |- | ||
| width="40" | | | width="40" | {{MasterOverlay|Icon - Celestia.png|Ebalon}} | ||
| width="150" | [[Celestia]] | | width="150" | [[Celestia]] | ||
|- | |- | ||
| width="40" | | | width="40" | {{MasterOverlay|Icon - Nyx Pieta.png|Ebalon}} | ||
| width="150" | [[Nyx Pieta]] | | width="150" | [[Nyx Pieta]] | ||
|- | |- | ||
| width="40" | | | width="40" | {{MasterOverlay|Dunno.png|Ebalon}} | ||
| width="150" | ??? | | width="150" | ??? | ||
|} | |} | ||
Revision as of 15:19, 28 February 2022
After completing their 3rd Job and reaching Rigomor, players are able to bring out their abilities beyond their limits to unlock new skills. Unlike previous advancements, reaching Master Class does not unlock Final Enhanced effects for 3rd Job skills, a new portrait, or a new skill cut-in for non-master skills, but it will give a skill cut-in that is used exclusively for Master Skills.
General Information
Characters can only advance to their Master Class after completing their 3rd Job Change and reaching Rigomor. To advance, the character must complete the Master Class quest available at the Town Board or use their respective class Item Mall Class Change item. If the character has already reached Master Class, they can change their class with the Master Class Change Ticket.
Master Class Quest

Skill Quests
Master Skill Second Stage
Master Skill Third Stage
Master Skill Fourth Stage
Master Road


.png)


Benefits of Master Class
Master Skill
After advancing to the Master Class, the player will have access to a Master Skill. This skill is available in 4 stages, increasing in power with each stage. The first stage is automatically unlocked upon advancing to Master Class while additional stages can be unlocked by completing their Skill Quests in sequential order.
Master Skills don't have Skill Traits and are not affected by Skill Damage Increase stat but they have their own Master Skill Damage Increase option. When a Master Skill is used, a special Master Class Skill Cut-in will be shown.
Artifact
- Main Article: Artifact System
When players advance to their Master Class, they will be able to use Master Artifacts.
-
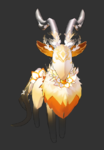
Serne, Gaia's Artifact
-
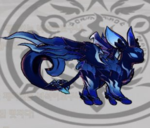
Alisha, Rosso's Artifact
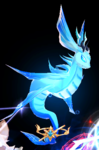
-
Revent, Ventus's Artifact
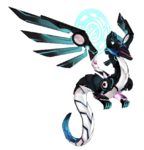
-
Vaikal, Denif's Artifact
-
Karte, Adrian's Artifact
-
Leon, Solace's Artifact
-
Dachsologie, Hernia's Artifact


.png&action=edit&redlink=1)
.png)
.png)
.png)
.png)
.png)
.png)
.png)
.png)
.png)
.png)
List of Classes
|
|
|
| ||||||||||||||||||||||||||||||||||||||||||||
|
|
|
| ||||||||||||||||||||||||||||||||||||||||||||
|
|
|
| ||||||||||||||||||||||||||||||||||||||||||||
|
| ||||||||||||||||||||||||||||||||||||||||||||||
.png.png)
.png.png)
.png.png)
.png.png)
.png.png)
.png.png)
Trivia
(Old).png)
- Adrian's sign used to be light purple instead of deep blue before Eve and Add's Master Class was officially released.
- Hernia is the only master to have multiple dungeons. This is due to them taking place inside of Ain's psyche/Noah's memories instead of physical locations.
- Additionally, both of her dungeons drop the same Force Skill, and the accessories that can be obtained from them are functionally the same, only differing in name and appearance.