|
|
| Line 26: |
Line 26: |
| Just like in villages, your combat system is disabled here and skills cannot be used. | | Just like in villages, your combat system is disabled here and skills cannot be used. |
|
| |
|
| Feita is the only one that doesn't have a rest area. | | Feita and Ruben is the only ones that doesn't have rest areas. |
| <br> | | <br> |
|
| |
|
Revision as of 14:00, 15 May 2014
Information: This article is currently under development. Please be patient while we're adding the finishing touches!
Hunting Fields
The Hunting Fields is one of the alternative methods to obtain EXP, besides dungeons and PvP. The Hunting Fields allows you to explore areas of Elrios and face enemies.
Field Mobs
Just like dungeons, there will be mobs where you can defeat for EXP, ED, and drops. Many mobs that appear here will have similar appearances and attacks to regular mobs found in Dungeons.
Defeated monsters will respawn within a set amount of time at the same spot that they reside in. If monsters move too far from their respawn area, they will immediately stop fighting you and start running back to their spot. They will be absolutely invincible when this occurs.
Defeating mobs will lower your stamina as well as Equipment durability. When you run out of stamina, you may continue to fight but no EXP, ED, or drops will be given.
There will be two types of mobs: Aggressive and Reactive.
Aggressive Mobs
Aggressive Mobs are monsters that will attack you whenever you are within range of their attacks. Aggressive monsters are identified with a yellow life-bar.
Reactive Mobs
Reactive Mobs are monsters that will attack you only when you attack them first. Unless you attack them first, they will make no attempt to fight you. Reactive monsters are identified with a green life-bar.
Safe Spots
Every field has an area that cannot be reached by monsters. This area can be identified by a wider, farther viewpoint. This is the ideal spot for healing without being attacked by monsters or having to leave the field.
Resting Areas
As the name suggests, the Resting Areas are areas between Towns and Fields where you may rest and recover HP and MP with no monsters to bother you. This is where the NPCs Helen and Glaive can be found. In addition, you may also find a Board and Mailbox.
Just like in villages, your combat system is disabled here and skills cannot be used.
Feita and Ruben is the only ones that doesn't have rest areas.
Field Bosses
Just like dungeons, you can face bosses in the Hunting Fields. Each region, except Ruben, will have a chance of spawning a unique Field Boss or Bosses. Their chances of appearing will increase if more monsters in the area are being killed.
List of Bosses
| Epithet
|
Boss Name
|
Image
|
Description
|
Moves (All are performed with Super Armor)
|
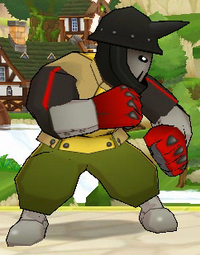
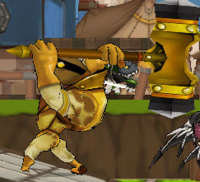
| Thief Duo
|
Uool
|
|
Too much fighting around Wally's Castle? The hulking soldier Uool will be there, Illy in tow, of course.
|
- Leaping Undercut: Jumps in the air and punches the ground.
- Punch Combo: A two punch combo.
- Uppercut: Moves forward and delivers and uppercut sending player flying.
- Power Up!: Uool will buff himself with a red aura. This will give him Super Armor and increased speed for 10~17 seconds.
|
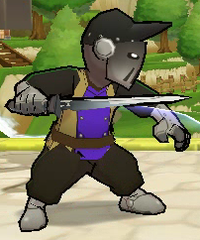
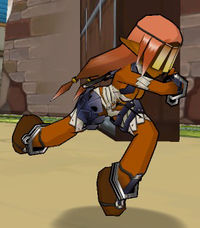
| Illy
|
|
A sly assassin who always appears by Uool's side, ready with his blade.
|
- Dagger Combo: A quick short dagger combo.
- Air Slash: Slash targets while jumping.
|
|-|
Bethma=
| Epithet
|
Boss Name
|
Image
|
Description
|
Moves (All are performed with Super Armor)
|
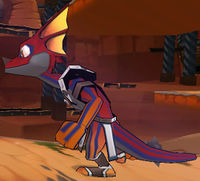
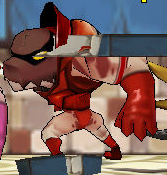
| Wandering Saurus
|
Vescoo
|
|
A powerful, wandering Saurus lizardman, whose bright red skin is a source of pride.
|
- Overhead Smash: Draw its club and slam it with an overhead swing.
- Uppercut Swing: Ready its club for few seconds, slides forwards, then does a twirl uppercut sending players flying.
- Quake: He will violently swing his club to the ground, both in front and behind him.
|
| First Nasod
|
Wally No. 0 TYPE_P
|

|
This large robot is said to be a terrifying vehicle of Wally. Brave are the adventurers who seek it.
|
- Booster Dash: By using the jet packs behind his back, Wally will rush at you, dealing heavy damage.
- Mecha Punch: Punches you with its giant metal arms.
- Missiles: Bringing his robotic arms behind him, six missiles will come out of Wally on both sides!
- Thruster Explosion: Extending his arms, Wally will summon two blue bursts of energy from his hands to damage all those on the sides of him.
- System Error: TYPE_P will go on a rampage, rapidly dashing back and forth through the stage and tackling anyone in its path.
|
|-|
Altera=
| Epithet
|
Boss Name
|
Image
|
Description
|
Moves (All are performed with Super Armor)
|
| Cruel Slayer
|
Sleshu
|
|
The field-roaming commander hates adventurers. Force a face-off by making trouble.
|
- Guard: He will use his sword to block all attacks, reducing the damage dealt to him.
- Kick: Kick his opponent in front of him.
- Slash: Jump towards you while swinging his sword.
- Finishing Slash: - Sleshu can quickly dash past his opponents while doing multiple slashes.
|
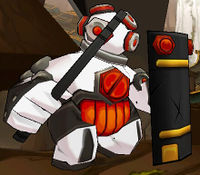
| Nasod Supervisor
|
Muta
|
|
A tough Nasod guard boss that oversees the field.
|
- Block: Defend against attacks from the front.
- Shield Bash: Smash its shield against any target in front of it three times.
- Stun Baton: Takes out a baton and zaps anybody in the general area in front of it.
- Magic Shield: After a certain amount of damage, Muta will set up a shield in a similar fashion to Joaquin and will try to recover its life. Unlike Joaquin, Muta will not have any damage reduction in this state.
|
|-|
Feita=
| Epithet
|
Boss Name
|
Image
|
Description
|
Moves (All are performed with Super Armor)
|
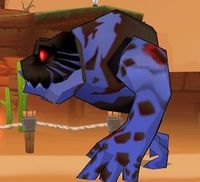
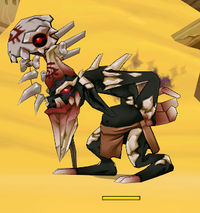
| Corrupt Glitter
|
Bater
|
|
Bater is one tough Glitter gone wrong. He hardly knows any better than to walk aimlessly and chomp at enemies.
|
- Bite: Similar to the Glitter Zombies, Bater can attack simply by biting his enemies.
- Toxic Vomit: Bater can vomit onto his opponents, which will release several Poisonous Clouds that can severely poison you.
|
| Gigantic Jubigee
|
Wamu
|

|
This giant can be tough to beat. Avoid the exploding seed pocket at all costs.
|
- Gland Explosion: After being attacked its poison gland will expand until it decides to explode dealing large damage and inflicting poison.
- Fatal Release: When it reaches maximum size, Wamu will do a more damaging explosion and revert back to it's normal size.
|
|-|
Velder=
| Epithet
|
Boss Name
|
Image
|
Description
|
Moves (All are performed with Super Armor)
|
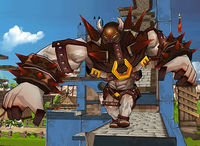
| Uno and the Girls
|
Lanos
|
|
What Lanos lack in brain size, he makes up for in muscular hands bigger than his head. He fights side by side with Shinee and Moonstar.
|
- Downward Punch: The Glitter pulls his arm back and punches downwards at you. The punch is inaccurate and it will miss you entirely if you stand right next to him.
- Double Lariat: The Glitter spins himself around with his arms wide apart, knocking everything in his radius away from him. This does rather substantial damage if he manages to combo you.
- Leap Smash: The Glitter leaps up into the air and smashes downwards.
- Running Punch: If the Glitter notices that you are some distance away from you, he will run towards you and punch you. This does not do much damage as long as he doesn't combo you.
- Seismic Smash: The Glitter squats, and repeatedly smashes the ground with his two arms. At the 4th smash, it will cause an earthquake effect on whoever is on the same level ground as it. Does substantial damage.
- Adrenaline: After his health is reduced below a certain percentage, Lanos can increase his Action Speed significantly for a short amount of time.
|
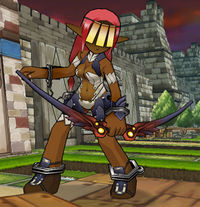
| Moonstar
|
|
If there weren't anyone else to fight, she and Shinee would be shooting arrows at each other!
|
- Spray Shot: She will shoot 3 arrow in a spread.
- Rapid Shot: She is able to perform Rena's Rapid Shot, she'll finish it off with an Arc Shot.
- Aerial Bomber: High jump across the screen, shooting an arrow downwards that explodes on impact.
- Slash: Moonstar draws her knife and quickly slashes her enemies twice.
- Tumble: A defensive move where Moonstar backflips several times.
- Encouragement: Similar to a Pet encouraging their master, Lanos can regain health by having Shinee and Moonstar cheer him on.
|
| Shinee
|
|
A dark elf lady who may have a rivalry with Moonstar, but she sets it aside during battle.
|
- Advanced Kick Combo: Starts with 2 normal kicks followed by 3 powerful kicks: A rear horse kick, knee kick and a long range knee kick. Similar to Wind Sneaker combo ZZ→ZZZ.
- Slash: Shinee draws her knife and slashes you twice with it. Induces KD and Bleed (see Status Effects)
- Tumble: Shinee will perform a series of back flips, avoid any attack that goes her way. She is completely invincible during this.
- Air Kick Combo 1 & a half: Shinee performs the Triple Air Kick maneuver. However, she only stops at the second kick and starts combo-ing you later.Similar to Combat Ranger combo →→↑ZZZ canceled on second Z.
- Nature Force: Dark Ver.: Shinee imbues her attacks with the power of darkness. Similar to Wind Sneaker's Nature's Force active skill.
- Spinning Kick: Dark Ver.: Shinee spins horizontally, drilling into opponents with her feet. Similar to Combat Ranger's Spinning Kick special active skill. This does substantial damage.
- Slide Double Kick: Dark Ver.: Shinee slide kicks behind the you followed by a kick and another kick into the air.
- Encouragement: Similar to a Pet encouraging their master, Lanos can regain health by having Shinee and Moonstar cheer him on.
|
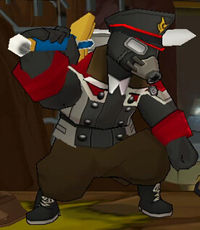
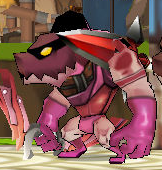
| Dark Soldiers
|
Glitter Troops: Red
|
|
The bullheaded member of the Dark Soldiers: Glitter Troops is an effective mid-ranged fighter.
|
- Spear Combo: Stab forward with its spear then performs an overhead slash.
- Spear Charge: Charges forward with his spear dealing multiple hits.
- Aerial Counter: It will counter attack with a downward smash if it is struck while in the air.
- G Force: He will try to gather all of his troop and then he will do a similar to introduction as they spawns granting them increase damage and movement speed.
|
| Glitter Troops: Pink
|
|
The Dark Soldiers: Glitter Troops count on this guy to take their enemies down from afar.
|
- Arrow Shot: Fires an arrow forward.
- Down Shot: Fire an arrow downward.
|
| Glitter Troops: Black
|
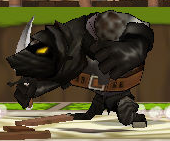
|
The Dark Soldiers: Glitter Troops mob boasts of this monster that moves like a ninja.
|
- Aerial Slash: Dashes forward and perform an aerial attack.
- Slash & Dodge: After stabbing you, it will roll away.
- Bomb Recovery: When recovering they will roll out of the way and leave behind a poisonous explosive.
|
| Glitter Troops: Yellow
|
|
A giant hammer allows this monster to crush rivals into the ground. He appears among a group named Dark Soldiers: Glitter Troops.
|
- Tank: Attacks from the front will have little effect on it.
- Flail Smash: Smash its flail in front of it.
- Earthquake: Due to its immense weight, just jumping will create shockwaves.
|
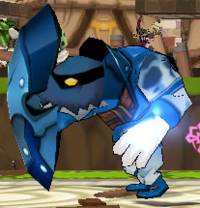
| Glitter Troops: Blue
|
|
The defender of the Dark Soldiers: Glitter Troops, this monster is tough to catch unawares.
|
- Block: Guards against any oncoming attacks from the front.
- Shield Bash: Smashes players with its shield.
- Shield Rush: Dash forward shield bashing anybody in front of it.
|
|-|
Hamel=
| Epithet
|
Boss Name
|
Image
|
Description
|
Moves (All are performed with Super Armor)
|
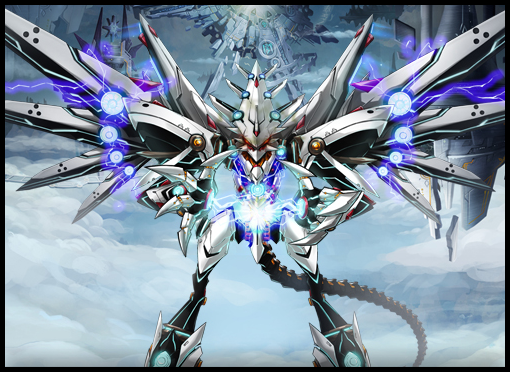
| Guardian Golem
|
Stone God
|

|
You're lucky if this one doesn't show up, unless you're looking for an instant, gigantic enemy.
|
- Activate: Upon being approached it will spin dealing damage to those immediately next to it.
- Slam: The Nasod will slam players with its arms.
- Projectile Counter: They can create a force field to deflect projectiles.
- God's Blessing: The Stone God will release several lightning bolts around it that can stun any targets, at the cost of his defense and magic defense decreased by 50% for 5 seconds.
- It can calls lightning bolts up to 10 times.
Note:
-This Boss has a stoic threshold of 25 hits.
|
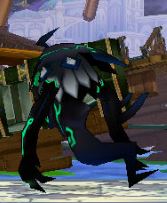
| The Raven Shadow
|
Shadows
|
|
The harsh demon shaman roams the grounds of Hamel to fight off adventurers with magic and lightning.
|
- Totem: Tries to create a totem, does not appear to actually do anything.
- Recovery: They will swing its arm in a circle when tithey recover.
- Shadow Void: Shadows will summon a dark void that draws players near it while causing damage as well. After a while, the void will home in on players and explode. This will also cause the inability to use skills.
|
|-|
Sander=
| Epithet
|
Boss Name
|
Image
|
Description
|
Moves (All are performed with Super Armor)
|
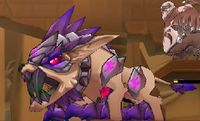
| Crazy Dog
|
Cerberus
|
|
This crazy dog swipes with his rock hard paws. He uses his feral instincts to howl and charge at enemies, causing them to run in panic!
|
- Poison Gas: Cerberus will exhale toxic gas to its targets, inflicting Poison to all targets.
- Charge: Cerberus will dash into his targets while continuously headbutting them.
- Panic Aura: Cerberus will emit a large green aura, dealing multiple hits while inflicting Panic to all targets.
|
| Dark Magician
|
Mapu
|
|
This warlock is one of the more powerful Trocks who uses undead sorcery to manipulate its opponents.
|
- Dark Skull: Mapu will summon a dark skull that does substantial damage.
- Bomb Trail: Mapu will dash in Super Armor while leaving Fogta Trocks in his trail. Anyone in his path will be affected by Condemnation (You are completely unable to move, similar to Petrified. Cannot be mitigated by Light Resistance). After five Trocks are dropped, Mapu will detonate them.
|
Rewards
You will receive rewards from killing Field Bosses. Rewards can only be received if you have contributed at least 8% of the bosses' life. After killing the boss, they will drop a Roasted Mutton to recover 100% HP, a Pineapple to recover 150 MP, a Field Boss Cube, and an Evil Souls Orb. If you contribute the most damage towards the boss when over 4 people fought against the boss, there will receive two Field Boss Cubes instead.
Please note that you will not receive anything from killed bosses if you are in a Field area whose level range is 10 levels above or below your current level.
Evil Souls Orb
Rewards can be obtained from Evil Souls Orb by exchanging them to Ariel. Exchanging 3 Evil Souls Orb will let you pick your reward between:
- 1 EXP Medal (15% for 1 Day)
- 2 COBO Complete Recovery Potions
- 3 Vigor Potions
- 1 El Tree Seed
Exchanging 30 Orbs will give you a chance to earn seals. Unlike exchanging 3 Orbs, these rewards will be randomly selected for you:
- 1 COBO Phoru Foot Stamp (White)
- 1 COBO Phoru Foot Stamp (Purple)
Field Boss Cube
Field Boss Cubes can be opened to give a random reward:
- Region 1~6
- Region 7~12
- Region 13~18
- Region 19~20
- Other
{{
Story
Gameplay
Character Progression
Systems
Items
Equipment
Cash
Miscellaneous
Other Media
}}


