Eun's Power: Difference between revisions

From Elwiki
m (Text replacement - "(\[\[|link *=) *Specter[_ ]of[_ ]Blade *\]\]" to "$1Spell : Aerial Blades]]")
Line 51: Line 51:


=== List of Energy Conversion ===
{{tabs
{| width="100%" style="background: none repeat scroll 0% 0% transparent; border: medium none transparent;"
|name=LEC
|-
|tab1=NA
| width="25%" valign="top" |
|contents1=
'''[[Ara|Little Xia]] / Basic'''
{{{!}} width="100%" style="background: none repeat scroll 0% 0% transparent; border: medium none transparent;"
{| cellpadding="5" border="1" style="border-collapse: collapse; text-align: center"
{{!}}-
|- style="background-color: {{ColorSel|CharLight|Ara}}"
{{!}} valign="top" {{!}}
! Skill !! Orbs Gain /<br>Consumed !! Cancel<br>bonus
'''[[Ara]]'''
|-
{{{!}} class="wikitable" cellpadding="5" border="1" style="border-collapse: collapse; text-align: center"  
| [[File:TempestDance2.png|link=Tempest Dance]]  || -2 || +3  
! Skill !! Orbs Gain / Consumed !! Cancel bonus  
|-
{{!}}-
| [[File:GainForce2.png|link=Energy Absorption]]    || +1 per Target hit<br>(Maximum: 1~3) || 0
{{!}} [[Tempest Dance]]  {{!}}{{!}} -3 {{!}}{{!}} +3  
|-  
{{!}}-
| [[File:WindWegde2.png|link=Wolf Stance 2 : Wind Wedge]]    || -2<br>(With skill note -1) || +2<br>(With skill note +1)
{{!}} [[Energy Absorption|Energy Absorption]]    {{!}}{{!}} +1 per Target hit (Maximum: 2) {{!}}{{!}} 0
|-
{{!}}-  
| [[File:PullingPerice2.png|link=Dragon Stance 2 : Pulling Thrust]] || +1 || +2  
{{!}} [[Wolf Stance 2 : Wind Wedge]]    {{!}}{{!}} -2<br>With skill note -1 {{!}}{{!}} +2<br>With skill note +1  
|-
{{!}}-
| [[File:QuickAttack.png|link=Quick Thrust]]  || -2<br>(-1 if used to cancel a skill) || 0
{{!}} [[Dragon Stance 2 : Pulling Thrust|Pulling Thrust]] {{!}}{{!}} +1 {{!}}{{!}} +2  
|-
{{!}}-
| [[File:BodyofSteel.png|link=Steel Body]]  || -2<br>(-1 if used to cancel a skill) || 0
{{!}} [[Quick Thrust|Quick Thrust]]  {{!}}{{!}} -2 {{!}}{{!}} 0
|-
{{!}}-
| [[File:ForceSpear2.png|link=Force Spear]]   || -1 || 0
{{!}} [[Steel Body|Steel Body]]  {{!}}{{!}} -2 {{!}}{{!}} 0
|-
{{!}}-
| [[File:HeavenlyStrike.png|link=Heavenly Strike]]   || -1 || 0
{{!}} [[Shadow Press|Shadow Press]] {{!}}{{!}} +1 {{!}}{{!}} +1  
|-
{{!}}-
| [[File:ShadowRising2.png|link=Shadow Press]] || +1 || +1
{{!}} [[Force Spear]]   {{!}}{{!}} -1 {{!}}{{!}} 0  
|-
{{!}}-
| [[File:ShadowKnot2.png|link=Exorcism Stance 3 : Shadoweave]]    || +1<br>(With skill note -2) || +4
{{!}} [[Falling Dragon]] {{!}}{{!}} Consume All (Minimum: 5) {{!}}{{!}} 0
|-
{{!}}-
| [[File:FallingDragon2.png|link=Falling Dragon]] || -6 ~ -10<br>(KR: -10) || 0
{{!}} [[Exorcism Stance 3 : Shadoweave|Shadoweave]]    {{!}}{{!}} +1<br>With skill note -3 {{!}}{{!}} +4
|}
{{!}}-
| width="25%" valign="top" |
{{!}}}
{{!}} valign="top" {{!}}
'''[[Little Hsien]] / [[Sakra Devanam]]'''
{{{!}} class="wikitable" cellpadding="5" border="1" style="border-collapse: collapse; text-align: center"  
{| cellpadding="5" border="1" style="border-collapse: collapse; text-align: center"
! Skill !! Orbs Gain / Consumed !! Cancel bonus  
|- style="background-color: {{ColorSel|CharLight|Ara}}"
{{!}}-
! Skill !! Orbs Gain /<br>Consumed !! Cancel<br>bonus
{{!}} [[Tiger Stance 1 : Rock Smash|Rock Smash]]          {{!}}{{!}} {{!}}{{!}} +1  
|-
{{!}}-
| [[File:RockCrash.png|link=Tiger Stance 1 : Rock Smash]]          || || +1  
{{!}} [[Dragon Stance 3 : Eight Trigram Palm|Eight Trigram Palm]]    {{!}}{{!}} +1 {{!}}{{!}} +1  
|-
{{!}}-
| [[File:DoubleCollision.png|link=Dragon Stance 3 : Eight Trigram Palm]]    || +1 || +1  
{{!}} [[Fall|Fall]]      {{!}}{{!}} +1 {{!}}{{!}} +2
|-
{{!}}-
| [[File:Falling.png|link=Fall]]      || +1 || +1
{{!}} [[Tiger Stance 2 : Tiger Claw]]          {{!}}{{!}} {{!}}{{!}} +1  
|-
{{!}}-
| [[File:Tigerclaw.png|link=Tiger Stance 2 : Tiger Claw]]          || || +1<br>(With skill note<br>+2)
{{!}} [[Dragon Stance 4 : Moonlight Slash]]      {{!}}{{!}} +1 {{!}}{{!}} 0
|-
{{!}}-
| [[File:MoonlightSlash.png|link=Dragon Stance 4 : Moonlight Slash]]      || +1 || 0
{{!}} [[Fierce Tiger Strike|Fierce Tiger Strike]]          {{!}}{{!}} +1 {{!}}{{!}} 0
|-
{{!}}-
| [[File:WhiteTiger.png|link=Fierce Tiger Strike]]          || +1 || 0
{{!}} [[Tiger Stance 3 : Earth Axis|Earth Axis]]        {{!}}{{!}} {{!}}{{!}} +1  
|-
{{!}}-
| [[File:Lowbrandish.png|link=Tiger Stance 3 : Earth Axis]]        || || +1  
{{!}} [[Tiger Stance 4 : Raging Wave|Raging Wave]]      {{!}}{{!}} +1 {{!}}{{!}} +1  
|-
{{!}}-
| [[File:TurbulentWave.png|link=Tiger Stance 4 : Raging Wave]]      || +1 || +1  
{{!}} [[Peerlessness Slash|Matchless Truth]]  {{!}}{{!}} +1 {{!}}{{!}} +3  
|-
{{!}}-
| [[File:PeerlessnessSlash.png|link=Peerlessness Slash]]  || +1 || +3  
{{!}} [[Suppression|Suppression]]          {{!}}{{!}} Consume All (Minimum: 6) {{!}}{{!}} 0  
|-
{{!}}-
| [[File:Supression.png|link=Suppression]]          || -6 ~ -10<br>(KR: -10) || 0  
{{!}} [[Flying Kite|Flying Kite]]      {{!}}{{!}} Consume All (Minimum: 6) {{!}}{{!}} 0  
|-
{{!}}}
| [[File:ShallowAssault.png|link=Flying Kite]]      || -6 ~ -10<br>(KR: -10) || 0  
{{!}} valign="top" {{!}}
|}
| width="25%" valign="top" |
'''[[Little Devil]] / [[Yama Raja]]'''
{{{!}} class="wikitable" cellpadding="5" border="1" style="border-collapse: collapse; text-align: center"  
{| cellpadding="5" border="1" style="border-collapse: collapse; text-align: center"
! Skill !! Orbs Gain / Consumed !! Cancel bonus
|- style="background-color: {{ColorSel|CharLight|Ara}}"
{{!}}-
! Skill !! Orbs Gain /<br>Consumed !! Cancel<br>bonus
{{!}} [[Rakshasa Stance 1 : Soul Reaping|Soul Reaping]]        {{!}}{{!}} -4<br>+1 per Target hit (Maximum: 3)<br>With skill note +2 per Terget hit (Maximum: 4) {{!}}{{!}} +2
|-
{{!}}-
| [[File:StealSoul.png|link=Rakshasa Stance 1 : Soul Reaping]]        || -4<br>+1 per Target hit<br>(Maximum: 3)<br>(With skill note +2 per Target hit )<br>(Maximum: 4) || +2  
{{!}} [[Wolf Stance 3 : Wolf Claw]]            {{!}}{{!}} 0  {{!}}{{!}} +1
|-
{{!}}-
| [[File:WolfClaw.png|link=Wolf Stance 3 : Wolf Claw]]            || || +1  
{{!}} [[Mana Swap|Mana Swap]]    {{!}}{{!}} +1 ~ 3 {{!}}{{!}} 0
|-
{{!}}-
| [[File:MPSteal.png|link=Mana Swap]]    || +1 ~ 3 || 0  
{{!}} [[Life Swap|Life Swap]]  {{!}}{{!}} +2 ~ 3  {{!}}{{!}} 0
|-
{{!}}-
| [[File:HPSteal.png|link=Life Swap]]  || +2 ~ 3  || 0  
{{!}} [[Wolf Stance 4 : Wolf Fang|Wolf Fang]]          {{!}}{{!}} -2 {{!}}{{!}} +2
|-
{{!}}-
| [[File:WolfSpear2.png|link=Wolf Stance 4 : Wolf Fang]]          || -2 || +2  
{{!}} [[Infernal Circle|Infernal Circle]]      {{!}}{{!}} -4 {{!}}{{!}} +4
|-
{{!}}-
| [[File:HellofTornado.png|link=Infernal Circle]]      || -4 || +4  
{{!}} [[Rakshasa Stance 3 : Spear Prison|Spear Prison]]        {{!}}{{!}} -2 {{!}}{{!}} +3
|-
{{!}}-
| [[File:SpearPrison.png|link=Rakshasa Stance 3 : Spear Prison]]        || 0 || +3
{{!}} [[Energy Wave]]          {{!}}{{!}} +1 {{!}}{{!}} 0
|-
{{!}}-
| [[File:WaveEnergy.png|link=Energy Wave]]          || +1 || 0  
{{!}} [[Repel|Repel]]          {{!}}{{!}} -2 {{!}}{{!}} 0
|-
{{!}}-
| [[File:Reflect.png|link=Repel]]          || -2 || 0  
{{!}} [[High Speed]]          {{!}}{{!}} -1 {{!}}{{!}} 0
|-
{{!}}-
| [[File:HighSpeed.png|link=High Speed]]          || -1 || 0  
{{!}} [[Rakshasa Stance 2 : Energy Burst|Energy Burst]]          {{!}}{{!}} -2 {{!}}{{!}} +2
|-
{{!}}-
| [[File:ChainField.png|link=Rakshasa Stance 2 : Energy Burst]]          || -4 || +2  
{{!}} [[Resurrection]]        {{!}}{{!}} Consume All (Minimum: 3) {{!}}{{!}} 0
|-
{{!}}-
| [[File:YRPassive3.png|link=Resurrection]]        || -3 ~ -10 || 0
{{!}} [[Rakshasa Stance 4 : Soul Escape|Soul Escape]]          {{!}}{{!}} -2<br>+1 per Target hit (Maximum: 2) {{!}}{{!}} +3
|-
{{!}}-
| [[File:Bulleto.png|link=Rakshasa Stance 4 : Soul Escape]]          || -2<br>(+1 per Target hit )<br>(Maximum: 2) || +3  
{{!}} [[Suppression Energy|Suppression Energy]] {{!}}{{!}} -5 {{!}}{{!}} 0
|-
{{!}}-
| [[File:EnergySuppress.png|link=Suppression Energy]] || -5 || 0  
{{!}} [[Energy Void]]          {{!}}{{!}} 0 ~ -6 {{!}}{{!}} 0
|-
{{!}}}
| [[File:EnergyVoid.png|link=Energy Void]]          || 0 ~ -5 || 0  
{{!}}}
|}
|tab2=KR
| width="25%" valign="top" |
|contents2=
{{{!}} width="100%" style="background: none repeat scroll 0% 0% transparent; border: medium none transparent;"
{{!}}-
{{!}} valign="top" {{!}}
'''[[Ara]]'''
{{{!}} class="wikitable" cellpadding="5" border="1" style="border-collapse: collapse; text-align: center"  
! Skill !! Orbs Gain / Consumed !! Cancel bonus
{{!}}-
{{!}} [[Tempest Dance]]  {{!}}{{!}} -2 {{!}}{{!}} +3
{{!}}-
{{!}} [[Energy Absorption]]    {{!}}{{!}} +1 per Target hit (Maximum: 1~3) {{!}}{{!}} 0
{{!}}-
{{!}} [[Wolf Stance 2 : Wind Wedge]]    {{!}}{{!}} -2<br>With skill note -1 {{!}}{{!}} +2<br>With skill note +1
{{!}}-
{{!}} [[Dragon Stance 2 : Pulling Thrust]] {{!}}{{!}} +1 {{!}}{{!}} +2
{{!}}-
{{!}} [[Quick Thrust]]  {{!}}{{!}} -2 (-1 if used to cancel a skill) {{!}}{{!}} 0
{{!}}-
{{!}} [[Steel Body]]  {{!}}{{!}} -2 (-1 if used to cancel a skill) {{!}}{{!}} 0
{{!}}-
{{!}} [[Shadow Press]]  {{!}}{{!}} +1 {{!}}{{!}} +1
{{!}}-
{{!}} [[Force Spear]]    {{!}}{{!}} -1 {{!}}{{!}} 0
{{!}}-
{{!}} [[Falling Dragon]] {{!}}{{!}} Consume All (Minimum: 6) {{!}}{{!}} 0
{{!}}-
{{!}} [[Exorcism Stance 3 : Shadoweave]]    {{!}}{{!}} +1<br>With skill note -2 {{!}}{{!}} +4
{{!}}-
{{!}}}
{{!}} valign="top" {{!}}
'''[[Little Hsien]] / [[Sakra Devanam]]'''
{{{!}} class="wikitable" cellpadding="5" border="1" style="border-collapse: collapse; text-align: center"
! Skill !! Orbs Gain / Consumed !! Cancel bonus  
{{!}}-
{{!}} [[Tiger Stance 1 : Rock Smash]]          {{!}}{{!}} 0  {{!}}{{!}} +1
{{!}}-
{{!}} [[Dragon Stance 3 : Eight Trigram Palm]]    {{!}}{{!}} +1 {{!}}{{!}} +1
{{!}}-
{{!}} [[Fall]]      {{!}}{{!}} +1 {{!}}{{!}} +1
{{!}}-
{{!}} [[Tiger Stance 2 : Tiger Claw]]          {{!}}{{!}} 0  {{!}}{{!}} +1 (+2 with skill note)
{{!}}-
{{!}} [[Dragon Stance 4 : Moonlight Slash]]      {{!}}{{!}} +1 {{!}}{{!}} 0
{{!}}-
{{!}} [[Fierce Tiger Strike]]          {{!}}{{!}} +1  {{!}}{{!}} 0
{{!}}-
{{!}} [[Tiger Stance 3 : Earth Axis]]        {{!}}{{!}} 0  {{!}}{{!}} +1
{{!}}-
{{!}} [[Tiger Stance 4 : Raging Wave]]      {{!}}{{!}} +1 {{!}}{{!}} +1
{{!}}-
{{!}} [[Peerlessness Slash]]  {{!}}{{!}} +1 {{!}}{{!}} +3
{{!}}-
{{!}} [[Suppression]]          {{!}}{{!}} Consume All (Minimum: 6) {{!}}{{!}} 0
{{!}}-
{{!}} [[Flying Kite]]      {{!}}{{!}} Consume All (Minimum: 6) {{!}}{{!}} 0
{{!}}}
{{!}} valign="top" {{!}}
'''[[Little Devil]] / [[Yama Raja]]'''
{{{!}} class="wikitable" cellpadding="5" border="1" style="border-collapse: collapse; text-align: center"
! Skill !! Orbs Gain / Consumed !! Cancel bonus
{{!}}-
{{!}} [[Rakshasa Stance 1 : Soul Reaping]]        {{!}}{{!}} -4<br>+1 per Target hit (Maximum: 3)<br>With skill note +2 per Target hit (Maximum: 4) {{!}}{{!}} +2  
{{!}}-
{{!}} [[Wolf Stance 3 : Wolf Claw]]            {{!}}{{!}} {{!}}{{!}} +1  
{{!}}-
{{!}} [[Mana Swap]]    {{!}}{{!}} +1 ~ 3 {{!}}{{!}} 0  
{{!}}-
{{!}} [[Life Swap]]  {{!}}{{!}} +2 ~ 3  {{!}}{{!}} 0  
{{!}}-
{{!}} [[Wolf Stance 4 : Wolf Fang]]          {{!}}{{!}} -2 {{!}}{{!}} +2  
{{!}}-
{{!}} [[Infernal Circle]]      {{!}}{{!}} -4 {{!}}{{!}} +4  
{{!}}-
{{!}} [[Rakshasa Stance 3 : Spear Prison]]        {{!}}{{!}} 0 {{!}}{{!}} +3
{{!}}-
{{!}} [[Energy Wave]]          {{!}}{{!}} +1 {{!}}{{!}} 0  
{{!}}-
{{!}} [[Repel]]          {{!}}{{!}} -2 {{!}}{{!}} 0  
{{!}}-
{{!}} [[High Speed]]          {{!}}{{!}} -1 {{!}}{{!}} 0  
{{!}}-
{{!}} [[Rakshasa Stance 2 : Energy Burst]]          {{!}}{{!}} -4 {{!}}{{!}} +2  
{{!}}-
{{!}} [[Resurrection]]        {{!}}{{!}} Consume All (Minimum: 3) {{!}}{{!}} 0
{{!}}-
{{!}} [[Rakshasa Stance 4 : Soul Escape]]          {{!}}{{!}} -2<br>+1 per Target hit (Maximum: 2) {{!}}{{!}} +3  
{{!}}-
{{!}} [[Suppression Energy]] {{!}}{{!}} -5 {{!}}{{!}} 0  
{{!}}-
{{!}} [[Energy Void]]          {{!}}{{!}} 0 ~ -5 {{!}}{{!}} 0  
{{!}}}
{{!}} valign="top" {{!}}
'''[[Little Specter]] / [[Asura]]'''
{{{!}} class="wikitable" cellpadding="5" border="1" style="border-collapse: collapse; text-align: center"  
{| cellpadding="5" border="1" style="border-collapse: collapse; text-align: center"
! Skill !! Orbs Gain / Consumed !! Cancel bonus  
|- style="background-color: {{ColorSel|CharLight|Ara}}"
{{!}}-
! Skill !! Orbs Gain /<br>Consumed !! Cancel<br>bonus
{{!}} [[Phantom Fox Stance 1 : Savor]]        {{!}}{{!}} 0 ~ -1 {{!}}{{!}} +1  
|-
{{!}}-
| [[File:ALS_1.png|link=Phantom Fox Stance 1 : Savor]]        || 0 ~ -1 || +1  
{{!}} [[Phantom Fox Stance 2 : Discordance]]        {{!}}{{!}} 0 ~ -1 {{!}}{{!}} +1  
|-
{{!}}-
| [[File:ALS_3.png|link=Phantom Fox Stance 2 : Discordance]]        || 0 ~ -1 || +1  
{{!}} [[Mana Drain(Little_Specter) | Mana Drain]]    {{!}}{{!}} -1 {{!}}{{!}} 0
|-
{{!}}-
| [[File:ALS_4.png|link=Mana Drain]]    || -1 || 0
{{!}} [[Exorcism Stance 2 : Specter Restraints]]        {{!}}{{!}} 0 ~ -3 {{!}}{{!}} +2  
|-
{{!}}-
| [[File:ALS_6.png|link=Exorcism Stance 2 : Specter Restraints]]        || 0 ~ -3 || +2  
{{!}} [[Specter Walk]]        {{!}}{{!}} -1 {{!}}{{!}} 0
|-
{{!}}-
| [[File:ALS_2.png|link=Specter Walk]]        || -1 || 0
{{!}} [[Exorcism Stance 4 : Darkness Sever]]        {{!}}{{!}} -3 {{!}}{{!}} 0
|-
{{!}}-
| [[File:ALS_5.png|link=Exorcism Stance 4 : Darkness Sever]]        || -3 || 0
{{!}} [[Spell : Storm]]          {{!}}{{!}} 0 ~ -4 {{!}}{{!}} +5  
|-
{{!}}-
| [[File:ALS_7.png|link=Spell : Storm]]          || 0 ~ -4 || +5  
{{!}} [[Spell : Aerial Blades]]      {{!}}{{!}} 0 ~ -3 {{!}}{{!}} +4  
|-
{{!}}-
| [[File:ALS_8.png|link=Spell : Aerial Blades]]      || 0 ~ -3 || +4  
{{!}} [[Phantom Fox Stance 3 : Rapid Raid]]        {{!}}{{!}} 0 ~ -1 {{!}}{{!}} +1
|-
{{!}}-
| [[File:AA_1.png|link=Phantom Fox Stance 3 : Rapid Raid]]        || 0 ~ -1 || +1
{{!}} [[Spell : Necromancy]]          {{!}}{{!}} +1 {{!}}{{!}} 0  
|-
{{!}}-
| [[File:AA_2.png|link=Spell : Necromancy]]          || +1 || 0  
{{!}} [[Spell : Thunder]]          {{!}}{{!}} +1 {{!}}{{!}} 0  
|-
{{!}}-
| [[File:AA_3.png|link=Spell : Thunder]]          || +1 || 0  
{{!}} [[Phantom Fox Stance 4 : Fox's Meal]]          {{!}}{{!}} +1<br>+1 per Target hit (Maximum: 2){{!}}{{!}} +1  
|-
{{!}}-
| [[File:AA_4.png|link=Phantom Fox Stance 4 : Fox's Meal]]          || +1<br>(+1 per Target hit)<br>(Maximum: 2) || +1  
{{!}} [[Suppression : Specter]]          {{!}}{{!}} +1 {{!}}{{!}} 0  
|-
{{!}}-
| [[File:AA_6.png|link=Suppression : Specter]]          || +1 || 0  
{{!}} [[Fox Fire]]          {{!}}{{!}} 0 ~ -4 {{!}}{{!}} 0  
|-
{{!}}}
| [[File:AA_5.png|link=Fox Fire]]          || 0 ~ -4 || 0  
{{!}}}
|}
}}
|}
<br>
<br>


Revision as of 05:19, 3 February 2015

Every character in Elsword has his/her unique features that sets them apart from other characters.

Power of Eun
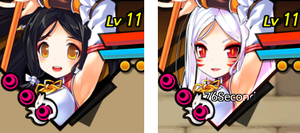
Changes to UI Face.
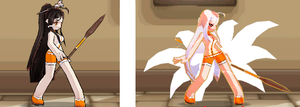
When Ara is in Celestial Fox Mode, her battle stance changes.

By using the hairpin of Eun (design varies on her class), Ara is able to go into a 3rd awakening bead transformation called the Celestial Fox Mode. While in this mode, her appearance changes, in which her hairstyle will change(hairstyle varies on her class) and become fully white, 9 spectral tails will also appear on her back, giving her the looks of the Gumiho. Equipped accessory will not be shown in this mode. Benefits of Celestial Fox Mode will be:

  • Ara gains the standard awakening damage increase.
  • Unlike when she is in normal mode, her spirit bar will only regenerate if certain actives are used, so when she is in Celestial Fox mode, her spirit bar will automatically regenerate 1 orb when you kill a target or after using 9 commands. Do note that breaking doors or boxes in Celestial Fox Mode also recovers the spirit bar.
    • This is indicated by a small black fire surrounding her after the target dies.
    • She also gets healed (roughly 2% HP) for every enemy you kill.
  • She also gain an attack speed, movement and jump speed, critical bonus( 5% stack for maximum 5 stacks) and casting time of skills will be shortened . Values are to be tested.


Awakening Bead

Ara's 3rd Awakening Bead

Like Chung, Ara 3rd awakening bead looks different. However, it can be obtained just like any other bead. The main reason it looks different is to indicate that her Celestial Fox Mode is ready and fully functional.


Movements

Ara is the only character that has various types of movement. She can:

  • Double Jump (Lightly jump up higher than the norm)
    • Press .
  • Air Dash (Run on air)
    • While unable to jump as high as Eve, she can dash farther mid-air than Eve in one dash.
    • Press , then or to make Ara run on the air. Holding the or button (respectively) will make her continue running on air. Same thing occurs when holding / while dashing off a platform.
  • Forward Jump (Quickly bounce forward)
    • While dashing or air dashing, .


Spirit Energy

File:SpiritBar.png
A bar spirit located below her MP.

A system only exclusive to Ara.
Ara has a unique combo system which involves using Spirit Energy. Spirit Energy is shown as beads below your HP bar. New players start with a 4 bead gauge, but can expand by 1 bead every 10th level (e.g. level 20 will give you 6 beads, level 30 will give you 7 beads) up to 10 beads. After Ara Balance, she will start with max beads.


Spirit Energy depletes when using certain skills/active skills. It can also be replenished by using certain skills/active skills such as Shadow Press or Energy Absorption.

Skill Linking

A system only exclusive to Ara.
Ara is able to cancel active skills by using another skill/active skill right before the previous skill used ends. This will cancel the active skill's final hit which prevents KD, but also gains extra Spirit Energy depending on the skill. For example, if you used Exorcism Stance 3 : Shadoweave (which usually gains 1 spirit energy when used) and cancel with Tiger Stance 2 : Tiger Claw, you will gain 5 Spirit Energy instead (1 from using Shadow Knot + 4 from cancel bonus as stated in description).

Finally, after filling your gauge between 5-10 beads, you can unleash certain skills which requires no MP but instead depletes all Spirit Energy and deals damage multiplied by the amount of beads collected such as; Falling Dragon, Suppression and Flying Kite.

List of Energy Conversion

Little Xia / Basic

Skill Orbs Gain /
Consumed
Cancel
bonus
-2 +3
+1 per Target hit
(Maximum: 1~3)
0
-2
(With skill note -1)
+2
(With skill note +1)
+1 +2
-2
(-1 if used to cancel a skill)
0
-2
(-1 if used to cancel a skill)
0
-1 0
-1 0
File:ShadowRising2.png +1 +1
+1
(With skill note -2)
+4
-6 ~ -10
(KR: -10)
0

Little Hsien / Sakra Devanam

Skill Orbs Gain /
Consumed
Cancel
bonus
0 +1
+1 +1
+1 +1
0 +1
(With skill note
+2)
+1 0
+1 0
0 +1
+1 +1
+1 +3
-6 ~ -10
(KR: -10)
0
-6 ~ -10
(KR: -10)
0

Little Devil / Yama Raja

Skill Orbs Gain /
Consumed
Cancel
bonus
-4
+1 per Target hit
(Maximum: 3)
(With skill note +2 per Target hit )
(Maximum: 4)
+2
0 +1
+1 ~ 3 0
+2 ~ 3 0
-2 +2
-4 +4
0 +3
+1 0
-2 0
-1 0
-4 +2
-3 ~ -10 0
-2
(+1 per Target hit )
(Maximum: 2)
+3
-5 0
0 ~ -5 0

Little Specter / Asura

Skill Orbs Gain /
Consumed
Cancel
bonus
File:ALS 1.png 0 ~ -1 +1
File:ALS 3.png 0 ~ -1 +1
File:ALS 4.png -1 0
File:ALS 6.png 0 ~ -3 +2
File:ALS 2.png -1 0
File:ALS 5.png -3 0
File:ALS 7.png 0 ~ -4 +5
File:ALS 8.png 0 ~ -3 +4
File:AA 1.png 0 ~ -1 +1
File:AA 2.png +1 0
+1 0
File:AA 4.png +1
(+1 per Target hit)
(Maximum: 2)
+1
File:AA 6.png +1 0
File:AA 5.png 0 ~ -4 0


Updates

  • 07/10/2014 KR
    • Ara starts with max spirit beads.
    • During Celestial Fox Mode, Ara will gain a spirit bead and recover some HP after 9 commands.
    • Added Critical increase effect to Celestial Fox Mode.


Trivia

File:AraDifferent.png
When Ara is in Celestial Fox Mode.(Compared to a awakened Tactical Trooper, Ara does not have the awaken aura for her Celestial Fox Mode.)
  • In Celestial Fox Mode, Ara strangely lacks the awakening aura.
    • After becomes a Little Specter, she uses Eun's power most of the time that even if not entering Celestial Fox Mode, her awakening lacks of aura.
  • In the Japanese Version of the game, when Ara enters Celestial Fox Mode, the pitch of her voice is noticeably lower.


General Guides
{{
Story
Gameplay
Character Progression
Systems
Items
Equipment
Cash
Miscellaneous
Other Media
}}