Nature's Force System/pl: Difference between revisions
m (Text replacement - "(\[\[ *:?|link *=) *Freezing[_ ]Arrow[_ ]-[_ ]Sting *\]\]" to "${1}Freezing Arrow]]") |
Shironsaki (talk | contribs) m (Text replacement - "GAs1.png" to "GrandArcherSkill6.png") |
||
| (33 intermediate revisions by 3 users not shown) | |||
| Line 6: | Line 6: | ||
<br> | <br> | ||
== Energia Przyrody == | == Energia Przyrody == | ||
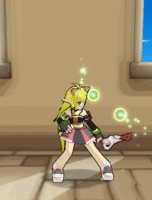
[[ | [[File:Ns1.png]]<br> | ||
01/01/2014 na koreańskim serwerze [[Rena/pl|Rena]] otrzymała nowy system - '''Energię Przyrody'''. '''Energia Przyrody''' jest unikalnym systemem, znanym tylko elfom. Interfejs tego systemu znajduje się pod wskaźnikiem MP postaci. Kule '''Energii Przyrody''' w grze są nazywane, skrótowo NF. | 01/01/2014 na koreańskim serwerze [[Rena/pl|Rena]] otrzymała nowy system - '''Energię Przyrody'''. '''Energia Przyrody''' jest unikalnym systemem, znanym tylko elfom. Interfejs tego systemu znajduje się pod wskaźnikiem MP postaci. Kule '''Energii Przyrody''' w grze są nazywane, skrótowo NF. | ||
<br> | <br> | ||
| Line 33: | Line 33: | ||
*5 pasków: Pojawia się trzecia kulka. Taki sam wygląd. | *5 pasków: Pojawia się trzecia kulka. Taki sam wygląd. | ||
**Ze względu na liczbę kul, która nie jest równa liczbie pasków '''Energii Przyrody''', nie wskazują one dobrze poziomu naładowania. | **Ze względu na liczbę kul, która nie jest równa liczbie pasków '''Energii Przyrody''', nie wskazują one dobrze poziomu naładowania. | ||
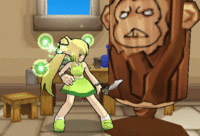
[[ | [[File:NF2.png]] | ||
<br> | <br> | ||
=== Nowy Podwójny Skok === | === Nowy Podwójny Skok === | ||
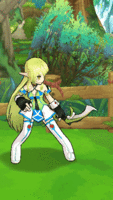
[[ | [[File:Ns3.png|300px|right]] | ||
Wraz z nowym systemem, mobilność [[Rena/pl|Reny]] również wzrosła. Jej podwójny skok został zmieniony z powietrznego salto, do wyskoku z powietrznej platformy, stworzonej z wiatru i liści. Podobnie jak [[Elsword/pl|Elsword]] oraz [[Raven/pl|Raven]], Rena także posiada możliwość biegu w powietrzu, lecz na mniejszy dystans. Wraz z nowym, podwójnym skokiem, combo [[Combat Ranger/pl|Strzelca bojowego]] {{CUU}}{{CZ}}{{CZ}} zmieniło się z wybicia przeciwnika w powietrze, na stworzenie małego tornada, które przyciąga przeciwnika. | Wraz z nowym systemem, mobilność [[Rena/pl|Reny]] również wzrosła. Jej podwójny skok został zmieniony z powietrznego salto, do wyskoku z powietrznej platformy, stworzonej z wiatru i liści. Podobnie jak [[Elsword/pl|Elsword]] oraz [[Raven/pl|Raven]], Rena także posiada możliwość biegu w powietrzu, lecz na mniejszy dystans. Wraz z nowym, podwójnym skokiem, combo [[Combat Ranger/pl|Strzelca bojowego]] {{CUU}}{{CZ}}{{CZ}} zmieniło się z wybicia przeciwnika w powietrze, na stworzenie małego tornada, które przyciąga przeciwnika. | ||
<br> | <br> | ||
| Line 46: | Line 46: | ||
</gallery> | </gallery> | ||
<br> | <br> | ||
[[ | [[File:Ns4.png|300px|right]] | ||
=== Nature's Force Buff === | === Nature's Force Buff === | ||
| Line 54: | Line 54: | ||
=== Nature's Force Damage Boost === | === Nature's Force Damage Boost === | ||
[[ | [[File:NF5.png|300px|right]] | ||
When Rena has at least 1 bar in her nature bars gauge, she is able to boost the damage done by the skill. | When Rena has at least 1 bar in her nature bars gauge, she is able to boost the damage done by the skill. | ||
*At the end of each combo, an orb will explode on the target. However, this does not apply to single hit combos (E.g: ↑Z). | *At the end of each combo, an orb will explode on the target. However, this does not apply to single hit combos (E.g: ↑Z). | ||
| Line 70: | Line 70: | ||
| valign="top" | | | valign="top" | | ||
'''[[Rena]]/<br>Base''' | '''[[Rena]]/<br>Base''' | ||
{| border="1" style="border-collapse: collapse;" cellpadding="1" | {| class="related-skills" border="1" style="border-collapse: collapse;" cellpadding="1" | ||
|- | |- | ||
| width="40" | [[ | | width="40" | [[File:Multiplestinger.png]]<br> | ||
| width="150" | [[Multiple Stinger]]<br>: 2 Bars<br> | | width="150" | [[Multiple Stinger]]<br>: 2 Bars<br> | ||
|- | |- | ||
| width="40" | [[ | | width="40" | [[File:RenaSkill1.png]]<br> | ||
| width="150" | [[Backflip Shot]]<br>:1 Bar<br> | | width="150" | [[Backflip Shot]]<br>:1 Bar<br> | ||
|- | |- | ||
| width="40" | [[ | | width="40" | [[File:Risingfalcon.png]]<br> | ||
| width="150" | [[Rising Falcon]]<br>: 1 Bar<br> | | width="150" | [[Rising Falcon]]<br>: 1 Bar<br> | ||
|- | |- | ||
| width="40" | [[ | | width="40" | [[File:RenaSkill5.png]]<br> | ||
| width="150" | [[Assault Kick]]<br>: 1 Bar<br> | | width="150" | [[Assault Kick]]<br>: 1 Bar<br> | ||
|- | |- | ||
| width="40" | [[ | | width="40" | [[File:RenaSkill1Old.png]]<br> | ||
| width="150" | [[Rail Stinger]]<br>: 1 Bar<br> | | width="150" | [[Rail Stinger]]<br>: 1 Bar<br> | ||
|- | |- | ||
| width="40" | [[ | | width="40" | [[File:RenaSkill2.png]] | ||
| width="150" | [[Perfect Storm]]<br>: 2 Bars<br> | | width="150" | [[Perfect Storm]]<br>: 2 Bars<br> | ||
|- | |- | ||
| width="40" | [[ | | width="40" | [[File:RenaSkill7.png]] | ||
| width="150" |[[Siege Mode|Siege Mode]]<br>: 1 Bar<br> | | width="150" |[[Siege Mode|Siege Mode]]<br>: 1 Bar<br> | ||
|- | |- | ||
| width="40" | [[ | | width="40" | [[File:RenaSkill4.png]] | ||
| width="150" | [[Aero Tornado]]<br>: 3 Bars<br> | | width="150" | [[Aero Tornado]]<br>: 3 Bars<br> | ||
|} | |} | ||
| Line 100: | Line 100: | ||
'''[[Sniping Ranger]]/<br>[[Grand Archer]]''' | '''[[Sniping Ranger]]/<br>[[Grand Archer]]''' | ||
{| border="1" style="border-collapse: collapse;" cellpadding="1" | {| class="related-skills" border="1" style="border-collapse: collapse;" cellpadding="1" | ||
|- | |- | ||
| width="40" | [[ | | width="40" | [[File:SnipingRangerSkill5.png]] | ||
| width="150" | [[Shooting Magnum]]<br>: 1 Bar<br> | | width="150" | [[Shooting Magnum]]<br>: 1 Bar<br> | ||
|- | |- | ||
| width="40" | [[ | | width="40" | [[File:SnipingRangerSkill2.png]] | ||
| width="150" | [[Guided Arrow]]<br>: 2 Bars<br> | | width="150" | [[Guided Arrow]]<br>: 2 Bars<br> | ||
|- | |- | ||
| width="40" | [[ | | width="40" | [[File:GrandArcherSkill5.png]] | ||
| width="150" | [[Entangle]]<br>: 1 Bar<br> | | width="150" | [[Entangle]]<br>: 1 Bar<br> | ||
|- | |- | ||
| width="40" | [[ | | width="40" | [[File:SnipingRangerSkill6.png]] | ||
| width="150" | [[Crazy Shot]]<br>: 3 Bars<br> | | width="150" | [[Crazy Shot]]<br>: 3 Bars<br> | ||
|- | |- | ||
| width="40" | [[ | | width="40" | [[File:GrandArcherSkill2.png]] | ||
| width="150" | [[Gungnir]]<br>: 3 Bars<br> | | width="150" | [[Gungnir]]<br>: 3 Bars<br> | ||
|- | |- | ||
| width="40" | [[ | | width="40" | [[File:WindSneakerSkill5.png]] | ||
| width="150" | [[Reflective Kick]]<br>: 1 Bar<br> | | width="150" | [[Reflective Kick]]<br>: 1 Bar<br> | ||
|- | |- | ||
| width="40" | [[ | | width="40" | [[File:GrandArcherSkill1.png]] | ||
| width="150" | [[Stigma Shot]]<br>: 1 Bar<br> | | width="150" | [[Stigma Shot]]<br>: 1 Bar<br> | ||
|- | |- | ||
| width="40" | [[ | | width="40" | [[File:SnipingRangerSkill1.png]] | ||
| width="150" | [[Arc Shot]]<br>: 1 Bar<br> | | width="150" | [[Arc Shot]]<br>: 1 Bar<br> | ||
|- | |- | ||
| width="40" | [[ | | width="40" | [[File:SnipingRangerSkill7.png]] | ||
| width="150" | [[Rapid Shot]]<br>: 1 Bar<br> | | width="150" | [[Rapid Shot]]<br>: 1 Bar<br> | ||
|- | |- | ||
| width="40" | [[ | | width="40" | [[File:GrandArcherSkill4.png]] | ||
| width="150" | [[Aero Strafe]]<br>: 2 Bars<br> | | width="150" | [[Aero Strafe]]<br>: 2 Bars<br> | ||
|- | |- | ||
| width="40" | [[ | | width="40" | [[File:GrandArcherSkill3.png]] | ||
| width="150" | [[Wind Blast]]<br>: 2 Bars<br> | | width="150" | [[Wind Blast]]<br>: 2 Bars<br> | ||
|- | |- | ||
| width="40" | [[ | | width="40" | [[File:SnipingRangerSkill3.png]] | ||
| width="150" | [[Wind Wall]]<br>: 2 Bars<br> | | width="150" | [[Wind Wall]]<br>: 2 Bars<br> | ||
|- | |- | ||
| width="40" | [[ | | width="40" | [[File:GrandArcherSkill6.png]] | ||
| width="150" | [[Freezing Arrow]]<br>: 1 Bar<br> | | width="150" | [[Freezing Arrow]]<br>: 1 Bar<br> | ||
|- | |- | ||
| width="40" | [[ | | width="40" | [[File:Freezing Arrow D.png]] | ||
| width="150" | [[Freezing Arrow - Drizzle]]<br>: 1 Bar<br> | | width="150" | [[Freezing Arrow - Drizzle]]<br>: 1 Bar<br> | ||
|} | |} | ||
| Line 149: | Line 149: | ||
'''[[Combat Ranger]]/<br>[[Wind Sneaker]]''' | '''[[Combat Ranger]]/<br>[[Wind Sneaker]]''' | ||
{| border="1" style="border-collapse: collapse;" cellpadding="1" | {| class="related-skills" border="1" style="border-collapse: collapse;" cellpadding="1" | ||
|- | |- | ||
| width="40" | [[ | | width="40" | [[File:CombatRangerSkill3.png]] | ||
| width="150" | [[Spinning Kick]]<br>: 1 Bar<br> | | width="150" | [[Spinning Kick]]<br>: 1 Bar<br> | ||
|- | |- | ||
| width="40" | [[ | | width="40" | [[File:CombatRangerSkill2.png]] | ||
| width="150" | [[Crescent Kick]]<br>: 2 Bars<br> | | width="150" | [[Crescent Kick]]<br>: 2 Bars<br> | ||
|- | |- | ||
| width="40" | [[ | | width="40" | [[File:CombatRangerSkill4.png]] | ||
| width="150" | [[Low Kick]]<br>: 1 Bar<br> | | width="150" | [[Low Kick]]<br>: 1 Bar<br> | ||
|- | |- | ||
| width="40" | [[ | | width="40" | [[File:Middle Kick.png]] | ||
| width="150" | [[Middle Kick]]<br>: 1 Bar<br> | | width="150" | [[Middle Kick]]<br>: 1 Bar<br> | ||
|- | |- | ||
| width="40" | [[ | | width="40" | [[File:CombatRangerSkill6.png]] | ||
| width="150" | [[Dive Kick Bombing]]<br>: 3 Bars<br> | | width="150" | [[Dive Kick Bombing]]<br>: 3 Bars<br> | ||
|- | |- | ||
| width="40" | [[File: | | width="40" | [[File:WindSneakerSkill2.png]] | ||
| width="150" | [[Violent Attack]]<br>: 3 Bars<br> | | width="150" | [[Violent Attack]]<br>: 3 Bars<br> | ||
|- | |- | ||
| width="40" | [[ | | width="40" | [[File:WindSneakerSkill5.png]] | ||
| width="150" | [[Reflective Kick]]<br>: 1 Bar<br> | | width="150" | [[Reflective Kick]]<br>: 1 Bar<br> | ||
|- | |- | ||
| width="40" | [[ | | width="40" | [[File:WindSneakerSkill1.png]] | ||
| width="150" | [[Nature's Force]]<br>: 1 Bar<br> | | width="150" | [[Nature's Force]]<br>: 1 Bar<br> | ||
|- | |- | ||
| width="40" | [[ | | width="40" | [[File:WindSneakerSkill6.png]] | ||
| width="150" | [[Slide Double Kick]]<br>: 1 Bar<br> | | width="150" | [[Slide Double Kick]]<br>: 1 Bar<br> | ||
|- | |- | ||
| width="40" | [[ | | width="40" | [[File:CombatRangerSkill7.png]] | ||
| width="150" | [[Assault Impact]]<br>: 1 Bar<br> | | width="150" | [[Assault Impact]]<br>: 1 Bar<br> | ||
|- | |- | ||
| width="40" | [[ | | width="40" | [[File:CombatRangerSkill5.png]] | ||
| width="150" | [[Back Kick]]<br>: 1 Bar<br> | | width="150" | [[Back Kick]]<br>: 1 Bar<br> | ||
|- | |- | ||
| width="40" | [[ | | width="40" | [[File:High Kick.png]] | ||
| width="150" | [[High Kick]]<br>: 1 Bar<br> | | width="150" | [[High Kick]]<br>: 1 Bar<br> | ||
|- | |- | ||
| width="40" | [[ | | width="40" | [[File:WindSneakerSkill4.png]] | ||
| width="150" | [[Sharp Fall]]<br>: 2 Bars<br> | | width="150" | [[Sharp Fall]]<br>: 2 Bars<br> | ||
|} | |} | ||
| Line 195: | Line 195: | ||
'''[[Trapping Ranger]]/<br>[[Night Watcher]]''' | '''[[Trapping Ranger]]/<br>[[Night Watcher]]''' | ||
{| border="1" style="border-collapse: collapse;" cellpadding="1" | {| class="related-skills" border="1" style="border-collapse: collapse;" cellpadding="1" | ||
|- | |- | ||
| width="40" | [[ | | width="40" | [[File:Evoke.png]] | ||
| width="150" | [[Evoke]]<br>: 1 Bar<br> | | width="150" | [[Evoke]]<br>: 1 Bar<br> | ||
|- | |- | ||
| width="40" | [[ | | width="40" | [[File:Fatality.png]] | ||
| width="150" | [[Fatality]]<br>: 2 Bars<br> | | width="150" | [[Fatality]]<br>: 2 Bars<br> | ||
|- | |- | ||
| width="40" | [[ | | width="40" | [[File:GrandArcherSkill5.png]] | ||
| width="150" | [[Invisible Trap]]<br>: 1 Bar<br> | | width="150" | [[Invisible Trap]]<br>: 1 Bar<br> | ||
|- | |- | ||
| width="40" | [[ | | width="40" | [[File:Explosiontrap.png]] | ||
| width="150" | [[Explosive Trap]]<br>: 1 Bar<br> | | width="150" | [[Explosive Trap]]<br>: 1 Bar<br> | ||
|- | |- | ||
| width="40" | [[ | | width="40" | [[File:Thorn Trap.png]] | ||
| width="150" | [[Thorn Vine Trap]]<br>: 1 Bar<br> | | width="150" | [[Thorn Vine Trap]]<br>: 1 Bar<br> | ||
|- | |- | ||
| width="40" | [[ | | width="40" | [[File:Spike Trap.png]] | ||
| width="150" | [[Briar Trap]]<br>: 1 Bar<br> | | width="150" | [[Briar Trap]]<br>: 1 Bar<br> | ||
|- | |- | ||
| width="40" | [[ | | width="40" | [[File:Callofruin.png]] | ||
| width="150" | [[Call of Ruin]]<br>: 3 Bars<br> | | width="150" | [[Call of Ruin]]<br>: 3 Bars<br> | ||
|- | |- | ||
| width="40" | [[ | | width="40" | [[File:WindSneakerSkill5.png]] | ||
| width="150" | [[Reflective Kick]]<br>: 1 Bar<br> | | width="150" | [[Reflective Kick]]<br>: 1 Bar<br> | ||
|- | |- | ||
| width="40" | [[ | | width="40" | [[File:NWActive1.png]] | ||
| width="150" | [[Delayed Fire]]<br>: 1 Bar<br> | | width="150" | [[Delayed Fire]]<br>: 1 Bar<br> | ||
|- | |- | ||
| width="40" | [[ | | width="40" | [[File:Trappingarrow.png]] | ||
| width="150" | [[Trapping Arrow - Buster]]<br>: 2 Bars<br> | | width="150" | [[Trapping Arrow - Buster]]<br>: 2 Bars<br> | ||
|- | |- | ||
| width="40" | [[ | | width="40" | [[File:TA fungus.png]] | ||
| width="150" | [[Trapping Arrow - Fungus]]<br>: 2 Bars<br> | | width="150" | [[Trapping Arrow - Fungus]]<br>: 2 Bars<br> | ||
|- | |- | ||
| width="40" | [[ | | width="40" | [[File:NWSActive1.png]] | ||
| width="150" | [[Furious Engage]]<br>: 1 Bar<br> | | width="150" | [[Furious Engage]]<br>: 1 Bar<br> | ||
|- | |- | ||
| width="40" | [[ | | width="40" | [[File:NWSActive2.png]] | ||
| width="150" | [[Gliding Strike]]<br>: 2 Bars<br> | | width="150" | [[Gliding Strike]]<br>: 2 Bars<br> | ||
|- | |- | ||
| width="40" | [[ | | width="40" | [[File:Wrath seed.png]] | ||
| width="150" | [[Seed of Wrath]]<br>: 1 Bar<br> | | width="150" | [[Seed of Wrath]]<br>: 1 Bar<br> | ||
|- | |- | ||
| width="40" | [[ | | width="40" | [[File:Eldrasil's rage.png]] | ||
| width="150" | [[Eldrasil's Fury]]<br>: 1 Bar<br> | | width="150" | [[Eldrasil's Fury]]<br>: 1 Bar<br> | ||
|} | |} | ||
| Line 246: | Line 246: | ||
== Feature Information == | == Feature Information == | ||
{| cellpadding="5" border="1" style="border-collapse: collapse; text-align: center" | {| cellpadding="5" border="1" style="border-collapse: collapse; text-align: center" class="colortable-Rena" | ||
|- | |- | ||
! rowspan=3 | Bars !! colspan=2 | Explosion !! colspan=6 | Buff | ! rowspan=3 | Bars !! colspan=2 | Explosion !! colspan=6 | Buff | ||
|- style="background: | |- style="background:{{ColorSel|CharLight|Rena}}" | ||
! rowspan=2 | Damage per<br>Bar Used !! rowspan=2 | Max Bars<br>Used !! colspan=3 | Normal !! colspan=3 | Awakening | ! rowspan=2 | Damage per<br>Bar Used !! rowspan=2 | Max Bars<br>Used !! colspan=3 | Normal !! colspan=3 | Awakening | ||
|- style="background: | |- style="background:{{ColorSel|CharLight|Rena}}" | ||
! Movement<br>Speed !! Passive MP<br>Recovery !! Damage<br>Reduction !! Movement<br>Speed !! Passive MP<br>Recovery !! Damage<br>Reduction | ! Movement<br>Speed !! Passive MP<br>Recovery !! Damage<br>Reduction !! Movement<br>Speed !! Passive MP<br>Recovery !! Damage<br>Reduction | ||
|- | |- | ||
Latest revision as of 17:49, 22 August 2023


Każdy z bohaterów Elsworda posiada specjalny system, który odróżnia go od innych postaci.
Energia Przyrody

01/01/2014 na koreańskim serwerze Rena otrzymała nowy system - Energię Przyrody. Energia Przyrody jest unikalnym systemem, znanym tylko elfom. Interfejs tego systemu znajduje się pod wskaźnikiem MP postaci. Kule Energii Przyrody w grze są nazywane, skrótowo NF.
Increasing Amount of Nature Orbs
Rena posiada możliwość zbierania Kul Przyrody przez korzystanie z kopniaków oraz strzał. Po 3 atakach napełnia się 1 pasek Energii Przyrody.
Np., korzystanie z ![]()
![]()
![]()
![]() jest trzema atakami, pomimo zadawania pięciu uderzeń.
jest trzema atakami, pomimo zadawania pięciu uderzeń.
Korzystanie z umiejętności również zbiera ładunki systemu Reny. W odróżnieniu od korzystania z kombosów, umiejętności nie muszą trafić celu. Za każde 150 PM użytych, by aktywować umiejętność, odnawia się jeden pasek. Np. Każda komenda ładuje tyle co umiejętność za 25 PM:
- Umiejętność aktywna za 30 MP: +1.2 komendy
- Umiejętność za 100 MP: +4 komendy
- Umiejętność za 200 MP: +8 komend
- Umiejętność za 300 MP: +12 komend
Za każdy napełniony pasek pojawia się dodatkowy efekt graficzny, który otacza Renę:
- 1 pasek: Pojawia się bladozielona kulka.
- 2 paski: Kulka pozostawia za sobą zielony ślad.
- 3 paski: Kulka staje się bardziej świecąca.
- 4 paski: Pojawia się druga kulka. Posiada taki sam wygląd jak pierwsza kulka.
- 5 pasków: Pojawia się trzecia kulka. Taki sam wygląd.
- Ze względu na liczbę kul, która nie jest równa liczbie pasków Energii Przyrody, nie wskazują one dobrze poziomu naładowania.

Nowy Podwójny Skok

Wraz z nowym systemem, mobilność Reny również wzrosła. Jej podwójny skok został zmieniony z powietrznego salto, do wyskoku z powietrznej platformy, stworzonej z wiatru i liści. Podobnie jak Elsword oraz Raven, Rena także posiada możliwość biegu w powietrzu, lecz na mniejszy dystans. Wraz z nowym, podwójnym skokiem, combo Strzelca bojowego ![]()
![]()
![]() zmieniło się z wybicia przeciwnika w powietrze, na stworzenie małego tornada, które przyciąga przeciwnika.
zmieniło się z wybicia przeciwnika w powietrze, na stworzenie małego tornada, które przyciąga przeciwnika.
-
Nowa animacja Podwójnego Skoku
-
Nowa animacja dla

 (Strzelec Bojowy/Pędziwiatr)
-
Stary Podwójny Skok


Nature's Force Buff
Gdy Rena posiada co najmniej 3 paski Energii Przyrody, zdobywa buff, który zwiększa wszystkie prędkości, regenerację MP, zdobywane MP ze strzał oraz zmniejszenie kosztów strzał.
Nature's Force Damage Boost

When Rena has at least 1 bar in her nature bars gauge, she is able to boost the damage done by the skill.
- At the end of each combo, an orb will explode on the target. However, this does not apply to single hit combos (E.g: ↑Z).
- Some combos removed the orb detonation after a later patch on the same day.
- Sniping Ranger: ↑↑X[X], →→X[X]
- Combat Ranger: ↑↑Z[Z]
- Night Watcher: →→↑Z[Z], →→Z[X], ZZZ[X]
- Some combos removed the orb detonation after a later patch on the same day.
- The list below shows the maximum number of bars used for each eligible skill. The explosion hits the first target struck by the skill.
- If a skill is used with less than the maximum number of bars, the explosion damage is equal to the number of bars available.
- Some skills (e.g., Phoenix Strike) do not use bars.


Feature Information
| Bars | Explosion | Buff | ||||||
|---|---|---|---|---|---|---|---|---|
| Damage per Bar Used |
Max Bars Used |
Normal | Awakening | |||||
| Movement Speed |
Passive MP Recovery |
Damage Reduction |
Movement Speed |
Passive MP Recovery |
Damage Reduction | |||
| 1 | 370% | 3 | None | +10% | +1/3 Seconds | +10% | ||
| 2 | ||||||||
| 3 | +10% | +1/3 Seconds | +10% | |||||
| 4 | ||||||||
| 5 | ||||||||
Tips and Details
- Damage is based on (physical attack + magic attack)/2.
- The explosion hits all targets in range and ignores defense and guard. It also does not knock down.
- Siege Mode is the only way to deplete the nature orb gauge without increasing its counter. This is done by hitting a target with the kick from entering the stance. Since it costs 0 MP to activate, cancelling Siege after that prevents the gauge from increasing. This is very useful for testing things in Free Training.
- The damage reduction is a rare type and that multiplies the damage reduction stat and adds to it: Damage reduction = 1-(1 - (Stat*1.1 + .1))
- E.g., if you have no damage reduction stat, you gain 10% damage reduction. If you have 40%, it is increased to 54%. In other cases, a 10% damage reduction buff would increase the 40% to 46% due to different mechanics.
- Mechanized Mark III's 5-set effect and Knight's Destiny are the other buffs of this type.
Trivia
- Although the poster states the system as Nature Force, a direct translation of the words indicate it as Nature's Spirit.
- This is how in NA, this feature is named Nature's Force, similar to the KR poster.
- Easy to confuse with Wind Sneaker's Nature's Force.
- This is how in NA, this feature is named Nature's Force, similar to the KR poster.
- Implemented ZZZ cancel point (ZZZ loop) and GA ^^XX combo.
Updates
- 01/02/2014 KR
- Nature's Spirit system added.
- 01/28/2014 KR
- Commands required to gain a nature orb reduced from seven to six.
- Skills increase your Nature's Spirit command count on activation.
