Way of the Sword/ko: Difference between revisions
Joenks6665 (talk | contribs) (→스킬 목록) |
Joenks6665 (talk | contribs) (→스킬 목록) |
||
| Line 35: | Line 35: | ||
|- style="background-color: rgb(255, 255, 255);" | |- style="background-color: rgb(255, 255, 255);" | ||
| width="40" | [[Image:ElSkill4.png]]<br> | | width="40" | [[Image:ElSkill4.png]]<br> | ||
| width="150" | [[Parry/ko|반격]]<br>: | | width="150" | [[Parry/ko|반격]]<br>: <font color="#A91C24">파괴</font><br> | ||
|- style="background-color: rgb(255, 255, 255);" | |- style="background-color: rgb(255, 255, 255);" | ||
| width="40" | [[Image:ElSkill12.png]]<br> | | width="40" | [[Image:ElSkill12.png]]<br> | ||
| width="150" | [[Kick/ko|발차기]]<br>: | | width="150" | [[Kick/ko|발차기]]<br>: <font color="#4E82E8">활력</font><br> | ||
|- style="background-color: rgb(255, 255, 255);" | |- style="background-color: rgb(255, 255, 255);" | ||
| width="40" | [[Image:Rolling.png]]<br> | | width="40" | [[Image:Rolling.png]]<br> | ||
| width="150" | [[Roll/ko|구르기]]<br>: | | width="150" | [[Roll/ko|구르기]]<br>: <font color="#4E82E8">활력</font><br> | ||
|- style="background-color: rgb(255, 255, 255);" | |- style="background-color: rgb(255, 255, 255);" | ||
| width="40" | [[Image:Wavesword.png]]<br> | | width="40" | [[Image:Wavesword.png]]<br> | ||
| width="150" | [[Sword Wave/ko|소드 웨이브]]<br>: | | width="150" | [[Sword Wave/ko|소드 웨이브]]<br>: <font color="#4E82E8">활력</font><br> | ||
|- style="background-color: rgb(255, 255, 255);" | |- style="background-color: rgb(255, 255, 255);" | ||
| width="40" | [[Image:ElSkill1.png]] | | width="40" | [[Image:ElSkill1.png]] | ||
| width="150" | [[Mega Slash/ko|메가 슬래시]]<br>: | | width="150" | [[Mega Slash/ko|메가 슬래시]]<br>: <font color="#A91C24">파괴</font><br> | ||
|- style="background-color: rgb(255, 255, 255);" | |- style="background-color: rgb(255, 255, 255);" | ||
| width="40" | [[Image:ElSkill5.png]] | | width="40" | [[Image:ElSkill5.png]] | ||
| width="150" | [[Assault Slash/ko|어설트 슬래시]]<br>: | | width="150" | [[Assault Slash/ko|어설트 슬래시]]<br>: <font color="#4E82E8">활력</font><br> | ||
|- style="background-color: rgb(255, 255, 255);" | |- style="background-color: rgb(255, 255, 255);" | ||
| width="40" | [[Image:ElSkill9.png]] | | width="40" | [[Image:ElSkill9.png]] | ||
| width="150" |[[Fatal Fury/ko|페이탈 퓨리]]<br>: | | width="150" |[[Fatal Fury/ko|페이탈 퓨리]]<br>: <font color="#4E82E8">활력</font><br> | ||
|- style="background-color: rgb(255, 255, 255);" | |- style="background-color: rgb(255, 255, 255);" | ||
| width="40" | [[Image:ElSkill2.png]] | | width="40" | [[Image:ElSkill2.png]] | ||
| width="150" | [[Unlimited Blade/ko|언리미티드 블레이드]]<br>: | | width="150" | [[Unlimited Blade/ko|언리미티드 블레이드]]<br>: <font color="#4E82E8">활력</font><br> | ||
|- style="background-color: rgb(255, 255, 255);" | |- style="background-color: rgb(255, 255, 255);" | ||
| width="40" | [[Image:ElSkill13.png]] | | width="40" | [[Image:ElSkill13.png]] | ||
| width="150" | [[Flame Geyser/ko|플레임 게이저]]<br>: | | width="150" | [[Flame Geyser/ko|플레임 게이저]]<br>: <font color="#A91C24">파괴</font><br> | ||
|- style="background-color: rgb(255, 255, 255);" | |- style="background-color: rgb(255, 255, 255);" | ||
| width="40" | [[Image:ElSkill6.png]] | | width="40" | [[Image:ElSkill6.png]] | ||
| width="150" | [[Triple Geyser/ko|트리플 게이저]]<br>: | | width="150" | [[Triple Geyser/ko|트리플 게이저]]<br>: <font color="#A91C24">파괴</font><br> | ||
|} | |} | ||
| Line 71: | Line 71: | ||
|- style="background-color: rgb(255, 255, 255);" | |- style="background-color: rgb(255, 255, 255);" | ||
| width="40" | [[Image:Weapon Break SK.png]] | | width="40" | [[Image:Weapon Break SK.png]] | ||
| width="150" | [[Weapon Break/ko|웨폰 브레이크]]<br>: | | width="150" | [[Weapon Break/ko|웨폰 브레이크]]<br>: <font color="#A91C24">파괴</font><br> | ||
|- style="background-color: rgb(255, 255, 255);" | |- style="background-color: rgb(255, 255, 255);" | ||
| width="40" | [[Image:ElSkill5i.png]] | | width="40" | [[Image:ElSkill5i.png]] | ||
| width="150" | [[Armor Break/ko|아머 브레이크]]<br>: | | width="150" | [[Armor Break/ko|아머 브레이크]]<br>: <font color="#A91C24">파괴</font><br> | ||
|- style="background-color: rgb(255, 255, 255);" | |- style="background-color: rgb(255, 255, 255);" | ||
| width="40" | [[Image:ElSkill10.png]] | | width="40" | [[Image:ElSkill10.png]] | ||
| width="150" | [[Air Slash/ko|에어 슬래시]]<br>: | | width="150" | [[Air Slash/ko|에어 슬래시]]<br>: <font color="#A91C24">파괴</font><br> | ||
|- style="background-color: rgb(255, 255, 255);" | |- style="background-color: rgb(255, 255, 255);" | ||
| width="40" | [[Image:RPassive5.png]] | | width="40" | [[Image:RPassive5.png]] | ||
| width="150" | [[Counter Chance/ko|기회의 포착]]<br>: | | width="150" | [[Counter Chance/ko|기회의 포착]]<br>: <font color="#4E82E8">활력</font><br> | ||
|- style="background-color: rgb(255, 255, 255);" | |- style="background-color: rgb(255, 255, 255);" | ||
| width="40" | [[Image:ElSkill14.png]] | | width="40" | [[Image:ElSkill14.png]] | ||
| width="150" | [[Spiral Blast/ko|스파이럴 블래스트]]<br>: | | width="150" | [[Spiral Blast/ko|스파이럴 블래스트]]<br>: <font color="#A91C24">파괴</font><br> | ||
|- style="background-color: rgb(255, 255, 255);" | |- style="background-color: rgb(255, 255, 255);" | ||
| width="40" | [[Image:ElSkill9i.png]] | | width="40" | [[Image:ElSkill9i.png]] | ||
| width="150" | [[Windmill/ko|윈드 밀]]<br>: | | width="150" | [[Windmill/ko|윈드 밀]]<br>: <font color="#4E82E8">활력</font><br> | ||
|- style="background-color: rgb(255, 255, 255);" | |- style="background-color: rgb(255, 255, 255);" | ||
| width="40" | [[Image:ElSkill3.png]] | | width="40" | [[Image:ElSkill3.png]] | ||
| width="150" | [[Armageddon Blade/ko|아마겟돈 블레이드]]<br>: | | width="150" | [[Armageddon Blade/ko|아마겟돈 블레이드]]<br>: <font color="#4E82E8">활력</font><br> | ||
|- style="background-color: rgb(255, 255, 255);" | |- style="background-color: rgb(255, 255, 255);" | ||
| width="40" | [[Image:ElSkill6i.png]] | | width="40" | [[Image:ElSkill6i.png]] | ||
| width="150" | [[Double Slash/ko|더블 슬래시]]<br>: | | width="150" | [[Double Slash/ko|더블 슬래시]]<br>: <font color="#A91C24">파괴</font><br> | ||
|- style="background-color: rgb(255, 255, 255);" | |- style="background-color: rgb(255, 255, 255);" | ||
| width="40" | [[Image:ElSkill3i.png]] | | width="40" | [[Image:ElSkill3i.png]] | ||
| width="150" | [[Rolling Smash/ko|롤링 스매시]]<br>: | | width="150" | [[Rolling Smash/ko|롤링 스매시]]<br>: <font color="#4E82E8">활력</font><br> | ||
|- style="background-color: rgb(255, 255, 255);" | |- style="background-color: rgb(255, 255, 255);" | ||
| width="40" | [[Image:Impact Smash.png]] | | width="40" | [[Image:Impact Smash.png]] | ||
| width="150" | [[Impact Smasher/ko|임팩트 스매시]]<br>: | | width="150" | [[Impact Smasher/ko|임팩트 스매시]]<br>: <font color="#A91C24">파괴</font><br> | ||
|- style="background-color: rgb(255, 255, 255);" | |- style="background-color: rgb(255, 255, 255);" | ||
| width="40" | [[Image:ElSkill7i.png]] | | width="40" | [[Image:ElSkill7i.png]] | ||
| width="150" | [[Sonic Blade/ko|소닉 블레이드]]<br>: | | width="150" | [[Sonic Blade/ko|소닉 블레이드]]<br>: <font color="#4E82E8">활력</font><br> | ||
|- style="background-color: rgb(255, 255, 255);" | |- style="background-color: rgb(255, 255, 255);" | ||
| width="40" | [[Image:SI Sandstorm.png]] | | width="40" | [[Image:SI Sandstorm.png]] | ||
| width="150" | [[Sandstorm/ko|샌드 스톰]]<br>: | | width="150" | [[Sandstorm/ko|샌드 스톰]]<br>: <font color="#A91C24">파괴</font><br> | ||
|} | |} | ||
| Line 114: | Line 114: | ||
|- style="background-color: rgb(255, 255, 255);" | |- style="background-color: rgb(255, 255, 255);" | ||
| width="40" | [[Image:ElSkill13i.png]] | | width="40" | [[Image:ElSkill13i.png]] | ||
| width="150" | [[Fire Fist/ko|대폭살]]<br>: | | width="150" | [[Fire Fist/ko|대폭살]]<br>: <font color="#A91C24">파괴</font><br> | ||
|- style="background-color: rgb(255, 255, 255);" | |- style="background-color: rgb(255, 255, 255);" | ||
| width="40" | [[Image:Sword Enchant New.png]] | | width="40" | [[Image:Sword Enchant New.png]] | ||
| width="150" | [[Sword Enchantment/ko|소드 인챈트]]<br>: | | width="150" | [[Sword Enchantment/ko|소드 인챈트]]<br>: <font color="#A91C24">파괴</font><br> | ||
|- style="background-color: rgb(255, 255, 255);" | |- style="background-color: rgb(255, 255, 255);" | ||
| width="40" | [[Image:ElSkill7.png]] | | width="40" | [[Image:ElSkill7.png]] | ||
| width="150" | [[Wind Blade/ko|윈드 블레이드]]<br>: | | width="150" | [[Wind Blade/ko|윈드 블레이드]]<br>: <font color="#A91C24">파괴</font><br> | ||
|- style="background-color: rgb(255, 255, 255);" | |- style="background-color: rgb(255, 255, 255);" | ||
| width="40" | [[Image:RPassive5.png]] | | width="40" | [[Image:RPassive5.png]] | ||
| width="150" | [[Counter Chance/ko|기회의 포착]]<br>: | | width="150" | [[Counter Chance/ko|기회의 포착]]<br>: <font color="#4E82E8">활력</font><br> | ||
|- style="background-color: rgb(255, 255, 255);" | |- style="background-color: rgb(255, 255, 255);" | ||
| width="40" | [[Image:ElSkill11.png]] | | width="40" | [[Image:ElSkill11.png]] | ||
| width="150" | [[Rising Slash/ko|라이징 슬래시]]<br>: | | width="150" | [[Rising Slash/ko|라이징 슬래시]]<br>: <font color="#A91C24">파괴</font><br> | ||
|- style="background-color: rgb(255, 255, 255);" | |- style="background-color: rgb(255, 255, 255);" | ||
| width="40" | [[Image:Rising Wave.png]] | | width="40" | [[Image:Rising Wave.png]] | ||
| width="150" | [[Rising Wave/ko|라이징 웨이브]]<br>: | | width="150" | [[Rising Wave/ko|라이징 웨이브]]<br>: <font color="#4E82E8">활력</font><br> | ||
|- style="background-color: rgb(255, 255, 255);" | |- style="background-color: rgb(255, 255, 255);" | ||
| width="40" | [[Image:ElSkill2i.png]] | | width="40" | [[Image:ElSkill2i.png]] | ||
| width="150" | [[Sword Fire/ko|소드 파이어]]<br>: | | width="150" | [[Sword Fire/ko|소드 파이어]]<br>: <font color="#4E82E8">활력</font><br> | ||
|- style="background-color: rgb(255, 255, 255);" | |- style="background-color: rgb(255, 255, 255);" | ||
| width="40" | [[Image:ElSkill15.png]] | | width="40" | [[Image:ElSkill15.png]] | ||
| width="150" | [[Storm Blade/ko|스톰 블레이드]]<br>: | | width="150" | [[Storm Blade/ko|스톰 블레이드]]<br>: <font color="#A91C24">파괴</font><br> | ||
|- style="background-color: rgb(255, 255, 255);" | |- style="background-color: rgb(255, 255, 255);" | ||
| width="40" | [[Image:ElSkill10i.png]] | | width="40" | [[Image:ElSkill10i.png]] | ||
| width="150" | [[Phoenix Talon/ko|피닉스 탤런]]<br>: | | width="150" | [[Phoenix Talon/ko|피닉스 탤런]]<br>: <font color="#4E82E8">활력</font><br> | ||
|- style="background-color: rgb(255, 255, 255);" | |- style="background-color: rgb(255, 255, 255);" | ||
| width="40" | [[Image:Heat Rune.png]] | | width="40" | [[Image:Heat Rune.png]] | ||
| width="150" | [[Heat Rune/ko|초열의 룬]]<br>: | | width="150" | [[Heat Rune/ko|초열의 룬]]<br>: <font color="#A91C24">파괴</font><br> | ||
|- style="background-color: rgb(255, 255, 255);" | |- style="background-color: rgb(255, 255, 255);" | ||
| width="40" | [[Image:Freeze Rune.png]] | | width="40" | [[Image:Freeze Rune.png]] | ||
| width="150" | [[Freeze Rune/ko|한빙의 룬]]<br>: | | width="150" | [[Freeze Rune/ko|한빙의 룬]]<br>: <font color="#A91C24">파괴</font><br> | ||
|- style="background-color: rgb(255, 255, 255);" | |- style="background-color: rgb(255, 255, 255);" | ||
| width="40" | [[Image:Critical Sword.png]] | | width="40" | [[Image:Critical Sword.png]] | ||
| width="150" | [[Critical Sword/ko|크리티컬 소드]]<br>: | | width="150" | [[Critical Sword/ko|크리티컬 소드]]<br>: <font color="#A91C24">파괴</font><br> | ||
|- style="background-color: rgb(255, 255, 255);" | |- style="background-color: rgb(255, 255, 255);" | ||
| width="40" | [[Image:ElSkill4i.png]] | | width="40" | [[Image:ElSkill4i.png]] | ||
| width="150" | [[Splash Explosion/ko|스플래시 익스플로전]]<br>: | | width="150" | [[Splash Explosion/ko|스플래시 익스플로전]]<br>: <font color="#4E82E8">활력</font><br> | ||
|- style="background-color: rgb(255, 255, 255);" | |- style="background-color: rgb(255, 255, 255);" | ||
| width="40" | [[Image:SI_Lunablade_NEW.png]] | | width="40" | [[Image:SI_Lunablade_NEW.png]] | ||
| width="150" | [[Luna Blade/ko|루나 블레이드]]<br>: | | width="150" | [[Luna Blade/ko|루나 블레이드]]<br>: <font color="#A91C24">파괴</font><br> | ||
|} | |} | ||
| Line 163: | Line 163: | ||
|- style="background-color: rgb(255, 255, 255);" | |- style="background-color: rgb(255, 255, 255);" | ||
| width="40" | [[Image:Sword Shield.png]] | | width="40" | [[Image:Sword Shield.png]] | ||
| width="150" | [[Sword Shield/ko|소드 실드]]<br>: | | width="150" | [[Sword Shield/ko|소드 실드]]<br>: <font color="#4E82E8">활력</font><br> | ||
|- style="background-color: rgb(255, 255, 255);" | |- style="background-color: rgb(255, 255, 255);" | ||
| width="40" | [[Image:HarshChaser.png]] | | width="40" | [[Image:HarshChaser.png]] | ||
| width="150" | [[Harsh Chaser/ko|하쉬 체이서]]<br>: | | width="150" | [[Harsh Chaser/ko|하쉬 체이서]]<br>: <font color="#A91C24">파괴</font><br> | ||
|- style="background-color: rgb(255, 255, 255);" | |- style="background-color: rgb(255, 255, 255);" | ||
| width="40" | [[Image:Piercing Sword.png]] | | width="40" | [[Image:Piercing Sword.png]] | ||
| width="150" | [[Piercing Sword/ko|피어싱 소드]]<br>: | | width="150" | [[Piercing Sword/ko|피어싱 소드]]<br>: <font color="#4E82E8">활력</font><br> | ||
|- style="background-color: rgb(255, 255, 255);" | |- style="background-color: rgb(255, 255, 255);" | ||
| width="40" | [[Image:CresCut.png]] | | width="40" | [[Image:CresCut.png]] | ||
| width="150" | [[Crescent Cut/ko|크레센트 컷]]<br>: | | width="150" | [[Crescent Cut/ko|크레센트 컷]]<br>: <font color="#4E82E8">활력</font><br> | ||
|- style="background-color: rgb(255, 255, 255);" | |- style="background-color: rgb(255, 255, 255);" | ||
| width="40" | [[Image:RPassive5.png]] | | width="40" | [[Image:RPassive5.png]] | ||
| width="150" | [[Counter Chance/ko|기회의 포착]]<br>: | | width="150" | [[Counter Chance/ko|기회의 포착]]<br>: <font color="#4E82E8">활력</font><br> | ||
|- style="background-color: rgb(255, 255, 255);" | |- style="background-color: rgb(255, 255, 255);" | ||
| width="40" | [[Image:SwordFall.png]] | | width="40" | [[Image:SwordFall.png]] | ||
| width="150" | [[Sword Fall/ko|소드 폴]]<br>: | | width="150" | [[Sword Fall/ko|소드 폴]]<br>: <font color="#A91C24">파괴</font><br> | ||
|- style="background-color: rgb(255, 255, 255);" | |- style="background-color: rgb(255, 255, 255);" | ||
| width="40" | [[Image:MaelstromRage.png]] | | width="40" | [[Image:MaelstromRage.png]] | ||
| width="150" | [[Maelstrom Rage/ko|메일스톰 레이지]]<br>: | | width="150" | [[Maelstrom Rage/ko|메일스톰 레이지]]<br>: <font color="#4E82E8">활력</font><br> | ||
|- style="background-color: rgb(255, 255, 255);" | |- style="background-color: rgb(255, 255, 255);" | ||
| width="40" | [[Image:FinalStrike.png]] | | width="40" | [[Image:FinalStrike.png]] | ||
| width="150" | [[Final Strike/ko|파이널 스트라이크]]<br>: | | width="150" | [[Final Strike/ko|파이널 스트라이크]]<br>: <font color="#A91C24">파괴</font><br> | ||
|- style="background-color: rgb(255, 255, 255);" | |- style="background-color: rgb(255, 255, 255);" | ||
| width="40" | [[Image:PhantomSword2.png]] | | width="40" | [[Image:PhantomSword2.png]] | ||
| width="150" | [[Phantom Sword/ko|팬텀 소드]]<br>: | | width="150" | [[Phantom Sword/ko|팬텀 소드]]<br>: <font color="#4E82E8">활력</font><br> | ||
|- style="background-color: rgb(255, 255, 255);" | |- style="background-color: rgb(255, 255, 255);" | ||
| width="40" | [[Image:ISspecial3.png]] | | width="40" | [[Image:ISspecial3.png]] | ||
| width="150" | [[Mirage Sting/ko|미라지 스팅]]<br>: | | width="150" | [[Mirage Sting/ko|미라지 스팅]]<br>: <font color="#4E82E8">활력</font><br> | ||
|- style="background-color: rgb(255, 255, 255);" | |- style="background-color: rgb(255, 255, 255);" | ||
| width="40" | [[Image:Fatal Slap.png]] | | width="40" | [[Image:Fatal Slap.png]] | ||
| width="150" | [[Fatal Slap/ko|페이탈 슬랩]]<br>: | | width="150" | [[Fatal Slap/ko|페이탈 슬랩]]<br>: <font color="#A91C24">파괴</font><br> | ||
|- style="background-color: rgb(255, 255, 255);" | |- style="background-color: rgb(255, 255, 255);" | ||
| width="40" | [[Image:ISspecial1.png]] | | width="40" | [[Image:ISspecial1.png]] | ||
| width="150" | [[Sword Blasting/ko|소드 블래스팅]]<br>: | | width="150" | [[Sword Blasting/ko|소드 블래스팅]]<br>: <font color="#A91C24">파괴</font><br> | ||
|- style="background-color: rgb(255, 255, 255);" | |- style="background-color: rgb(255, 255, 255);" | ||
| width="40" | [[Image:ISspecial2.png]] | | width="40" | [[Image:ISspecial2.png]] | ||
| width="150" | [[Rage Cutter/ko|레이지 커터]]<br>: | | width="150" | [[Rage Cutter/ko|레이지 커터]]<br>: <font color="#4E82E8">활력</font><br> | ||
|} | |} | ||
Revision as of 13:26, 23 February 2014
Every character in Elsword has their own unique features that sets them apart from other characters.

기본 정보
엘리시스`의 검의 길
When playing Elsword, there will be an additional gauge below the skill hotkeys. This Way of the Sword(Also known as WotS) gauge will enable you to activate "Aura of Vitality" or "Spirit of Destruction" for a period of time.
Depending on the type of combo attack (e.g. Z and X key moves) or skill you use, the gauge will lean towards vitality or destruction. While in either "Aura of Vitality" or "Aura of Destruction", you will receive special benefits.
Note that the system they use is not what what it may appear to be at first; vitality-based attacks take away vitality from the gauge, leaning the gauge towards destruction; destruction-based attacks take away destruction from the gauge, leaning the gauge towards vitality; this is why only attacks that use the gauge area affected in the respective aura.
커맨드 목록


스킬 목록
|
엘소드/
|
|
|
|


Aura of Vitality
When the gauge is completely blue (by using destruction-type moves), the "Aura of Vitality" will be unleashed in the form of an azure aura.

While in this form you will receive the following benefits:
- Increased action, movement, and jump speed.
- Vitality-based skills cost 30% less mana for both mana usage and usage requirements.
- Some special active will only cost from 100MP to 60 MP, 200MP to 140 MP, 250 MP to 175 MP, 300 MP to 210 MP
- Hits from vitality-based attacks and skills will have massive increase in mana regeneration per hit.
Aura of Destruction
When the gauge is completely red (by using vitality-type moves), the "Aura of Destruction" will be unleashed in the form of a crimson aura.

While in this form, you will receive the following benefits:
- Destruction-based actives and skills will do 50% more damage, and destruction-based combos will do 100% more damage. (This stacks with any other damage modifiers)
- When attacked, Elsword will howl, and enemies within his immediate surrounding are damaged and knocked away. It takes approximately 1 second for Elsword to be able to move after howling (during that time, Elsword is both stoic and vulnerable). Elsword will remain stoic for 6 seconds. This ability will not activate again until the stoic runs out. It also won't activate if Stoic is already in use. Contrary to popular belief, this state is also triggered even if Elsword is hit while airborne (in which case, he doesn't howl and therefore doesn't get vulnerable: he can move right after its activation).
- This wears off roughly 1/5 of the gauge whenever activated from hits, and decreases slowly from combos that use destruction or (similar to being hit in this state) decreases rapidly from special actives.
- Unlike his Stoic skill, the Stoic state obtained from Aura of Destruction does not reduce damage of received attacks, except for negating the first hit.
- If this is activated when "flattened" is inflicted upon Elsword, he cancels the flattening.
Trivia
- While in the "Aura of Vitality" mode, Lord Knight can easily use several 200mp and 300mp skills in a single combo due to them having the passive "Vitality".
- In the same fashion, the "Concentrated Mana" passive guild skill and the Magic Necklace cash shop item make it even easier for all Elswords to use skills more often during that state.
- The sword icons that appear on the right side of the gauge are Lord Knight's and Rune Slayer's swords for "Aura of Destruction" and "Aura of Vitality", respectively.
| 특수 능력 | ||||
|---|---|---|---|---|
|

|
|
|
|
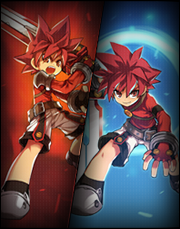
| 검의 길 | 메모라이즈 | 자연의 기운 | 레이븐의 분노 | 코어 개방 |
|
|
|
| |
| 프라이터니어 | 은 | 검의 길 | 다이너모 포인트 | |
| 가이드 목록 | ||||||||||||||||||||||||
|---|---|---|---|---|---|---|---|---|---|---|---|---|---|---|---|---|---|---|---|---|---|---|---|---|
{{
|