Hope Bridge
From Elwiki


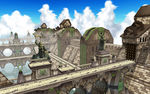
Hope Bridge
| “ | The closer you get to the heart of the capital, the more anxious you feel, just like in Feita...
|
” |

Description
An essential bridge that leads to the palace.
Recommended Level
48-50
Required Combat Power
6,580
Dungeon Layout

Mobs
{{
{{
}}
| Monster Image | Monster Description | Monster Moves |
|---|---|---|
  |
Arc Glitter Guard - The same as the Glitter Spearman from Feita, except that it has a horn, grey skin, wears shiny golden armor, and wields a flashier spear. |
|
  |
Arc Glitter Protector - The same as the Glitter Shielder from Feita, except that it has a horn, grey skin, wears shiny golden armor, and wields a flashier shield. |
|
  |
Arc Glitter Dasher - The same as the Glitter Pounder from Feita, except that it has a horn, grey skin, wears shiny golden armor, and wields a flashier hammer. |
|
  |
Arc Glitter Sniper - The same as the Glitter Archer from Feita, except that it has a horn, grey skin, wears shiny golden armor, and wields a flashier bow. |
|
  |
Arc Glitter Panzer - With a shield for a face, a shield in hand and a mace in the other, this monster is slow but highly defensive. |
|
  |
Glitter Commander - This is a muscular and taller version of a Glitter. |
|
  |
Wyvern - A yellow wyvern with brown spots over its body. |
|
  |
Blood Eater - Similar to the Mana Eater in Feita, except that it eats HP instead of MP. |
|
  |
Dark Elf Sentinel - A skimpily dressed elf with dark skin. |
|
Obstacles
{{
{{
}}
| Obstacles Image | Obstacles Description |
|---|---|

|
Barricades - These barricades merely block your way. |
| Pitfalls - A gaping hole in the ground, falling down one of these will result in a percent loss in HP. |
Boss
{{
{{
}}
| Monster Image | Boss Description | Boss Moves |
|---|---|---|
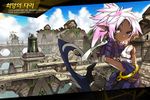
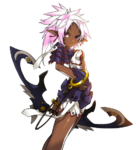
  |
Chloe - Apparent Leader of the Dark Elves. |
|
Dialogue
- Mid Dungeon Cutscene
- Dungeon Victory Quote
 Chloe: Velder is already within our grasp! Do not let anyone cross this bridge!!
{{
}}
| Image | Name | Boss | Character | Stats |
|---|---|---|---|---|
 |
Accessory (Top Piece): Physical Attack +30 Magical Attack +30 [Unidentified * ?] Action Speed +1% |

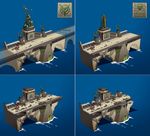
Gallery
-
-

An old segment of Hope Bridge prior to the 2015 Battle Superstars update.
-
Concept art.
-
Old loading image.
-


Trivia
{{
- Chloe does not undergo a death animation when defeated. Instead, her bow will fall off, she will hold her arm, say something and then jump high into the air and out of reach, alluding to her later appearances in the story.
- Based on one of Elesis's dungeon victory quotes, it seems she has met Chloe in the past, before she joined the Demon Army. This was later confirmed during the events of Dark Elves' Outpost, though their initial meeting and Elesis' debt to her is still left undisclosed.
- Stealthy Morfos and shrunken down Invincible Vardon appear in the mid dungeon cutscene despite neither appearing in the actual dungeon.
- Invincible Vardon appearing as a miniboss in other Velder dungeons, however never Hope Bridge.
- Stealthy Morfos was a miniboss in Hope Bridge and Southern Gate, but both instances have been removed.
Updates
{{
}}
| Date | Changes | |
|---|---|---|
| KR | NA | |
| - | - |
|
| 07/08/2021 | 08/04/2021 |
|
Alternative Names
{{
}}
| Server | Name | Translation |
|---|---|---|
| 희망의 다리 | Hope Bridge | |
| 希望之橋 | Hope Bridge | |
| 希望之桥 | Hope Bridge | |
| Hoffnungsbrücke | Hope Bridge | |
| Puente de la esperanza | Hope Bridge | |
| Pont de l'espoir | Hope Bridge | |
| Ponte della Speranza | Hope Bridge | |
| Most Nadziei | Hope Bridge | |
| Bridge of Hope | ||
| Ponte da Esperança | Hope Bridge | |