Henir's Time and Space/Season 3: Difference between revisions
m (→Basics: Minor) |
m (Mornsta moved page Henir's Spacetime to Henir's Time and Space) |
(No difference)
| |
Revision as of 18:14, 2 December 2012

Originally William's Spacetime.
This dungeon mode allows you to fight the major bosses in Elsword in a boss rush style.
Through this mode, you can collect Pieces of Time and Space, which you can exchange Glaive for special items and/or equipment.
Henir's Spacetime may be attempted as much as the player wishes, but they can only receive items for 3 runs per day.
- If the stage fails to load or you disconnect while loading, it will still consume one of your rewarded runs for the day.
- After all rewarded runs are consumed for the day, you will no longer be able to get Time Space Fragments, items, or ED drops from completion. You will still be able to complete the daily quest though.
Basic Guide
There are two modes in Henir's Spacetime...
Normal Mode

The Rules are :
- Consumable(s) : Usable
- Resurrection(s) : Allowed
- Death of party/solo : Fail
- Free resurrection(s) at Rest Areas or at boss (Ran only)
- Boss Level : Equal to the highest level member in the party
Challenge Mode

The Rules are :
- Consumable(s) : Disabled
- Resurrection(s) : Not Allowed
- Death of party/solo : Fail
- Free resurrection(s) at Rest Areas or at boss (Ran only)
- Boss Level : All bosses and players will be normalized to Level 1
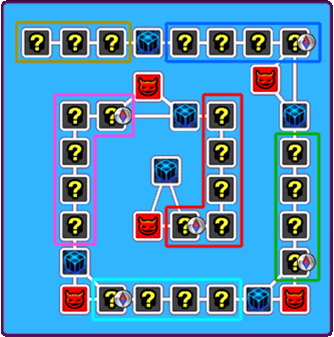
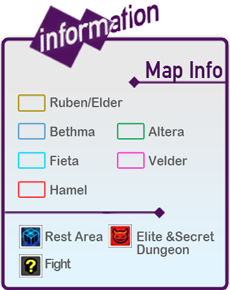
Layout
Boss Set List
Ruben Set/Elder Set
Stage 1 : William Phoru
Stage 2 : Fairy Guardian (x5) OR Monkey King (x1), Toto (x1) OR Mush King, Bomber Boss Mong OR Ancient Phoru
Stage 3 : Awakened Banthus (x1), Nasod Banthus (x1) OR Wally No.8 (x1), Verngert (x1) OR Ent, Bat King OR Jango, Kid Phoru, William Phoru
Bethma Set
Stage 1 : Lizardman Warrior (x2)
Stage 2 : Berauk (x2) OR Dark Berauk (x3) OR Kayak the Shaman (x2)
Stage 3 : Nasod Driller (x2) OR Wally No. 8 MK2 (x2)
Stage 4 : Armoured Wally No. 9 (x2)
Secret Stage : Nasod Inspector (x1)
Altera Set
Stage 1 : Raven (x2) OR Corrupt Nasod Driller (x2)
Stage 2 : Ignis and Leviathan OR Parasitic Alterasia Turret, Corrupt Nasod Excavator (x2)
Stage 3 : Crow Rider (x2)
Stage 4 : King Nasod (x1)
Secret Stage : Kayak the Shadow Shaman (x1), Ancient Bone Dragon (x1)
Elite Stage : Code: Q-PROTO_00 (x1), Apple (x1)
Feita Set
Stage 1 : Dullahan Knight (x2) OR Teach the Tyrant (x2)
Stage 2 : Amethyst (x1), Glitter Necromancer (x2) OR Plant Overlord (x3)
Stage 3 : Cutty Sark (x1)
Stage 4 : Berthe (x2)
Secret Stage : Alterasia Type-H (x1)
Elite Stage : Proxy the Nimble (x1), Wise Dutor (x1), Assaulter Crash (x1)
Velder Set
Stage 1 : Uno Hound (x2)
Stage 2 : Chloe (x3)
Stage 3 : Crazy Puppet, Arc Glitter Alchemists (x2)
Stage 4 : Spriggan (x2)
Stage 5 : Dark Nephilim (x1)
Secret Stage : Hoakin's Hallucination (x1)
Elite Stage : Stealthy Morfos (x1), McGard the Blitzkrieg (x1), Polka (x1), Invincible Vardon (x1), Sullen Hoakin (x1)
Hamel Set
Stage 1 : Shadow Master (x3)
Stage 2 : Coral Serpent (x3)
Stage 3 : Taranvash (x1) OR Victor (x2)
Stage 4 : Avalanche (x1) OR Magmanta (x2)
Stage 5 : Ran (x2)
Elite Stage : Shadow Stinger (x1), Bizarre Conrad(x1), Chloe the Corrupt (x1), Bobosse (x1)
Encountering Secret / Elite Stages
Secret and Elite stages are additional stages in Henir that the player may take to earn additional Pieces of Time and Space.
Encountering a secret\elite stage is random and the chances of them appearing is affected by both the number of players and fever.
The formula is: ([# of Players] -1) * 15 + Fever/3 = % Chance.
- 1 Player = 0% Chance [0 Fever]
- 2 Players = 15~26% Chance [0~33 Fever]
- 3 Players = 30~52% Chance [0~66 Fever]
- 4 Players = 45~78% Chance [0~100 Fever]
- Having any player be dead after the last boss of a Stage Set is defeated reduces the odds to 0%.
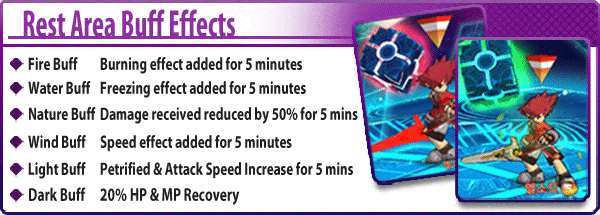
Rest Area Buffs
Rest Areas will have a chance of giving every player a special buff at random as follows:
Guide for Players
Basics
In Henir there are multiples of most enemies. Generally as a first priority, you would want to group the enemies if conveniently possible.
- By grouping enemies together, you can effectively multiply your damage output.
- A grouped enemy is usually much easier to defend against since you will only need to focus your attention on a single area.
Be considerate of your party mates.
- Do not pick up food items that you do not need.
- Do not purposely knock down bosses that have high knockdown damage reductions. (This includes everything past Feita Set)
- Do not hit the harpoons at Cutty Sark in Feita if you do not know the timing.
- Do not use 250+ MP skills at Berthe after he has over half his MP bar full.
- Magmanta will escape after 60 hits when it is not super armored, do not use weak multi-hit skills that will cause it to escape like awakened Plasma Cutter, or Cyclone.
- Some skills like Gungnir have a long skill delay which is needed to hit enemies, do not interrupt it with a short skill delay if it will interfere with the skill.
Have an understanding of how each boss fights before challenging Henir's Spacetime.
- There is information on every boss you can encounter in this wiki. If you are unfamiliar with any, you can read up on their skills and attacks as well as their weaknesses.
- However there are some bosses that operate differently in Henir. These include:
- No boss will have any displayed text warnings when they use a special attack.
- This can make Joaquin's Hallucination skill much harder to spot, especially if he is in dwarf mode.
- Uno Hound's regeneration is a fixed rate not dependent on its maximum HP. In Challenge mode, it will regenerate extremely fast.
- Chloe's summoning of Dark Elves is time based in here. They will all do it at the same time if the fight is prolonged.
- Taranvash's mirrors which will turn much faster than normal.
- Avalanche will fire 4 homing ice blasts instead of 2 when he retreats. These will move much faster and farther as well.
- Partially due to lag; Type-H and Joaquin's stages will end extremely fast once they are defeated, possibly preventing players from picking up their drops.
- This can be remedied by finding out who the host in the party is and letting them know that they need to stay alive and pick up the fragments.
- No boss will have any displayed text warnings when they use a special attack.
Rewards
After completing a run, you will receive Pieces of Time and Space. These will be used for crafting Henir equipment or exchanging for other rewards at Glaive.
In addition, certain titles can be obtained from completing Henir on Challenge mode. When you play in Challenge mode and quit the dungeon at the rest areas, you and your playtime will be placed on the leaderboards. Titles will only be awarded to Ranks 1 through 100.
Fail in Ruben: 0 Pieces of Time and Space
Exit after Ruben: 4 Pieces of Time and Space
Fail in Bethma: 1 Pieces of Time and Space
Exit after Bethma: 8 Pieces of Time and Space
- Secret Stage: 4 Pieces of Time and Space
Fail in Altera: 3 Pieces of Time and Space
Exit after Altera: 16 Pieces of Time and Space
- Secret Stage: 5 Pieces of Time and Space
- Elite Stage: 2 Pieces of Time and Space
Fail in Feita: 7 Pieces of Time and Space
Exit after Feita: 25 Pieces of Time and Space
- Secret Stage: 6 Pieces of Time and Space
- Elite Stage: 3 Pieces of Time and Space
Fail in Velder: 10 Pieces of Time and Space
Exit after Velder: 38 Pieces of Time and Space
- Secret Stage: 7 Pieces of Time and Space
- Elite Stage: 4 Pieces of Time and Space
Fail in Hamel: 25 Pieces of Time and Space
Exit after Hamel: 60 Pieces of Time and Space
- Elite Stage: 4 Pieces of Time and Space
Complete all of Henir's Spacetime (all secrets\elite in the most efficient path): 86 Pieces of Time and Space


