Dragon Nest: Abyss: Difference between revisions
SoheiKitsune (talk | contribs) |
|||
| Line 5: | Line 5: | ||
=Dragon Road: HELL= | =Dragon Road: HELL= | ||
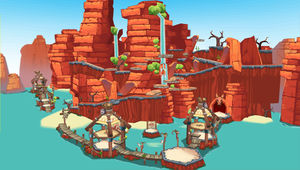
[[Image:3-xExterior.jpg|right|300px|The basic overview of 3-X]] | [[Image:3-xExterior.jpg|right|300px|The basic overview of 3-X]] | ||
You need to complete a repeatable quest given by the Besma Alchemist and obtain a ticket in order to enter the Normal Mode:<br/> | This is a [[Secret Dungeon]]. You need to complete a repeatable quest given by the Besma Alchemist and obtain a ticket in order to enter the Normal Mode:<br/> | ||
-Collect 1 Compasses which drop from boss [[3-4]] <br/> | -Collect 1 Compasses which drop from boss [[3-4]] <br/> | ||
-Collect 20 water balloons which drop from mobs in [[3-5]] on any difficulty ? <br/> | -Collect 20 water balloons which drop from mobs in [[3-5]] on any difficulty ? <br/> | ||
Revision as of 05:45, 6 January 2012

Dragon Road: HELL

This is a Secret Dungeon. You need to complete a repeatable quest given by the Besma Alchemist and obtain a ticket in order to enter the Normal Mode:
-Collect 1 Compasses which drop from boss 3-4
-Collect 20 water balloons which drop from mobs in 3-5 on any difficulty ?
HELL MODE Tickets are obtained from enemy drops in the actual dungeon.
Mobs
| Monster Image | Monster Description |
|---|---|
| Heavily Armoured Big, Dark Lizardman Similar to the Big, Dark Lizardman (Club) in Besma Lake (Night), except that its armour has more intricate patterns and it now wears a helmet. It also super armours itself extremely frequently when attacking and when it is hit too many times. | |
| Black-Eyed Lizard-Wizard Similar to the Lizard-Wizards seen in the Besma Region, except that it can summon guided balls of mana, and super armour itself occasionally. | |
| Lizardman Warrior Similar to the Lizardman Warriors in Dragon Road, except that it is alone and can super armour more frequently. | |
| Cautious Dark Lizardman Similar to the Dark Lizardman (Spear), in Besma Lake (Night), except that it can now throw spears (while in super armour) which can be quite annoying while soloing and wears a helmet. It can also super armours itself more frequently. | |
| Red Salamander Similar to the Red Salamanders seen in the Besma Region, except that it breathes fire faster and more often. It also super armours itself right when it breathes fire making things more difficult. |
Obstacles
Fire spitting hole: A hole that spits fire at intervals and can cause burning damage.
Mini-Boss, Giant Dark Lizardman Warrior
A giant version of the Dark Lizardman Warrior in Besma Lake (Night), except that it is now HUMONGOUS and super armours more frequently than before.
Sub-Boss, Old Lizard Shaman Wizard
The Old Lizard Shaman Wizard from Dragon's Nest is back now with better powers! Its moves are exactly the same except he immediately summons his other self, the salivating Choleric Shaman Wizard to aid it in battle. Both have similar powers except that the Choleric one is stronger by a little.
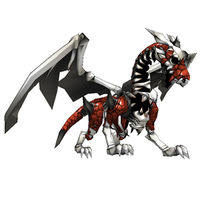
Boss, Ancient Bone Dragon

At the end of the sub-boss battle, the Old Lizard Shaman Wizard, hoping to cremate itself, summons the Ancient Bone Dragon to spit flame at the battlefield. (Though this is a cutscene, you had better run to either sides of the map as the flame can injure you substantially) The Ancient Bone Dragon then flies near you and proceeds to attempt to murder you.
Moves
Fire Bones: The dragon steps up with its front leg onto the platform, which will propel you upwards, then fires a few bones at you dealing rather substantial damage.
Head-whack: The dragon steps back, then swings its head to the right, dealing moderate damage while propelling you upwards.
Dragon Fire: The dragon breathes smoke momentarily, then steps up with its front leg onto the platform, which will propel you upwards, then breathes a long stretch of fire, continuously juggling you. This deals insane combo damage and the burning ailment will further intensify it.
Aerial Dragon Fire: The dragon flies up and flies to the other end of the cave and then back while breathing fire on the ground. It also repeat another time on hell mode (back and forth fire breath). If you get hit by the fire, you will keep flinching as this is the specialty of the Ancient Bone Dragon's fire.
Fire Rain: The dragon fires a bolt of fire up into the air, and flames rain onto the middle battleground.
Smoking: When you reduce the Ancient Bone Dragon's health to about 1/4, the dragon will start smoking. While it is in this state, you will receive damage as you attack it, even with ranged attacks such as arrows, fireballs and electrons (Special Actives are an exception). This effect can kill if your HP is low enough.
Tactics
- When the Dragon flies up to use Aerial Dragon Fire, that is a signal to run to the furthest left platform in order to avoid getting burnt by the insane flames. Then quickly run back to the furthest right platform once the flames have died down.
- When the Dragon is about to do use Dragon Fire, run to the middle battlefield and stick to the right wall, to avoid getting roasted. Another more advanced tactic is to jump over the ledge just after the Dragon slams its claw down and breathes fire, enabling you get some hits in while the Dragon's body is stretched out. This is useful for skills with wide hitboxes such as Valkyrie's Javelin, noted Rising Slash, noted Flying Impact, etc. If you attempt this tactic, your timing must be perfect.
- The Shock element proves very useful with this boss, as it creates windows of opportunities for attacking and also resets the Dragon if he is about to attack. Aisha's Time Stop is also effective.
- It is best to mana-break (hold Z up to 100MP) if you are hit by his combo attacks, such as Dragon Fire and Aerial Dragon Fire, to minimize the damage you receive.
- Large AoE moves such as Dimension Link Guardian, Gungnir, Meteor Shower, and Plasma Cutter work very well against this boss.Dimension Link Guardian can reak absolute havoc when the boss is using his Dragon Fire attack. Blizzard Shower can be somewhat useful as well.
