Bethma Lake (Night): Difference between revisions
From Elwiki
Gameboy224 (talk | contribs) No edit summary |
Gameboy224 (talk | contribs) No edit summary |
||
| (28 intermediate revisions by 8 users not shown) | |||
| Line 1: | Line 1: | ||
{{Languages| | '''THIS IS AN [[Old Maps|OLD MAP]]. | ||
{{DungeonPage | {{History}} | ||
{{Languages|Bethma Lake (Night)}} | |||
{{DungeonPage|Old | |||
| Color={{ColorSel|Village|3}} | | Color={{ColorSel|Village|3}} | ||
| DunButton=3-3Button.png | | DunButton=3-3Button.png | ||
| SmallPic=3-3select.png | | SmallPic=3-3select.png | ||
| BigPic=3- | | BigPic=Old 3-3new2.png | ||
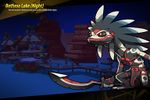
| DunName=Bethma Lake (Night) | | DunName=Bethma Lake (Night) | ||
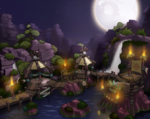
| Quotation=You've headed to | | Quotation=You've headed to Bethma Lake again in the middle of the night. | ||
| Description=Bethma Mountain's oasis. Careful of the Lizardman appearing from the dark. | | Description=Bethma Mountain's oasis. Careful of the Lizardman appearing from the dark. | ||
| LvNeed=23-25 | | LvNeed=23-25 | ||
| LvFit= | | LvFit=0 | ||
| DunMap | | DunMap=[[File:Bethma Lake (Night) Map.png]] | ||
| Mob=< | | Mob=<dfn>{{</dfn> | ||
|[[File:3-3-1.jpg|60px]] | |{{tt|[[File:3-3-1.jpg|60px]]|[[File:FireKomodo.png|150px]]}} | ||
|'''Fire Komodo''' - A Komodo that helps the '''Lizardmen''' tribe attack you. | |'''Fire Komodo''' - A Komodo that helps the '''Lizardmen''' tribe attack you. | ||
| | | | ||
| Line 18: | Line 20: | ||
*'''Flamethrower:''' The Komodo can breath fire. | *'''Flamethrower:''' The Komodo can breath fire. | ||
|- | |- | ||
|[[File:DNA3.jpg|60px]] | |{{tt|[[File:DNA3.jpg|60px]]|[[File:ShadowLizardman.png|200px]]}} | ||
|'''Shadow Lizardman''' - A '''Lizardman''' wielding a long spear. | |'''Shadow Lizardman''' - A '''Lizardman''' wielding a long spear. | ||
| | | | ||
| Line 25: | Line 27: | ||
*'''Spear Combo:''' Stab players three times with its spear. | *'''Spear Combo:''' Stab players three times with its spear. | ||
|- | |- | ||
|[[File:3-3-3.jpg|60px]] | |{{tt|[[File:3-3-3.jpg|60px]]|[[File:SaurusWarrior.png|200px]]}} | ||
|'''Saurus Warrior''' - An upgraded, bigger version of the '''Lizardman Saurus''', this can pack an even bigger punch! | |'''Saurus Warrior''' - An upgraded, bigger version of the '''Lizardman Saurus''', this can pack an even bigger punch! | ||
| | | | ||
| Line 31: | Line 33: | ||
*'''Uppercut Swing:''' Ready its club for few seconds then does a twirl uppercut sending players flying. | *'''Uppercut Swing:''' Ready its club for few seconds then does a twirl uppercut sending players flying. | ||
|- | |- | ||
|[[File:3-3-4.jpg|60px]] | |{{tt|[[File:3-3-4.jpg|60px]]|[[File:Armadillo.png|150px]]}} | ||
|'''Armadillo''' - A small armadillo that uses its shell to roll over you. | |'''Armadillo''' - A small armadillo that uses its shell to roll over you. | ||
| | | | ||
| Line 38: | Line 40: | ||
*'''Dive Roll:''' Jumps in the air and dive rolls onto players. | *'''Dive Roll:''' Jumps in the air and dive rolls onto players. | ||
|- | |- | ||
|[[File:3-2-1.jpg|60px]] | |{{tt|[[File:3-2-1.jpg|60px]]|[[File:ShamanLizardman.png|150px]]}} | ||
|'''Shaman Lizardman ''' - A skinny lizardmen that is capable of casting spells and healing others. | |'''Shaman Lizardman ''' - A skinny lizardmen that is capable of casting spells and healing others. | ||
| | | | ||
| Line 44: | Line 46: | ||
*'''Magic Missile:''' The Shaman can cast a magic missile that falls at a diagonal angle. | *'''Magic Missile:''' The Shaman can cast a magic missile that falls at a diagonal angle. | ||
*'''Heal:''' He is able to heal himself and mobs around him. | *'''Heal:''' He is able to heal himself and mobs around him. | ||
< | <dfn>}}</dfn> | ||
| MiniBoss=< | | MiniBoss=<dfn>{{</dfn> | ||
|[[File:3-3-mboss.jpg|60px]] | |{{tt|[[File:3-3-mboss.jpg|60px]]|[[File:SaurusSupervisor.png|200px]]}} | ||
|'''Saurus Supervisor''' - Leader of '''Lizardmen Sauruses''', he is also the strongest, especially with his gigantic spiked club. | |'''Saurus Supervisor''' - Leader of '''Lizardmen Sauruses''', he is also the strongest, especially with his gigantic spiked club. | ||
| | | | ||
| Line 52: | Line 54: | ||
*'''Knock Up:''' Saurus Supervisor prepares himself then swings his club launching targets into the air. | *'''Knock Up:''' Saurus Supervisor prepares himself then swings his club launching targets into the air. | ||
*'''Double Attack:''' A two hit combo with his club. | *'''Double Attack:''' A two hit combo with his club. | ||
< | <dfn>}}</dfn> | ||
| Obstacle=< | | Obstacle=<dfn>{{</dfn> | ||
|[[File:3-2-trap.jpg|60px]] | |[[File:3-2-trap.jpg|60px]] | ||
|'''Totem''' - An inert Totem that stands still. But don't get too close to it or else fire will come out of its mouth straight at you! | |'''Totem''' - An inert Totem that stands still. But don't get too close to it or else fire will come out of its mouth straight at you! | ||
< | <dfn>}}</dfn> | ||
| Boss=< | | Boss=<dfn>{{</dfn> | ||
|[[File:3-3-boss.jpg|60px]] | |{{tt|[[File:3-3-boss.jpg|60px]]|[[File:ShadowWarrior.png|250px]]}} | ||
|'''Shadow Warrior''' - Although this boss may look like the '''Lizardman Warriors''' from '''[[ | |'''Shadow Warrior''' - Although this boss may look like the '''Lizardman Warriors''' from '''[[Dragon Road]]''', the Shadow Lizardman is much stronger than you think. With agile capabilities making him hard to aim at, the Shadow Lizardman also uses its duel swords for a flurry of attacks! | ||
| | | | ||
*'''Swipe:''' The Lizardman will run over to you and use its dual swords to repeatedly hit you. | *'''Swipe:''' The Lizardman will run over to you and use its dual swords to repeatedly hit you. | ||
| Line 65: | Line 67: | ||
*'''Boomerang:''' A very strong skill, the Shadow Lizardman will throw its swords across the field like a boomerang slashing anything that gets in its way. If you are behind it when their swords return, you will be hit. | *'''Boomerang:''' A very strong skill, the Shadow Lizardman will throw its swords across the field like a boomerang slashing anything that gets in its way. If you are behind it when their swords return, you will be hit. | ||
*'''[[Counter Attack]]:''' Like [[Elsword]]'s [[Counter Attack]] skill, the boss will put up a stance and if you hit him during it, he'll deflect your attack and counter you with his swords, sending you high up into the air. | *'''[[Counter Attack]]:''' Like [[Elsword]]'s [[Counter Attack]] skill, the boss will put up a stance and if you hit him during it, he'll deflect your attack and counter you with his swords, sending you high up into the air. | ||
< | <dfn>}}</dfn> | ||
| BDrop={{tabs|name=1|tab1=Shadow Cannon|contents1={{:3-3Bdrop1}} |tab2=Enchanted Ceremonial Sword|contents2={{:3-3Bdrop3}} |tab3=Warrior Dual Weapon|contents3={{:3-3Bdrop4}}|tab4= | | BDrop={{tabs|divclass=forceland|name=1|tab1=Shadow Cannon|contents1={{:3-3Bdrop1}} |tab2=Enchanted Ceremonial Sword|contents2={{:3-3Bdrop3}} |tab3=Warrior Dual Weapon|contents3={{:3-3Bdrop4}}|tab4=Warrior Guns|contents4={{:3-3Bdrop5}}|tab5=Headdress of Darkness|contents5={{:3-3Bdrop2}}}} | ||
| | | SBGM=[http://www.youtube.com/watch?v=kKoQ2Jo9TUc '''''music012_stage'''''] | ||
[http://www.youtube.com/watch?v=ZmKhluO5Y0k '''''music015_boss'''''] | |||
| Video=[http://www.youtube.com/watch?v=BDJMkJbE5ks '''Click here for Bethma Lake (Night) Video'''] | | Video=[http://www.youtube.com/watch?v=BDJMkJbE5ks '''Click here for Bethma Lake (Night) Video'''] | ||
| Gallery= | |||
<gallery widths=150px heights=150px> | |||
File:3-31.jpg | |||
File:3-3Concept.png|Concept art. | |||
File:3-3new.jpg|Old loading image. | |||
</gallery> | |||
|Updates=<dfn>{{</dfn> | |||
{| cellpadding="5" border="1" style="border-collapse: collapse; text-align: center;" | |||
|- style="background:{{ColorSel|Village|3}}" class="textfloat" | |||
! colspan=2 | Date !! rowspan=2 | Changes | |||
|- style="background:{{ColorSel|Village|3}}" class="textfloat" | |||
! KR !! NA | |||
|- | |||
| 12/27/2007 || 05/04/2011 || align="left" | | |||
*'''Bethma Lake (Night)''' added. | |||
|- | |||
| 06/12/2014 || 04/29/2015 || align="left" | | |||
*Dungeon revamped. | |||
|- | |||
| 07/08/2021 || 08/04/2021 || align="left" | | |||
*'''Bethma Lake (Night)''' deleted. | |||
|} | |||
<dfn>}}</dfn> | |||
|AltLang= | |AltLang= | ||
{{AlternateLanguages | {{AlternateLanguages | ||
| Line 137: | Line 163: | ||
*'''Ciel''': ''Those lizard pests… Resorting to even surprise attacks…! Anyone who frightens Lu will taste my blades!'' | *'''Ciel''': ''Those lizard pests… Resorting to even surprise attacks…! Anyone who frightens Lu will taste my blades!'' | ||
*'''Ciel''': ''The silence here makes the area bearable, no? Perhaps a blend of honey would be a good suggestion.'' | *'''Ciel''': ''The silence here makes the area bearable, no? Perhaps a blend of honey would be a good suggestion.'' | ||
|RS= | |||
*'''Rose''': ''Lizardmen... they are even scarier at night.'' | |||
*'''Rose''': ''It's already hard with it being nighttime, but the enemies are using hiding techniques on top of that! Zero, can't you give me more information?!'' | |||
*'''Rose''': ''Fighting at night is hard... I need to get used to Elrios some more.'' | |||
|AN= | |||
*'''Ain''': ''Darkness is where evil lurks.'' | |||
}}}} | }}}} | ||
}} | }} | ||
Latest revision as of 03:11, 22 August 2024
THIS IS AN OLD MAP.

Warning: The information in this page is from an old version of Elsword and is no longer available.


Bethma Lake (Night)
| “ | You've headed to Bethma Lake again in the middle of the night.
|
” |

Description
Bethma Mountain's oasis. Careful of the Lizardman appearing from the dark.
Recommended Level
23-25
Required Combat Power
0
Dungeon Layout
_Map.png)
Mobs
{{
{{
}}
| Monster Image | Monster Description | Monster Moves |
|---|---|---|
  |
Fire Komodo - A Komodo that helps the Lizardmen tribe attack you. |
|
  |
Shadow Lizardman - A Lizardman wielding a long spear. |
|
  |
Saurus Warrior - An upgraded, bigger version of the Lizardman Saurus, this can pack an even bigger punch! |
|
  |
Armadillo - A small armadillo that uses its shell to roll over you. |
|
  |
Shaman Lizardman - A skinny lizardmen that is capable of casting spells and healing others. |
}} |
Mini Boss
{{
{{
}}
| Monster Image | Boss Description | Boss Moves |
|---|---|---|
  |
Saurus Supervisor - Leader of Lizardmen Sauruses, he is also the strongest, especially with his gigantic spiked club. |
}} |
Obstacles
{{
{{
}}
| Obstacles Image | Obstacles Description |
|---|---|

|
Totem - An inert Totem that stands still. But don't get too close to it or else fire will come out of its mouth straight at you!
}} |
Boss
{{
{{
}}
| Monster Image | Boss Description | Boss Moves |
|---|---|---|
  |
Shadow Warrior - Although this boss may look like the Lizardman Warriors from Dragon Road, the Shadow Lizardman is much stronger than you think. With agile capabilities making him hard to aim at, the Shadow Lizardman also uses its duel swords for a flurry of attacks! |
}} |
Dialogue
- Elsword
- Aisha
- Rena
- Raven
- Eve
- Chung
- Ara
- Elesis
- Add
- Lu/Ciel
- Rose
- Ain
- Elsword: Why don't you come out and fight where I can see you!?
- Elsword: Oh, sure, attack from some safe little hidey-hole, why don't you? Cowards! Darn it, it's too dark to see well, and those cowards know it! Gotta ask Sis what to do about sneaky opponents when I see her again. Darn it, night-fighting stinks!
- Elsword: Of course, she might just say, "Figure it out, kid."
{{
}}
| Image | Name | Boss | Character | Stats |
|---|---|---|---|---|
 |
Lv24 Cannon: Physical Attack +1967 Magical Attack +1967 [Unidentified * ?] Critical +1% |


Gallery
-

-
Concept art.
-
Old loading image.


Videos
Updates
{{
}}
| Date | Changes | |
|---|---|---|
| KR | NA | |
| 12/27/2007 | 05/04/2011 |
|
| 06/12/2014 | 04/29/2015 |
|
| 07/08/2021 | 08/04/2021 |
|
Alternative Names
{{
}}
| Server | Name | Translation |
|---|---|---|
| 베스마 호수(밤) | Besma Village Lake (Night) | |
| ベスマ湖(夜) | Bethma Lake (Night) | |
| 貝斯馬峽灣 | Besma Fjord | |
| 贝斯马峡湾 | Besma Fjord | |
| Besma-See bei Nacht | Besma Lake at Night | |
| Lago de Besma de noche | Besma Lake at Night | |
| Lac de Besma de nuit | Besma Lake at Night | |
| Lago di Besma - notte | Besma Lake - Night | |
| Jezioro Besma Nocą | Besma Lake at Night | |
| Lake Besma at Night | ||
| Lago de Besma (Noite) | Besma Lake (Night) | |