Savage White-Ghost's Castle: Difference between revisions
From Elwiki
Gameboy224 (talk | contribs) m (Text replacement - "08/05/2021 || -" to "08/05/2021 || 09/01/2021") |
(Corrected pattern names and updated for 9/1 patch notes) |
||
| Line 53: | Line 53: | ||
*'''<font color=red>Blue Flame:</font>''' Magic circles will appear on the ground and cause a burst of flames after a few seconds. If you get hit, you'll receive the '''Ember of Retribution''' debuff for 5 seconds. | *'''<font color=red>Blue Flame:</font>''' Magic circles will appear on the ground and cause a burst of flames after a few seconds. If you get hit, you'll receive the '''Ember of Retribution''' debuff for 5 seconds. | ||
*'''<font color=red>Link:</font>''' Targets two players in the party with a mark. While these players are near each other, the mark will turn blue and create a link between the two players that inflicts damage to any other allies that come into contact with it. If these players are not near each other, the circle will turn red and after a period of time if these players are still not connected, both players will be immediately killed along with close by teammates. | *'''<font color=red>Link:</font>''' Targets two players in the party with a mark. While these players are near each other, the mark will turn blue and create a link between the two players that inflicts damage to any other allies that come into contact with it. If these players are not near each other, the circle will turn red and after a period of time if these players are still not connected, both players will be immediately killed along with close by teammates. | ||
*'''<font color=red> | *'''<font color=red>Ultimate:</font>''' The boss charges up a devastating attack that wil send magic chains across the arena, killing all players regardless of where they are. This attack can only be nullified by having players occupy all of the blue marked areas on its side of the arena. | ||
'''''Attacks highlighted in <font color=red>red</font> bypass Invincibility frames.''''' | '''''Attacks highlighted in <font color=red>red</font> bypass Invincibility frames.''''' | ||
| Line 69: | Line 69: | ||
*'''<font color=red>Red sphere:</font>''' Hadron creates a red sphere in front of him. This sphere will suction players into it, dealing damage before vanishing. | *'''<font color=red>Red sphere:</font>''' Hadron creates a red sphere in front of him. This sphere will suction players into it, dealing damage before vanishing. | ||
*'''<font color=red>Leap & Fall:</font>''' Hadron jumps and stays airborn for some seconds before diving down, dealing damage on the impact. | *'''<font color=red>Leap & Fall:</font>''' Hadron jumps and stays airborn for some seconds before diving down, dealing damage on the impact. | ||
*'''<font color=red> | *'''<font color=red>Dimension Slash:</font>''' Hadron will send a barrage of afterimages of himself which zoom across the screen at vertical, horizontal, and diagonal angles in rapid succession. The areas are indicated by a yellow wind. He will finish the attack with a Leap & Fall. | ||
'''''Attacks highlighted in <font color=red>red</font> bypass Invincibility frames.''''' | '''''Attacks highlighted in <font color=red>red</font> bypass Invincibility frames.''''' | ||
| Line 78: | Line 78: | ||
| | | | ||
*'''Spheres:''' Right at the start of Phase 2, some spheres will form on the ground. By touching them, they'll send you up to the next platform. After getting up, you'll suffer [[Status_Effects|Confusion]] for 5 seconds. Everyone who stays on the bottom floor will die after some seconds. | *'''Spheres:''' Right at the start of Phase 2, some spheres will form on the ground. By touching them, they'll send you up to the next platform. After getting up, you'll suffer [[Status_Effects|Confusion]] for 5 seconds. Everyone who stays on the bottom floor will die after some seconds. | ||
*'''<font color=red> | *'''<font color=red>Feather Shooting:</font>''' Hadron teleports itself between the two map's corners, shooting out green projectiles. | ||
*'''<font color=red>Purple sphere:</font>''' Hadron launches a purple projectile, drastically pushing you back. | *'''<font color=red>Purple sphere:</font>''' Hadron launches a purple projectile, drastically pushing you back. | ||
*'''<font color=red> | *'''<font color=red>Dimension Slash:</font>''' Same as in phase 1, but the afterimage attack lasts longer and getting hit by them inflicts [[Status_Effects|Wound]] for 5 seconds. | ||
*'''<font color=red>Tornado:</font>''' Hadron spins in the center of the map, causing a tornado to appear. The tornado will constantly push you towards the nearest edge, while also shooting green projectiles every few seconds. Getting hit by the tornado will inflict 15 of cooldowns to all your potions. | *'''<font color=red>Tornado:</font>''' Hadron spins in the center of the map, causing a tornado to appear. The tornado will constantly push you towards the nearest edge, while also shooting green projectiles every few seconds. Getting hit by the tornado will inflict 15 of cooldowns to all your potions. | ||
| Line 194: | Line 194: | ||
| 08/27/2020 || align="left" | | | 08/27/2020 || align="left" | | ||
*Stage 2 | *Stage 2 | ||
**Hadron's Phase 2 | **Hadron's Phase 2 Feather Shooting attack debuff icon changed. | ||
**Debuffs are removed between phases. | **Debuffs are removed between phases. | ||
*Stage 3 | *Stage 3 | ||
| Line 211: | Line 211: | ||
| 01/28/2020 || 02/24/2020 || align="left" | | | 01/28/2020 || 02/24/2020 || align="left" | | ||
* Fixed lingering '''Explosion''' pattern of Hadron's Copy (Blue). | * Fixed lingering '''Explosion''' pattern of Hadron's Copy (Blue). | ||
* Adjusted | * Adjusted '''Feather Shooting''' pattern interval. | ||
* Fixed lingering '''Core explosion''' pattern in phase 3. | * Fixed lingering '''Core explosion''' pattern in phase 3. | ||
* Fixed an issue where headbomb would appear differently between clients (for example Person A has headbomb on Person C screen, but Person B actually has the headbomb). | * Fixed an issue where headbomb would appear differently between clients (for example Person A has headbomb on Person C screen, but Person B actually has the headbomb). | ||
* Headbomb will no longer be applied to summons. | * Headbomb will no longer be applied to summons. | ||
* If players fail to go up after ''' | * If players fail to go up after '''Dimension Pattern''' pattern in phase 1 of Hadron after reaching 150x, they will fall below the platform. | ||
|- | |- | ||
| 03/25/2021 || 04/28/2021 || align="left" | | | 03/25/2021 || 04/28/2021 || align="left" | | ||
| Line 225: | Line 225: | ||
|- | |- | ||
| 08/05/2021 || 09/01/2021 || align="left" | | | 08/05/2021 || 09/01/2021 || align="left" | | ||
*All monsters' HP and | *All monsters' in [[Savage White-Ghost's Castle]] will have decreased HP and Attack Power. | ||
*Story mode has been added. | *Story mode has been added. | ||
** | **Drop Rate will be different from Normal Mode. | ||
** | **Story Mode gauge increase rate will be different from the Normal Mode. | ||
**The revive system will be the same as the Normal Mode, however there are no limits to Resurrection Stones. | |||
*Blue Hadron's Copy | *Blue Hadron's Copy | ||
**''' | **'''Ultimate''' will now be affected by the number of players alive instead. | ||
**Story Mode: | **Story Mode: | ||
*** | ***The following text will show up before '''Hadron's Anger''' pattern: "If there's no characters fighting on one side of the wall, Hadron's Copy will be enraged and become stronger." | ||
*Hadron | *Hadron | ||
** | **Hadron will no longer use '''Dimension Slash''' and '''Feather Shooting''' continuously. | ||
*Haivan | *Haivan | ||
** | **Haivan can be damaged while moving up/down/left/right. | ||
** | **Duration between targeting and actually shooting at the target has been increased for the '''Focus Fire''' pattern. | ||
** | **'''Carpet Bombing''' will not fall to a set location. | ||
**Story Mode: | **Story Mode: | ||
*** | ***When zones are blocked, characters will be automatically moved to the platform they need to be. | ||
***When | ***When zones are blocked in Story Mode, the following guide text will show up: "After 15 sec., a line will be blocked. In Normal Mode, characters that do not arrive by the line in time will be killed." | ||
|} | |} | ||
<span style="display:none">}}</span> | <span style="display:none">}}</span> | ||
Revision as of 09:50, 1 September 2021


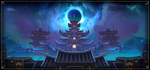
Savage White-Ghost's Castle
| “ | Savage White-Ghost's Castle. The White-Ghost Castle that was once glorious, is now filled with chilling silence.
|
” |

Description
In front of the White-Ghost Castle, a mysterious shadow blocks the El Search Party.
Recommended Level
99
Required Combat Power
- Story Mode
- Normal Mode
750,000
Details
- Up to 6 players can enter (minimum 3 players required to enter)
- All enemy attacks in this dungeon ignore players' physical and magical defense.
Demon Realm
- The El's power does not reach into this realm, Attack and HP will be reduced by 80%.
Obstacles
{{
}}
| Obstacles Image | Obstacles Description |
|---|---|

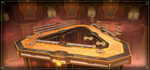
|
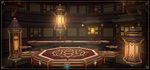
Teleporter - Portals between the two barracks where both of Hadron's Copies are. |
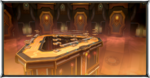
| Pitfall - After being launched up into the upper rafters of the castle, falling down will quickly tick away at player's HP until they die, effectively making them instant death.
|
Boss
{{
}}
| Monster Image | Boss Description | Boss Moves |
|---|---|---|

|
Hadron's Copy - A red spirit that guards the entrance to the White-Ghost Castle. Will guard one of two paths alongside its partner. |
Attacks highlighted in red bypass Invincibility frames. Note:
|

|
Hadron's Copy - A blue spirit that guards the entrance to the White-Ghost Castle. Will guard one of two paths alongside its partner. |
Attacks highlighted in red bypass Invincibility frames. Note:
|

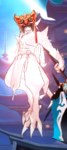
|
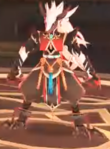
Hadron - A White-Ghost Army top rank and a martial arts master of his own right. A challenge for those who enter the castle. |
Attacks highlighted in red bypass Invincibility frames. |

|
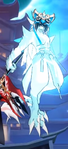
Hadron (Phase 2) - After reaching 150 HP bars, Hadron will send playing into the rafters, Hadron takes flight. |
Attacks highlighted in red bypass Invincibility frames. Note:
|

|
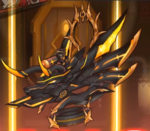
Haivan - The final trial within the castle, Haivan himself mounted on his weaponized vehicle. |
Attacks highlighted in red bypass Invincibility frames. Note:
|
Dialogue
 Aisha: Are those the gatekeepers to the White-Ghost Castle? ... Twins?
 Rena: No, an illusion. There must be someone controlling them somewhere.
 Elsword: We must face them both at the same time to enter. Let's split up!
{{
}}
| Image | Name | Boss | Character | Stats |
|---|---|---|---|---|
 |
Lv99 Accessory (Earring): |
Gallery
-
-
-
-

-
-
-
-
Pruinaum raid poster.
-
-
-

-
-
-

-
-
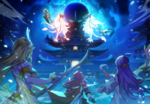
Old loading image.


.png)


Trivia
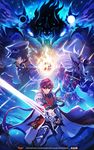
- The characters featured on the loading screen are the original trio: Knight Emperor, Aether Sage, and Daybreaker.
Updates
| Date | Changes | |
|---|---|---|
| KR | NA | |
| 08/13/2020 | 09/09/2020 |
|
| 08/27/2020 |
| |
| 09/24/2020 | 09/23/2020 |
|
| 01/28/2020 | 02/24/2020 |
|
| 03/25/2021 | 04/28/2021 |
|
| - | 05/12/2021 |
|
| 08/05/2021 | 09/01/2021 |
|
Alternative Names
{{
}}
| Server | Name | Translation |
|---|---|---|
| 야성에 잠식된 백귀의 성 | Savage White-Ghost's Castle | |
| 野性に蚕食された白鬼の城 | Wild White-Ghost's Castle | |
| 蝕獸之城 | ? | |
| 野性蚕食的白鬼之城 | ? | |
| Grausiges Geisterkönigschloss | Ghastly Spirit King's Castle | |
| Castillo espeluznante del rey de los espíritus | Ghastly Spirit King's Castle | |
| Château funeste du Grand Spectre | Ghastly Great Specter's Castle | |
| Castello Macabro del Re degli spiriti | Ghastly Spirit King's Castle | |
| Upiorny Zamek Króla Duchów | Ghastly Spirit King's Castle | |
| Ghastly Spirit King's Castle | ||
| Castelo dos Fantasmas-Brancos Selvagem | Savage White-Ghost's Castle | |
- Region 13~18
- Region 1~6
- Region 7~12
- Region 19~21
- Laby
- Noah
- Lithia
- Other
- Miscellaneous
| Rigomor | Master Road | Pruinaum Outskirts | |||
|---|---|---|---|---|---|
| {{ }} | {{ }} | {{ }} | {{ }} | {{ }} | {{ }} |
- Region 13~18
- Region 1~6
- Region 7~12
- Region 19~21
- Other