Burning Hope Bridge: Difference between revisions
From Elwiki
Gameboy224 (talk | contribs) m (Text replacement - "07/08/2021 || -" to "07/08/2021 || 08/04/2021") |
m (Text replacement - "<span style="display:none">{{</span>" to "<dfn>{{</dfn>") |
||
| Line 13: | Line 13: | ||
| LvFit=- | | LvFit=- | ||
| DunMap=[[File:Burning_Hope_Bridge_Map_HVH.png]] | | DunMap=[[File:Burning_Hope_Bridge_Map_HVH.png]] | ||
| Mob=< | | Mob=<dfn>{{</dfn> | ||
|[[File:Arc_Glitter_Guard.jpg|60px]] | |[[File:Arc_Glitter_Guard.jpg|60px]] | ||
|'''Arc Glitter Guard''' - The same as the '''Glitter Spearman''' from Feita, except that it has a horn, has grey skin, wears shiny golden armor and wields a flashier spear. | |'''Arc Glitter Guard''' - The same as the '''Glitter Spearman''' from Feita, except that it has a horn, has grey skin, wears shiny golden armor and wields a flashier spear. | ||
| Line 89: | Line 89: | ||
*'''Meteor Breath:''' Wyverns will fire mini-meteor fireballs out of their mouths. It is inadvisable to stand in front of a wyvern when he vomits meteors as it can juggle you, dealing very substantial damage. | *'''Meteor Breath:''' Wyverns will fire mini-meteor fireballs out of their mouths. It is inadvisable to stand in front of a wyvern when he vomits meteors as it can juggle you, dealing very substantial damage. | ||
<span style="display:none">}}</span> | <span style="display:none">}}</span> | ||
| MiniBoss=< | | MiniBoss=<dfn>{{</dfn> | ||
|[[File:InvincibleVardon_small.png|60px]] | |[[File:InvincibleVardon_small.png|60px]] | ||
|'''Invincible Vardon''' - One of the Elrios' best. Boasts great defense and weight.It has the same attacks as the '''Arc Glitter Panzer''', but when it falls from jumps it can cause earthquake effects. | |'''Invincible Vardon''' - One of the Elrios' best. Boasts great defense and weight.It has the same attacks as the '''Arc Glitter Panzer''', but when it falls from jumps it can cause earthquake effects. | ||
| Line 98: | Line 98: | ||
*'''Heavy Weight:''' Due to his immense size and weight, he will create a shock wave every time he lands after falling or jumping. | *'''Heavy Weight:''' Due to his immense size and weight, he will create a shock wave every time he lands after falling or jumping. | ||
<span style="display:none">}}</span> | <span style="display:none">}}</span> | ||
| Obstacle=< | | Obstacle=<dfn>{{</dfn> | ||
|[[File:Demoniac_Cannon.jpg|60px]] | |[[File:Demoniac_Cannon.jpg|60px]] | ||
|'''Demoniac Cannon''' - You can flip the direction of the cannon by hitting it a few times or destroying it. Can be quite annoying at times. | |'''Demoniac Cannon''' - You can flip the direction of the cannon by hitting it a few times or destroying it. Can be quite annoying at times. | ||
| Line 111: | Line 111: | ||
|'''Pitfalls''' - A gaping hole in the ground, falling down one of these will result in a percent loss in HP. | |'''Pitfalls''' - A gaping hole in the ground, falling down one of these will result in a percent loss in HP. | ||
<span style="display:none">}}</span> | <span style="display:none">}}</span> | ||
| Boss=< | | Boss=<dfn>{{</dfn> | ||
|[[File:Crazy_Puppet.jpg|60px]] | |[[File:Crazy_Puppet.jpg|60px]] | ||
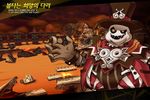
|'''Crazy Puppet''' - A pyromaniac puppet who apparently destroyed part of the Bridge of Hope. | |'''Crazy Puppet''' - A pyromaniac puppet who apparently destroyed part of the Bridge of Hope. | ||
| Line 188: | Line 188: | ||
File:5-4new.jpg|Old loading image. | File:5-4new.jpg|Old loading image. | ||
</gallery> | </gallery> | ||
|Updates=< | |Updates=<dfn>{{</dfn> | ||
{| cellpadding="5" border="1" style="border-collapse: collapse; text-align: center;" | {| cellpadding="5" border="1" style="border-collapse: collapse; text-align: center;" | ||
|- style="background:{{ColorSel|Village|6}}" class="textfloat" | |- style="background:{{ColorSel|Village|6}}" class="textfloat" | ||
Revision as of 18:10, 3 May 2022

Information: This dungeon can only be played in Heroic Mode.


Burning Hope Bridge
| “ | You've on the verge of escaped from the demons in the Palace, but only find a demon flame caster.
|
” |

Description
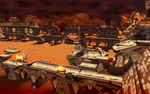
A bridge to escape the demon attacks. Elite demons are stationed here.
Recommended Level
-
Required Combat Power
-
Dungeon Layout

Mobs
{{
{{
}}
| Monster Image | Monster Description | Monster Moves |
|---|---|---|

|
Arc Glitter Guard - The same as the Glitter Spearman from Feita, except that it has a horn, has grey skin, wears shiny golden armor and wields a flashier spear. |
Unmounted:
Mounted:
|

|
Arc Glitter Protector - The same as the Glitter Shielder from Feita, except that it has a horn, has grey skin, wears shiny golden armor and wields a flashier shield. |
|

|
Arc Glitter Sniper - The same as the Glitter Archer from Feita, except that it has a horn, has grey skin, wears shiny golden armor and wields a flashier bow. |
|

|
Arc Glitter Panzer - A shield for a face, a shield in hand and a mace in the other, this monster is slow but highly defensive. |
|

|
Arc Glitter Alchemist - A Glitter who wears red robes and a cap. Can throw a variety of chemicals. |
|

|
Cockatrigle - A big, yellow chicken-like animal that utilizes quick pecking moves and super-armored laser attacks which can cause a very slight burning ailment. |
|

|
Siege Tower - A tower like wooden structure that consists of a Arc Glitter Sniper and a Glitter Rock Thrower. |
|

|
Glitter Rock Thrower - Immobile Glitters that find themselves a high vantage point and toss rocks downward. |
|

|
Kenaz - These fairies utilise fire based magic attacks that can burn you. |
|

|
Wyvern - A yellow wyvern with brown spots over its body. |
|
Mini Boss
{{
{{
}}
| Monster Image | Boss Description | Boss Moves |
|---|---|---|

|
Invincible Vardon - One of the Elrios' best. Boasts great defense and weight.It has the same attacks as the Arc Glitter Panzer, but when it falls from jumps it can cause earthquake effects. |
|
Obstacles
{{
{{
}}
| Obstacles Image | Obstacles Description |
|---|---|

|
Demoniac Cannon - You can flip the direction of the cannon by hitting it a few times or destroying it. Can be quite annoying at times. |

|
Faraway Archers - These archers fire up to 3 arrows per archer from a distance at you. These archers cannot be killed normally. However can be killed with skills such as Guided Arrow and Shooting Star. |

|
Barricades - These barricades merely block you way. |
| Pitfalls - A gaping hole in the ground, falling down one of these will result in a percent loss in HP.
|
Boss
{{
{{
}}
| Monster Image | Boss Description | Boss Moves |
|---|---|---|

|
Crazy Puppet - A pyromaniac puppet who apparently destroyed part of the Bridge of Hope. |
|

|
Puppet Stone - When using Puppet Soul Transfer Crazy Puppet will summon many Puppet Stones who are only meant to be distractions. |
|

|
Triple Bell Doll - When using Puppet Soul Transfer Crazy Puppet will summon a single puppet who's appearance is distinctly different than the others, destroy this puppet to do extra damage to Crazy Puppet and prevent him from going into overdrive. |
Strategy:
Note:
|
Dialogue
- Elsword
- Aisha
- Rena
- Raven
- Eve
- Chung
- Ara
- Elesis
- Add
- Lu/Ciel
- Rose
- Ain
- Elsword: Lousy Demons wrecked the Hope Bridge! I'm not gonna let them get away with this!
- Elsword: It's gotta be Demons controlling those puppets. But why do they keep setting stuff on fire?
Gallery
-
-
Old loading image.


Updates
{{
| Date | Changes | |
|---|---|---|
| KR | NA | |
| - | - |
|
| 07/08/2021 | 08/04/2021 |
|
Alternative Names
{{
}}
| Server | Name | Translation |
|---|---|---|
| 불타는 희망의 다리 | Burning Hope Bridge | |
| 燃燒的希望之橋 | Burning Hope Bridge | |
| 燃烧的希望之桥 | Burning Hope Bridge | |
| Brennende Brücke | Burning Bridge | |
| Puente en llamas | Burning Bridge | |
| Pont en flammes | Burning Bridge | |
| Ponte Ardente | Burning Bridge | |
| Płonący Most | Burning Bridge | |
| Burning Bridge | ||
| Ponte da Esperança em Chamas | Burning Hope Bridge | |
- Other
- Region 1~6
- Region 7~12
- Region 13~18
- Region 19~21
- Laby
- Noah
- Lithia
- Miscellaneous
| Event | Challenge Mode | Guild | ||
|---|---|---|---|---|
| {{ }} | {{ }} | {{ }} | {{ }} | {{ }} |
- Other
- Region 1~6
- Region 7~12
- Region 13~18
- Region 19~21