Heart of Spire/fr: Difference between revisions
(Created page with "{{Languages|x-5}} right =The Heart of Spire= Cutty Sark awaits you! ==Map Layout== {| cellspacing="0" cellpadding="5" border="1" width="0" style="border-...") |
No edit summary |
||
| Line 1: | Line 1: | ||
{{Languages|x-5}} | {{Languages|x-5}} | ||
[[File: | {{DISPLAYTITLE:X-5 : Sanctuaire}} | ||
[[File:3x-5selectfr.png|right]] | |||
=The Heart of Spire= | =The Heart of Spire= | ||
<center>{{quotation|You've headed to the Top of the tower through the '''Heart of Spire'''. The energy of El in the tower feels different somehow...}}</center> | |||
{| width="100%" style="font-size:1em; line-height:1.5em;" | |||
| valign="top" style="border:2px solid #800c9d; border-radius: 1px;"| | |||
{| cellspacing="2" cellpadding="5" rules="all" style="margin:0.5em 0.5em 0.5em 0.5em; empty-cells:show;" | |||
|valign="top" width="100%" align="center" style="border:1px solid; border-color:#000000; background: #800c9d; color:#FFFFFF;" colspan="12"| '''Description:''' | |||
|- | |||
|width="100%" colspan="12" align="center" style="border:1px solid; border-color:#000000; font-size:1em; line-height:1.5em;" valign="top"| | |||
Cutty Sark awaits you! | Cutty Sark awaits you! | ||
|- | |- | ||
! | |rowspan="4" | [[File:X-5newfr.png|800px]] | ||
! | |align="center" style="border:1px solid; border-color:#000000; background: #800c9d; color:#FFFFFF;" colspan="12" | '''Recommended Level:''' | ||
|- | |||
| style="border:1px solid; border-color:#000000;" align="center" colspan="12" | 42-44 | |||
|- | |||
| align="center" style="border:1px solid; border-color:#000000; background: #800c9d; color:#FFFFFF;" colspan="12" | '''Appropriate Item Level:''' | |||
|- | |||
| style="border:1px solid; border-color:#000000;" align="center" colspan="12" | | |||
32 | |||
|- | |||
|valign="top" width="100%" align="center" style="border:1px solid; border-color:#000000; background: #800c9d; color:#FFFFFF;" colspan="12"| '''Dungeon Layout:''' | |||
|- | |||
|width="100%" colspan="12" align="center" style="border:1px solid; border-color:#000000; font-size:1em; line-height:1.5em;" valign="top"| | |||
{{tabs|name=-|tab1=Normal|contents1=[[File:Heart_of_Spire_Map.png]] |tab2=Hard|contents2=[[File:Heart_of_Spire_Map.png]] |tab3=Very Hard|contents3=[[File:Heart_of_Spire_Map.png]]}} | |||
|- | |||
|valign="top" align="center" style="border:1px solid; border-color:#000000; background: #800c9d; color:#FFFFFF;" width="100%" colspan="12"| '''Mobs:''' | |||
|- | |||
| colspan="12" style="border:1px solid; border-color:#000000;" valign="top" width="100%" | | |||
{| cellspacing="0" cellpadding="5" border="1" width="100%" style="border-collapse: collapse;" | |||
|- | |||
! width=60 | Monster Image | |||
! Monster Description | |||
|- | |||
|[[File:Rt1.png|60px]] | |||
|'''Glitter Guard''' - A larger and higher ranked Glitter Soldier. His skin is now red. Has the same combos as the older '''Glitter Spearman''' but after the two spear prods it usually does, it will spin and whack you with its spear as a finisher. Just like its weaker counterpart, it can perform a mid-air counterattack if hit while airborne. | |||
|- | |||
|[[File:GlitterDasher1.png|60px]] | |||
|'''Glitter Dasher''' - A larger and higher ranked Glitter Soldier. His skin is now red. He has the same combos as the older '''Glitter Pounder''' but is now stronger and has less chance of falling down than its lower ranked counterparts. | |||
|- | |||
|[[File:GlitterSniper1.png|60px]] | |||
|'''Glitter Sniper''' - A larger and higher ranked Glitter Soldier. His skin is now red. He has the same moves as the older '''Glitter Archer''' except that he is stronger and slightly faster. | |||
|- | |||
|[[File:Dunno.png|60px]] | |||
|'''Glitter Protector''' - A larger and higher ranked Glitter Soldier. His skin is now red. He has the same moves as the older '''Glitter Defender''', but is now stronger. | |||
|- | |||
|[[File:Rtttt1.png|60px]] | |||
|'''Thunder Fly''' - A stronger version of the '''Lanturn Fly''', but can now stun you if it hits you. | |||
|- | |||
|[[File:Ptttt3x-21.png|60px]] | |||
|'''Mana Eater''' - Eats the mana of any players within range. Defeat it before it runs away to recover 100% mana. | |||
|- | |- | ||
| ''' | |[[File:StoneGargoyle1.png|60px]] | ||
|'''Stone Gargoyle''' - Attacks with high frequency sound waves that can deal substantial damage. | |||
|- | |- | ||
|[[File:Pttt3x-21.png|60px]] | |||
|'''Rage Stone Golem''' - A tall, heavy golem that utilizes slow moves like clapping at you with its huge palms and doing swan dives at you, which can cause flinching and flatten you. These golems can drop from the ceiling (Super Armoured) which can also flatten you if your mental capacity is that low for you to stand there. Super Armour is activated whenever it attacks. It's different from the '''Stone Golem''' as its moves are more like [[X-2|Teach the Tyrant]]. | |||
|} | |} | ||
== | |- | ||
''' | |valign="top" align="center" style="border:1px solid; border-color:#000000; background: #800c9d; color:#FFFFFF;" width="100%" colspan="12"| '''Mini Boss:''' | ||
''' | |- | ||
'' | | colspan="12" style="border:1px solid; border-color:#000000;" valign="top" width="100%" | | ||
''' | *[[File:AssaulterCrash1.png|60px]] | ||
'' | '''Assaulter Crash''' - A heavily armoured Glitter Knight with a humongous hammer. | ||
''' | <br> | ||
''' | '''Moves:''' | ||
<br> | |||
-''Dash:'' The Glitter dashes towards you and can continue to '''Leap Hammer''' or '''Hammer Swing'''. (Super Armored) | |||
<br> | |||
-''Leap Hammer:'' The Glitter jumps and pounds down at you heavily with its hammer. He can continue combo-ing from here. (Super Armored) | |||
<br> | |||
-''Hammer Swing:'' Usually chained from '''Leap Hammer'''. He simply swings his hammer to sideways and knocks you far far away. | |||
== | '''Note:''' | ||
''' | <br> | ||
'''Medieval Flails''' | -You will fight him on Hard or Very Hard. | ||
|- | |||
|valign="top" width="100%" align="center" style="border:1px solid; border-color:#000000; background: #800c9d; color:#FFFFFF;" colspan="12"| '''Obstacles:''' | |||
|- | |||
=== | |width="100%" colspan="12" style="border:1px solid; border-color:#000000; font-size:1em; line-height:1.5em;" valign="top"| | ||
''' | *[[File:MeFla1.png|60px]] | ||
''' | '''Medieval Flails''' - These things hang above pitfalls and sway around dangerously. The good thing about it is that it sometimes helps you injure some of the Stone Gargoyles. | ||
''' | *[[File:Harpoon1.png|60px]] | ||
<br | '''Harpoon''' - Harpoon are mounted on the boss platform, strike them at the right time in order to try and weaken Cutty Sark. | ||
|- | |||
|valign="top" width="100%" align="center" style="border:1px solid; border-color:#000000; background: #800c9d; color:#FFFFFF;" colspan="12"| '''Boss:''' | |||
|- | |||
|width="100%" colspan="12" style="border:1px solid; border-color:#000000; font-size:1em; line-height:1.5em;" valign="top"| | |||
*[[File:Cutty_Sark.jpg|60px]] | |||
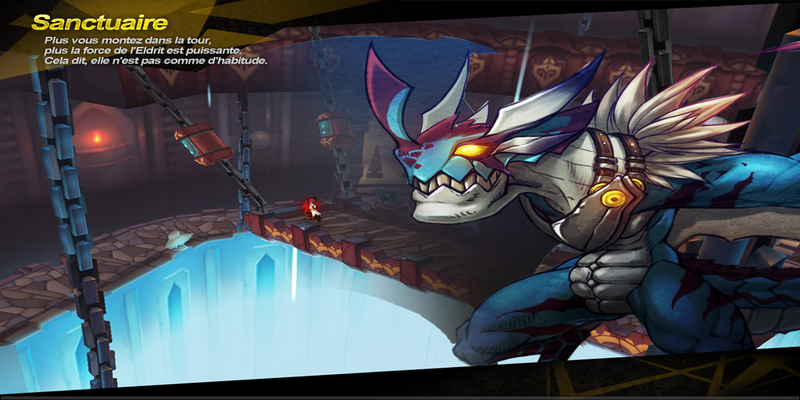
'''Cutty Sark''' - The giant blue Stone Gargoyle. | |||
<br> | |||
'''Moves:''' | |||
<br> | |||
-''Meteor Breath:'' Spits several meteors at the battlefield. It can cause moderate damage if juggled. | |||
== | <br> | ||
This is one of the most challenging maps ever. There are many ways of catching Cutty Sark: | -''Swoop:'' Flies back slightly then swoops down at the battlefield. | ||
<br> | |||
-''Draining Grab:'' Chained from '''Swoop''', the Gargoyle picks you up with its legs and starts draining your health. This will do substantial combo damage. Mana breaking (Counter) can be used to avoid the damage, however Cutty Sark will not let go until he is finished. | |||
<br> | |||
-''Double Swoop:'' The Gargoyle flies up in the air and swoops down twice around the battlefield, causing moderate damage. | |||
<br> | |||
-''Scream:'' The Gargoyle can summon '''Stone Gargoyles''' by screaming. | |||
{| class="wikitable collapsible collapsed" | |||
! style="background:#800c9d; color:#FFFFFF;" colspan="12" | '''Tactics''' | |||
|- | |||
|This is one of the most challenging maps ever. There are many ways of catching Cutty Sark: | |||
====Recommended Method==== | ====Recommended Method==== | ||
Just when Cutty Sark is about to swoop down (after he flies back a little), attack the levers on the ground to fire the huge harpoons installed in the battlefield to hit him. Hit him up to 4 times with the harpoons and Cutty Sark will fall to the battleground with lowered damage reduction and from there, you can skill/spam moves. Be careful as the harpoons launched can still damage you or your teammates.<br/> | Just when Cutty Sark is about to swoop down (after he flies back a little), attack the levers on the ground to fire the huge harpoons installed in the battlefield to hit him. Hit him up to 4 times with the harpoons and Cutty Sark will fall to the battleground with lowered damage reduction and from there, you can skill/spam moves. Be careful as the harpoons launched can still damage you or your teammates.<br/> | ||
| Line 64: | Line 124: | ||
====Third Method==== | ====Third Method==== | ||
Go to the far right or left (depending on where Cutty Sark is) of the platform and wait for Cutty Sark to come underneath one of the harpoons. Once he is underneath one of them you run over to that harpoon and hit it. After the harpoon launches | Go to the far right or left (depending on where Cutty Sark is) of the platform and wait for Cutty Sark to come underneath one of the harpoons. Once he is underneath one of them you run over to that harpoon and hit it. After the harpoon launches, you stay underneath Cutty Sark and see which way he is facing so that you will know which way he is going to attack (if he starts flying backwards while facing the left you just simply dash over to the right side to dodge his attack) | ||
* Note that this could get difficult if Cutty Sark is flying between you and the harpoon (meaning that you can barely reach the harpoon to hit him in time before he gets ready for another attack) | * Note that this could get difficult if Cutty Sark is flying between you and the harpoon (meaning that you can barely reach the harpoon to hit him in time before he gets ready for another attack) | ||
| Line 72: | Line 132: | ||
*If the lag is high enough to deny you that, keep using skills. If he survives afterward (which he most likely will), proceed to use any air tactics if you can reach him, otherwise repeat this method. | *If the lag is high enough to deny you that, keep using skills. If he survives afterward (which he most likely will), proceed to use any air tactics if you can reach him, otherwise repeat this method. | ||
*Not recommended to use any multi-hit moves, since during lag it still activates his super armor faster thanks to more hits registering on his hp bar ''slowly.'' | *Not recommended to use any multi-hit moves, since during lag it still activates his super armor faster thanks to more hits registering on his hp bar ''slowly.'' | ||
|} | |||
|- | |- | ||
|valign="top" align="center" style="border:1px solid; border-color:#000000; background: #800c9d; color:#FFFFFF;" width="50%" colspan="6"| '''Boss Drops:''' | |||
|valign="top" align="center" style="border:1px solid; border-color:#000000; background: #800c9d; color:#FFFFFF;" width="50%" colspan="6"| '''BGMs:''' | |||
|- | |- | ||
| | | colspan="6" style="border:1px solid; border-color:#000000;" valign="top" width="60%" | | ||
| Iron Head | {{tabs|name=1|tab1=Iron Head|contents1={{:X-5Bdrop1}} |tab2=Testament|contents2={{:X-5Bdrop2}}|tab3=Crust Wedge|contents3={{:X-5Bdrop3}}|tab4=Blue Wing Sark|contents4={{:X-5Bdrop4}}}} | ||
| [ | | colspan="6" style="border:1px solid; border-color:#000000;" valign="top" align="center" width="60%" | | ||
=== Dungeon === | |||
''' | [http://www.youtube.com/watch?v=wmSIJd_xxYA '''''music026_stage'''''] | ||
=== Boss === | |||
[http://www.youtube.com/watch?v=rbFD3sWpqs8 '''''music011_boss'''''] | |||
|} | |||
''' | |||
' | |||
|} | |} | ||
<br> | |||
<br | |||
{{Donjons}} | {{Donjons}} | ||
Revision as of 17:12, 20 July 2014
- English
- français
- Bahasa Indonesia
- italiano

The Heart of Spire
| “ | You've headed to the Top of the tower through the Heart of Spire. The energy of El in the tower feels different somehow...
|
” |
| ||||||||||||||||||||||||||||||||||||||||||||||||||||||||||||||||||||||||||||||||||||||||||||||||||||||||||||||||||||||||||||||||||||||||||||||||||||||||||||||||||||||||||||||||||||||||||||||||||||||||||||||||||||||||||||||||||||||||||||||||||||||||


