| Located
|
Monster Image
|
Monster Description
|
Info
|
| 8-1
|
|
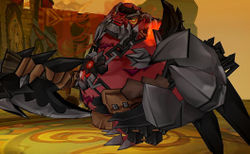
Giant Waldo - One of Karis's minions
|
Moves:
- Bottom Cast: Kicks up a slab of the ground then punches it to send it flying. A scale version of the one used by Berthe, but the rock will lodge itself in the ground after impact and will serve as an obstacle.
- 270 Degree Swing: A quick interrupt-able axe swing, this attack only hits in front of himself, but he always does not targeting his foes first to use this move.
- 270 Degree Power Swing: He will shout and flex before making a slow sweeping swing in super armor state. This attack only hits in front of himself. He will create a Incineration flaming effect similar to Ignition Crow - Incineration after this move. His head becomes wreathed in flames after his shout but it is not yet clear what long term significance this has.
- Dark Energy Release: Releases a blast of dark energy from the pendant on his stomach, which can reach up to a full screen away depending on his current size. Usually he will use this when you are too far of him or as counter.
- Pendant Explosion: An extremely lethal skill that can deal very high damage. He'll only use it when he's at maximum size and will revert to his starting size after use if he is not interrupted.
Notes:
- Has 35 Life Bars (Both Henir and all difficulties).
Drops:
|
| 8-2
|
|
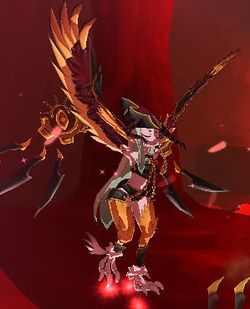
Steel Wing Kelaino - One of Karis's followers who kidnapped the Wind Priestess Anudran.
|
Moves:
- Scratch: She will super armor and fly upwards slightly before coming down to scratch at the player with her claws.
- Steel Dive Bomb: Kelaino will become invincible then launch upwards out of view. She will then perform a heavy dive attack on your location. If hit, the player will be launched away and knocked down. She is able to use this even when stun locked. When landing from this she is momentarily super armored and vulnerable to attack before she is able to take action.
- Retreat: She will fly into the background. She will summon 6 large spears across the length of the stage as well as generate a powerful tornado that will disable all player skills as well as the ability to jump and slowly push them outward from the center of the stage. After a set amount of time, the spears will fall and explode. Will use this skill at 8, 18, and 28 lifebars. May be possible to bypass these points by defeating her within a very short span of time at the start of the battle. Even though she is too high up after positioning herself to target with most attacks, she is not invincible and can still be hit with a sufficiently far reaching attack. This skill often has a safe zone on each side. When Kelaino uses this move the 3rd time, 7 spears will appear instead of 6, meaning one side will not have a safe zone.
- Sandstorm: She will super armor and spin to create four Cyclone(s) similar to that used by the Elemental Master. They will be spaced to both reach the players on the platforms as well as those on the ground behind her.
- Nine Impaling Blades: She will do a somersault in super armor then launch nine blades which will fall down from above in front of herself, one after another. She will occasionally cancel out of this mid-animation into her Retreat where she escapes into the background but this attack will still activate and play out as well.
- Berserk(?): Usually when damaged to around 8 bars of health she will gain a pink aura and appears to become faster, more aggressive, and do 50% more damage. (The entirety of how this effects her is not yet known.)
- Wind Bombing: When at full MP this skill becomes available to her. In a similar style to Shelling Guardian's Carpet Bombing, she will fly across the stage twice, launching two orbs reminiscent in appearance to Super Nova each pass. Each orb can hit multiple times, potentially dealing over 25,000 damage. Each bombing wave will strike 1\2 of the map. The direction of the first bombing wave is random, her second wave will always target the other half of the stage.When she uses this skill, there will be a large Danger warning accompanied with its skill name. She will instantly disappear when initiating this without an animation and start bombing without delay.
Notes:
- Has 35 Life Bars (Both Henir and all difficulties)
- High resistance against all elements in general (roughly 250\500 against everything).
- She will always fly when her health is 7 bars (trap her easily for a combo with Sakra Devanam's ^ZZ).
- Kelaino does not have a stoic threshold. As long as you don't knock her down, she can easily be defeated.
Drops:
|
| 8-3
|
|
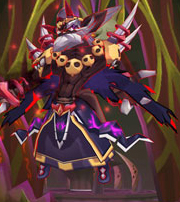
Chieftian Trockta – The possessed leader of the Trocks
|
Moves:
- Swipe: Trockta smacks you with his shaman assistant and cannot interrupted by any attack.
- This move can only interrupt after he swing his shaman assistant.
- Life Drain: Trockta shouts and all players(regardless of position) will be inflicted with Helpless. He then starts absorbing HP from one of them. The Helpless debuff lasts for 6 Seconds.
- He usually aim for the closest player.
- This skill will not kill the player but will leave them with 1HP.
- This move cannot be interrupted, but it can be shielded against with Wonder Wall.
- This move can be destroyed by keep hitting him with enough damage.
- Soul Shield: Trockta shields himself and summons minions to attack. You cannot damage him until you defeat all of the monsters.
- Identified HP thresholds is 25.5 , 15.5 & 5.5 Life bars.
- Dark Pulse: Trockta uses his shaman assistant to shoot a swirling shadow head at you. Trockta usually will use this if you are too far to him.
- Bone Trap: Trockta summons a bone-like cage below you that prevents you from moving. Does substantial damage if his shaman assistant touch Bone Trap.
- This move can easily avoid with do double jump but with timing.
- This move does deal minor damage! Meaning you'll get killed if he use this after he has drained your HP to 1!
Notes:
- Has 35 Life Bars (Both Henir and all difficulties)
- Roughly 250\500 resist to all elements.
Drops:
|
| 8-4
|
|
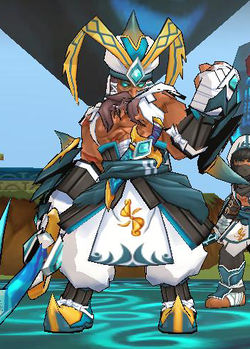
Great Battle Chief Karu – The possessed leader of Calluso Village
|
Moves and Notes:
- Karu's Slash: He will charge momentarily before unleashing a ground running wind blast that will erupt 4 times as it runs along the ground.
- Super Armor is off at 3rd hit and can be easily avoid by pass him and then hit him from behind.
- Quick Teleport: Jumps into the air and comes down near the player.
- He will teleport behind a random player.
- Wind Shield: Creates a magic shield around himself, becoming temporarily invincible for a few seconds and increase his damage by 20%.
- Karu's Sword Split: A multi-hit sword combo, his sword's reach is greatly multiplied by the wind extending from each slash.
- He usually use this move when attacked even getting Suppression : Bond's debuff.
- Wind Explosion: Charges a bright green orb of energy in his hand pulling all players towards him before detonating it.
- This move can easily avoid with do double jump but with timing.
- Wind Punch: Charges his fist with energy then does a boosted punch while sliding forwards significantly. Usually he will use this move after success hitting his foe with Karu's Slash move.
- Wind Thrust: Charges his sword with energy then launches a short ranged energy blast from it.
- Lucent Shredder: Charges his sword with energy then unleashes a spherical slash visually reminiscent to Bloody Accel. Usually he will use this move after success hitting his foe with Karu's Slash move.
Super armor is off before he's releasing a slash.
- Wind Shock: Jumps to the center of the screen and summons four tornadoes that close in from both sides then blows away all players near him with a sword swing.
- Usage of this attack will be signaled with an onscreen danger warning.
Notes:
- Has 35 Life Bars (Both Henir and 7-4)
- Roughly 250\500 resist to all elements.
Drops
|
| 8-5
|
|
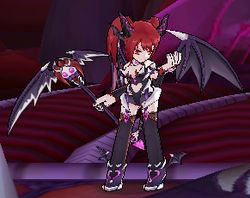
Karis, the Succubus Queen – The Demon mastermind behind Sander's problems.
|
Moves:
- Multiple Slash: Karis jumps forward and swing her scythe rapidly at the players.
- Fatal Hook: Karis jumps and then use her scythe to pull players in front of her.Will inflict helpless.
- Soul Side: Karis channel energy into her scythe then dash forward and release a shockwave similar to Sword Knight's Spiral Blast.
- Dark Sphere: Karis creates a magic circle, constantly damage any players in range then blast them away.
- She usually use this after Multiple Slash:
- Death Striker: Karis call out a rain of dark meteor from the sky similar to Elemental Master's shower but faster and will explode.
- Dark Light: Karis creates a black hole on her scythe, releasing a horde of bats which will constantly damage players.
- Teleport: Karis will teleport to a player side.
- She usually use this if all players are out of her range.
Notes:
- She has 35 Life Bars
Drops
|
| 8-6
|
|
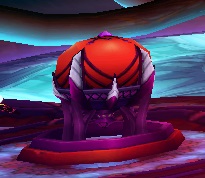
Tentacle Core - The core is connected and protected by Karis and is her weak point.
|
It can summon Crimson Eggs, tentacles, and pillars.
|
| 8-6
|
|
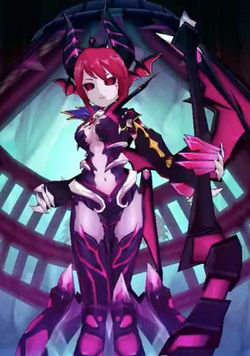
Karis's True Form - The Succubus Queen's True Form.
|
Moves:
- Dark Sphere: Karis launches a dark sphere toward a random player.
- Spectral Light: Karis launches multiple dark spheres that will home into the players.
- Death Slide: Karis creates 6 gigantic scythes then smash them into the ground, launching players into the air. She then call in multiple chains to constantly damage the players.
- Eve and Raven sometimes will not get hit by the second wave of attacks due to their Heavy Weight.
- Death Striker: Likes her original one but the amount of orbs falling down increase in numbers, size but decrease their falling speed. The orbs fall randomly but can cover the whole map.
- Retreat: Karis call out a hordes of Living Trock minions then hide her core away.
- Sometimes Karis will continue to fight even after summoning her minions.
Notes:
- She has 40 Life Bars
Drops:
|


