UI Guide/ko: Difference between revisions
m (Text replacement - "UI Revamp" to "UI Guide") |
m (Removed current context > copy+pasted NA version for translation) |
||
| Line 1: | Line 1: | ||
{{Languages|UI Guide}} | {{Languages|UI Guide}} | ||
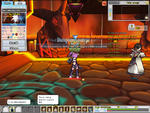
== UI | The '''User Interface''' provides information at a glance for your convenience, as well as access to numerous options and menus, through the use of visual indicators. It can be fully hidden by pressing the '''[Delete]''' key. | ||
== UI Guide == | |||
[[File:UI2016.png|thumb|600px|An overview of the user interface]] | |||
===Character Information=== | |||
Your character's username, Level (El Resonance Level), Resurrection Stone Count, HP, MP, Awakening Orbs, and other information is displayed in the top-left corner of your screen. Certain characters may display additional information depending on their [[Character Systems|Character System]]. If you currently have a [[Pet Guide|Pet]] summoned, its hunger and MP will be displayed underneath your character's portrait, as well as pet's quick slot. | |||
===Channel/Location=== | |||
The channel you are currently in, as well as your location within the game, will be displayed in the top-right of your screen. By clicking on the arrow next to your current channel, you can quickly select another channel to switch to, without exiting back to the menu (Can only be used in towns). | |||
===Buffs and Debuffs=== | |||
:''Main Article: [[Status Effects]]''<br> | |||
Your current Buffs and Debuffs are displayed just underneath your Channel/Location info. Small icons will appear to indicate the buffs and/or debuffs your character currently has, which can be hovered over to view additional info, as well as an accompanying timer to signify how much longer the effect will last. Server-wide buffs/benefits that affect every player, are listed in the top-center of the screen. the display can be moved freely around the screen and be flipped. | |||
== | ===Active Quests=== | ||
[[File: | :''Main Article: [[Quests]]''<br> | ||
Up to 7 of your currently active Quests will be displayed here, in order to easily track your progress. Upon completion of a quest, you are given the option to [[File:QuickClear.png]] a quest with a single click while in a town or field. Clicking on a quest will bring up the full information of it in the quest menu. To hide your active quests from your UI, you can disable it from the quest menu, or by pressing the '''[TAB]''' key. | |||
== | ===Events=== | ||
[[File: | Events are temporary activities that you can participate in for various rewards and benefits. Information about ongoing events can usually be found by hovering over, or clicking on event icons at the top of your screen. | ||
===Minimap=== | |||
==== Share ==== | |||
{| cellspacing="0" cellpadding="5" border="1" align="center" style="border-collapse: collapse; text-align: center" | |||
| [[File:Minimap Icon - Character.png]] || [[File:Minimap Icon - Party Member.png]] || [[File:Minimap Icon - Summon Unit.png]] || [[File:Minimap Icon - Door.png]] | |||
|- | |||
| My Character || Party Member || Summon Unit || Portal | |||
|} | |||
== | ==== Villages & Rest Areas ==== | ||
{| cellspacing="0" cellpadding="5" border="1" align="center" style="border-collapse: collapse; text-align: center" | |||
[[File: | | [[File:Minimap Icon - Ariel.png]] || [[File:Minimap Icon - Camilla.png]] || [[File:Minimap Icon - Luriel.png]] || [[File:Minimap Icon - Adams.png]] || [[File:Minimap Icon - Myu.png]] || [[File:Minimap Icon - Board.png]] || [[File:Minimap Icon - Mailbox.png]] || [[File:Minimap Icon - Blacksmith.png]] || [[File:Minimap Icon - Alchemist.png]] || [[File:Minimap Icon - Accessory Shop.png]] || [[File:Minimap Icon - Glave.png]] || [[File:Minimap Icon - Helen.png]] || [[File:Minimap Icon - Buff.png]] | ||
[[File: | |- | ||
| [[Ariel]] || [[Camilla]] || [[Luriel]] || [[Adams]] || [[Myu]] || Board || Mailbox || [[Blacksmith]] || [[Alchemist]] || Accessory Shop || [[Glave]] || [[Helen]]<br>([[Elrios Hot Springs|Elrios Hot Springs]]) || [[Purified Spirit & Shy Spirit|Shy Spirit]], [[Charming Geyser|Sirena]],<br>[[Tiny Spirit]], [[Asella]] | |||
|} | |||
==== Dungeons & Hunting Fields ==== | |||
{| cellspacing="0" cellpadding="5" border="1" align="center" style="border-collapse: collapse; text-align: center" | |||
| [[File:Minimap Icon - Mini Boss.png]] || [[File:Minimap Icon - Boss.png]] || [[File:Minimap Icon - Dungeon Door.png]] | |||
|- | |||
| Mini Boss,<br>Field Boss || Boss || Door | |||
|} | |||
The minimap indicates nearby NPCs and Party Members in towns. In dungeons, it will also display the number of remaining mobs in an area. You can click the 'M' button next to the minimap to view the Town/World map, or by pressing the '''[M]''' key. Pressing the key in a Dungeon will display the Dungeon map. Mail information, time to get event rewards (if there is an event), and item durability warnings are displayed next to the minimap. A repair option will appear here when your equipment durability is low, allowing you to repair it mid-dungeon, although repairing using this method costs significantly more than at a blacksmith. | |||
=== | ===Menu=== | ||
[[File: | {| cellspacing="0" cellpadding="5" border="1" align="center" style="border-collapse: collapse; text-align: center" | ||
<br> | | [[File:Cobo Express Icon.png]] || [[File:Character Icon.png]] || [[File:Inventory Icon.png]] || [[File:Profession Icon.png]] || [[File:Pet Icon.png]] || [[File:Skill Icon.png]] || [[File:Quest Icon.png]] || [[File:Life Icon.png]] || [[File:Guild Icon.png]] || [[File:Community Icon.png]] || [[File:Options Icon.png]] || [[File:Events Icon.png]] || [[File:Cash Shop Icon.png]] | ||
|- | |||
| Cobo Express<br>'''[']''' || Character<br>'''[U]''' || Inventory<br>'''[I]''' || [[Profession_System|Profession]]<br>'''[J]''' || [[Pet_Guide|Pet]]<br>'''[P]''' || [[Skills|Skill]]<br>'''[K]''' || [[Story|Quest]]<br>'''[L]''' || [[Life Content]]<br>'''{{tt|[ ]|No default keybind. Individual keybinds for [[Fishing]] and [[Pet Expedition]] can be set manually from the 'Set Custom Keyboard' menu.}}''' || [[Guild]]<br>'''[,]''' || Community<br>'''[0] [Y] [H]''' || Options<br>'''[O] [ESC]''' || Events || [[Item Mall]] | |||
|} | |||
== | ==== Event / Old Menu ==== | ||
{| cellspacing="0" cellpadding="5" border="1" align="center" style="border-collapse: collapse; text-align: center" | |||
| [[File:Jump Event Icon.png|30px]] || [[File:Album Icon CN.png|30px]] || [[File:El Mission Icon.png|30px]] || [[File:Friend Invitation Icon.png|30px]] || [[File:Friend Invitation2 Icon.png|30px]] || [[File:Elrios Aim Icon.png]] || [[File:Bingo Icon.png|30px]] || [[File:Elrios Guide Icon.png|30px]] || [[File:Story Icon.png]] | |||
|- | |||
| Jumping Event || Album || El Mission || Friend Invitation || Friend Invitation || Elrios Aim || [[Bingo]] || Elrios Guide<br>'''[F12]''' || [[Story/Side Story|Story]] | |||
|} | |||
''' | ==Character== | ||
[[File:UI - Character.png|270px|right|thumb|Character overview window.]] | |||
[[ | The '''Character''' screen is an overview of information about your character. Here you can manage your equipment and costumes, which can be equipped/unequipped by dragging and dropping, or right-clicking. You can also select other options to further strengthen, or customize your character, as well as view your normal or '''[[El Resonance]]''' level, and guild name.<br/> | ||
''' | Currently worn '''[[Titles|Title]]''' is shown in the top right corner of the window, from where it can also be changed. The section under your slots consists of a button that opens up '''[[Preset System]]''' settings, a light bulb icon that allows you to switch between the light and the dark style of the UI and equipment page pagination buttons in between.<br/> | ||
[[ | Your character's Combat Power, Defensive Power, and '''[[Attributing Equipment|Elemental Resistances]]''' are displayed in the lower portion of the window. More detailed information about your current stats can be accessed by clicking the magnifying glass button next to your Defensive Power. Also, there is another row in between that briefly recaps your PvP/Ereda progress, allowing you to look up more comprehensive data, including i.e. your win rate against a certain character. | ||
{{clearfix}} | |||
==Skill/Item Slots== | |||
:''Main Article: [[Skills]]''<br> | |||
The Skill Slots are where you equip your Skills to use in combat. 8 slots are available at the start, and advancing to [[Transcendence]] unlocks two additional Skill Slots. Upon unlocking either of your Hyper Active Skills, a Hyper Active Skill Slot will be unlocked, which can only be occupied by Hyper Active Skills. Advancing to [[3rd Jobs]] unlocks an additional 5 slots that can be accessed by pressing the spacebar. This is primarily used for [[Force Skills]], however normal Skills can be equipped here as well. Despite this, you may only carry a maximum of 10 normal Skills and 5 Force Skills at a time. Advancing to [[Master Class]] will unlock your Master Skill Slot, which can only be occupied by Master Skills. | |||
===Quick Slots=== | |||
'''Quick Slots''' are used to equip consumable items from your inventory, such as potions, food, drinks, [[Monster Card System|Monster Cards]], and other consumables. These items can only be used during gameplay if they are equipped to one of your Quick Slots, and will trigger the item's cooldown when swapping items in a field or dungeon. Equipping them in a town or resting area, skips the cooldown. | |||
===Customization=== | |||
Your Skill Slots, Quick Slots, [[Character Systems|special slots]], and buff list can all be resized and freely moved around on your screen. They can be reset back to their default sizes and positions by pressing the reset buttons in the options menu. | |||
[[ | |||
==Chat== | |||
[[Image:HQ Shop Item 212360.png|thumb|Extreme Nasod Mega-<br>phone]] | |||
===Megaphone Chat=== | |||
By using a '''Nasod Megaphone''', you can broadcast a message that is visible to everyone in channel you are currently in. The '''Extreme Nasod Megaphone''' works the same way, but instead broadcasts your message across the entire server (All Channels). These messages will appear in the Megaphone Chat, along with the current channel the user sent it from shown next to their name. Megaphones are obtained from the '''Item Mall''', [[Ariel]], trading, or events. | |||
===Chat=== | |||
[[Image:UICHATOPTIONS.png|thumb|Chat window settings.]]The chat box displays chat messages, announcements, system messages, whispers, [[Quick Voice]] messages, EXP/ED information, [[Mentor-Pupil System|Mentor Search Alarm]], Raid clear notification, item use/obtain messages and Couple/Marriage messages. There are multiple chat tabs in which you can switch to, in order to view specific types of chat messages only. These include: | |||
*'''All:''' view all chat messages and notifications. | |||
*'''Party:''' show only party chat; | |||
*'''Guild:''' show only guild chat; | |||
*'''Whisper:''' show only whispers you have sent/received; | |||
*'''Custom:''' display messages of the player's choice (display all by default). | |||
Additionally, you can adjust the font size and the background opacity of the chat window, as well as resize and move it. | |||
===Customization=== | |||
By clicking on the gear icon within the currently active chat tab, you can further customize what content you would prefer to be visible in it, by toggling the options to your liking. The chat box can be resized vertically and moved around freely to your liking. You can lock the chat box in place by click the lock icon, or hide it completely by clicking the speech bubble icon next to it. Doing so however, does not hide megaphone or mentor announcements. | |||
==Begin Playing== | |||
===Starting A Dungeon=== | |||
:''Main Article: [[Dungeons]]''<br> | |||
By clicking the '''Dungeon''' button, you can select the region and dungeon in which you wish to play in, granted you have them unlocked. Dungeons that are grayed out cannot be accessed until you unlock them by meeting the requirement(s), and complete all dungeons leading up to it in that region. Some will not be accessible at certain times, such as [[Secret Dungeon|Secret Dungeons]] being exclusive to 2 days of the week each or Giant Boss dungeons appearing every 2 hours. | |||
<br> | |||
[[File:DungeonSelect.png|center]] | |||
<br> | <br> | ||
On the majority of dungeons, you have the option to either automatically queue up for a party, by pressing the larger '''Start Dungeon (F8)''' button, or immediately enter as-is with '''Start with current members'''. When queuing, you are required to meet the minimum Appropriate Combat Power, as well as at least be in the level range for that dungeon in order to start. The latter option bypasses the level requirement but not the Combat Power one. | |||
Only 95% of the Combat Power requirement is needed to enter the dungeon. Do note that meeting the minimum Combat Power requirements does not guarantee that the dungeon can be cleared with an ease and within a convenient amount of time, if at all. | |||
== | ===Indicators=== | ||
[[File:Pvp 7.jpg|thumb|200px|Arena interface]] | |||
Sometimes dungeons, and region tabs will be marked with specific icons. | |||
*Dungeons and Regions marked with a '''(Q)''' indicate that an active quest is available there. | |||
*Dungeons with limited time entries with have timers next to them, indicating how long entry is available for, or how long until it will be opened. | |||
*Raid dungeons display small empty or filled beads under their icons indicating clear progress. | |||
<br> | ===Starting a PvP Match=== | ||
:''Main Article: [[PvP]]''<br> | |||
Entering a PvP match is much the same as entering a dungeon. By clicking the '''Arena''' button, you may select your preferences for combat, such as number of competitors, map exceptions, as well your progress towards your next rank. | |||
== | ==Community== | ||
[[ | The community tabs enable you to easily find other plays, and view information about their character, as well as see which of your friends are online. Players who are [[Wedding System|Coupled or Married]], can also access features on the couples tab. [[Mentor-Pupil System]] options and information are also available within the community tabs. | ||
===All=== | |||
The '''All''' tab allows you to see every player that is currently in the same location as you currently are in, along with their username, character icon, and their level. You can interact with players from this menu, such as viewing their equipment, adding them as a friend, or challenging them to a duel. It should be noted that a number of features require you to be standing close to the other player in order for them to work. | |||
=== | |||
===Friend=== | |||
=== | The '''Friend''' tab, gives you a list of all or your added friends, and shows you when they are online or offline. From here you can initiate a private chat between friends, which opens up an independent chat window that can be closed or minimized. You will receive a notification upon receiving messages from friends, which can be accessed by clicking on the community button. | ||
''' | |||
''' | |||
<br> | ===Couple/Marriage=== | ||
:''Main Article: [[Wedding System]]''<br> | |||
The '''Couple/Marriage''' tab allows you to see a full render of yourself, and your partner, as well as their current status and location. Married couples will have an option to request their partner to teleport to their exact location for free. Couples who wish to break up will also have the option to do so from this menu, for a fee. | |||
== | ===Forming a Party=== | ||
Forming a party allows you to play together with other players. There are multiple ways to form a party. | |||
*Right-click on your character or portrait and select "Add Party", then type in a name. | |||
*Accessing the Community '''[0]''', Friends '''[Y]''', or Guild window and inviting someone from the player lists. | |||
*Right-clicking on a player in a town or field, and selecting "Party Invite". | |||
*Using the [[Party List System]]. | |||
== | ==Gallery== | ||
<gallery widths=150px heights=150px> | |||
File:RubenVillageMenu.jpg|Example of the KR beta village UI circa 2007. | |||
File:OldDungeonUI.jpg|Old dungeon UI used between 2007 ~ 2009 (KR) | |||
File:OlderCharacterUI.jpg|Old character UI used between 2007 ~ 2008 (KR) | |||
File:OldCharacterUI.jpg|Old character UI used between 2008 ~ 2009 (KR) | |||
File:OldUIExample.png|Old UI used between 2009 ~ 2012 (KR) and 2011 ~ 2013 (NA) | |||
</Gallery> | |||
==Trivia== | |||
*During early beta versions of the KR version of the game, most of the entire game functioned through a menu UI. Villages were all simply select screens where you choose which options you'd like to use, rather than a fully rendered village to walk around in. | |||
<br/> | |||
==Updates== | |||
{| cellpadding="5" border="1" style="border-collapse: collapse; text-align: center" | |||
|- style="background-color: {{ColorSel|Misc}}" | |||
! colspan=2 | Date !! rowspan=2 | Changes | |||
|- style="background-color: {{ColorSel|Misc}}" | |||
! KR !! NA | |||
|- | |||
| 08/11/2012 || 06/04/2013 || align="left" | | |||
*UI revamped. | |||
|- | |||
| 12/06/2018 || - || align="left" | | |||
*Character Information UI revamped. | |||
|- | |||
| 11/25/2021 || - || align="left" | | |||
*Dungeon/Match start/new quest/village enter images, Chat, <br/>Cobo Transportion Service and several dialog boxes UI revamped. | |||
|} | |||
<br> | <br> | ||
{{Guides}} | |||
{{ | |||
Revision as of 09:50, 26 December 2022
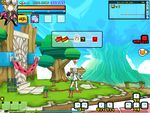
The User Interface provides information at a glance for your convenience, as well as access to numerous options and menus, through the use of visual indicators. It can be fully hidden by pressing the [Delete] key.
UI Guide

Character Information
Your character's username, Level (El Resonance Level), Resurrection Stone Count, HP, MP, Awakening Orbs, and other information is displayed in the top-left corner of your screen. Certain characters may display additional information depending on their Character System. If you currently have a Pet summoned, its hunger and MP will be displayed underneath your character's portrait, as well as pet's quick slot.
Channel/Location
The channel you are currently in, as well as your location within the game, will be displayed in the top-right of your screen. By clicking on the arrow next to your current channel, you can quickly select another channel to switch to, without exiting back to the menu (Can only be used in towns).
Buffs and Debuffs
- Main Article: Status Effects
Your current Buffs and Debuffs are displayed just underneath your Channel/Location info. Small icons will appear to indicate the buffs and/or debuffs your character currently has, which can be hovered over to view additional info, as well as an accompanying timer to signify how much longer the effect will last. Server-wide buffs/benefits that affect every player, are listed in the top-center of the screen. the display can be moved freely around the screen and be flipped.
Active Quests
- Main Article: Quests
Up to 7 of your currently active Quests will be displayed here, in order to easily track your progress. Upon completion of a quest, you are given the option to ![]() a quest with a single click while in a town or field. Clicking on a quest will bring up the full information of it in the quest menu. To hide your active quests from your UI, you can disable it from the quest menu, or by pressing the [TAB] key.
a quest with a single click while in a town or field. Clicking on a quest will bring up the full information of it in the quest menu. To hide your active quests from your UI, you can disable it from the quest menu, or by pressing the [TAB] key.
Events
Events are temporary activities that you can participate in for various rewards and benefits. Information about ongoing events can usually be found by hovering over, or clicking on event icons at the top of your screen.
Minimap
| My Character | Party Member | Summon Unit | Portal |
Villages & Rest Areas
| Ariel | Camilla | Luriel | Adams | Myu | Board | Mailbox | Blacksmith | Alchemist | Accessory Shop | Glave | Helen (Elrios Hot Springs) |
Shy Spirit, Sirena, Tiny Spirit, Asella |
Dungeons & Hunting Fields
| Mini Boss, Field Boss |
Boss | Door |
The minimap indicates nearby NPCs and Party Members in towns. In dungeons, it will also display the number of remaining mobs in an area. You can click the 'M' button next to the minimap to view the Town/World map, or by pressing the [M] key. Pressing the key in a Dungeon will display the Dungeon map. Mail information, time to get event rewards (if there is an event), and item durability warnings are displayed next to the minimap. A repair option will appear here when your equipment durability is low, allowing you to repair it mid-dungeon, although repairing using this method costs significantly more than at a blacksmith.
Menu
| Cobo Express ['] |
Character [U] |
Inventory [I] |
Profession [J] |
Pet [P] |
Skill [K] |
Quest [L] |
Life Content No default keybind. Individual keybinds for Fishing and Pet Expedition can be set manually from the 'Set Custom Keyboard' menu. [ ] |
Guild [,] |
Community [0] [Y] [H] |
Options [O] [ESC] |
Events | Item Mall |
Event / Old Menu
| Jumping Event | Album | El Mission | Friend Invitation | Friend Invitation | Elrios Aim | Bingo | Elrios Guide [F12] |
Story |
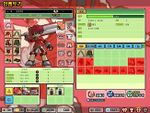
Character

The Character screen is an overview of information about your character. Here you can manage your equipment and costumes, which can be equipped/unequipped by dragging and dropping, or right-clicking. You can also select other options to further strengthen, or customize your character, as well as view your normal or El Resonance level, and guild name.
Currently worn Title is shown in the top right corner of the window, from where it can also be changed. The section under your slots consists of a button that opens up Preset System settings, a light bulb icon that allows you to switch between the light and the dark style of the UI and equipment page pagination buttons in between.
Your character's Combat Power, Defensive Power, and Elemental Resistances are displayed in the lower portion of the window. More detailed information about your current stats can be accessed by clicking the magnifying glass button next to your Defensive Power. Also, there is another row in between that briefly recaps your PvP/Ereda progress, allowing you to look up more comprehensive data, including i.e. your win rate against a certain character.
Skill/Item Slots
- Main Article: Skills
The Skill Slots are where you equip your Skills to use in combat. 8 slots are available at the start, and advancing to Transcendence unlocks two additional Skill Slots. Upon unlocking either of your Hyper Active Skills, a Hyper Active Skill Slot will be unlocked, which can only be occupied by Hyper Active Skills. Advancing to 3rd Jobs unlocks an additional 5 slots that can be accessed by pressing the spacebar. This is primarily used for Force Skills, however normal Skills can be equipped here as well. Despite this, you may only carry a maximum of 10 normal Skills and 5 Force Skills at a time. Advancing to Master Class will unlock your Master Skill Slot, which can only be occupied by Master Skills.
Quick Slots
Quick Slots are used to equip consumable items from your inventory, such as potions, food, drinks, Monster Cards, and other consumables. These items can only be used during gameplay if they are equipped to one of your Quick Slots, and will trigger the item's cooldown when swapping items in a field or dungeon. Equipping them in a town or resting area, skips the cooldown.
Customization
Your Skill Slots, Quick Slots, special slots, and buff list can all be resized and freely moved around on your screen. They can be reset back to their default sizes and positions by pressing the reset buttons in the options menu.
Chat

phone
Megaphone Chat
By using a Nasod Megaphone, you can broadcast a message that is visible to everyone in channel you are currently in. The Extreme Nasod Megaphone works the same way, but instead broadcasts your message across the entire server (All Channels). These messages will appear in the Megaphone Chat, along with the current channel the user sent it from shown next to their name. Megaphones are obtained from the Item Mall, Ariel, trading, or events.
Chat

The chat box displays chat messages, announcements, system messages, whispers, Quick Voice messages, EXP/ED information, Mentor Search Alarm, Raid clear notification, item use/obtain messages and Couple/Marriage messages. There are multiple chat tabs in which you can switch to, in order to view specific types of chat messages only. These include:
- All: view all chat messages and notifications.
- Party: show only party chat;
- Guild: show only guild chat;
- Whisper: show only whispers you have sent/received;
- Custom: display messages of the player's choice (display all by default).
Additionally, you can adjust the font size and the background opacity of the chat window, as well as resize and move it.
Customization
By clicking on the gear icon within the currently active chat tab, you can further customize what content you would prefer to be visible in it, by toggling the options to your liking. The chat box can be resized vertically and moved around freely to your liking. You can lock the chat box in place by click the lock icon, or hide it completely by clicking the speech bubble icon next to it. Doing so however, does not hide megaphone or mentor announcements.
Begin Playing
Starting A Dungeon
- Main Article: Dungeons
By clicking the Dungeon button, you can select the region and dungeon in which you wish to play in, granted you have them unlocked. Dungeons that are grayed out cannot be accessed until you unlock them by meeting the requirement(s), and complete all dungeons leading up to it in that region. Some will not be accessible at certain times, such as Secret Dungeons being exclusive to 2 days of the week each or Giant Boss dungeons appearing every 2 hours.

On the majority of dungeons, you have the option to either automatically queue up for a party, by pressing the larger Start Dungeon (F8) button, or immediately enter as-is with Start with current members. When queuing, you are required to meet the minimum Appropriate Combat Power, as well as at least be in the level range for that dungeon in order to start. The latter option bypasses the level requirement but not the Combat Power one.
Only 95% of the Combat Power requirement is needed to enter the dungeon. Do note that meeting the minimum Combat Power requirements does not guarantee that the dungeon can be cleared with an ease and within a convenient amount of time, if at all.
Indicators
Sometimes dungeons, and region tabs will be marked with specific icons.
- Dungeons and Regions marked with a (Q) indicate that an active quest is available there.
- Dungeons with limited time entries with have timers next to them, indicating how long entry is available for, or how long until it will be opened.
- Raid dungeons display small empty or filled beads under their icons indicating clear progress.
Starting a PvP Match
- Main Article: PvP
Entering a PvP match is much the same as entering a dungeon. By clicking the Arena button, you may select your preferences for combat, such as number of competitors, map exceptions, as well your progress towards your next rank.
Community
The community tabs enable you to easily find other plays, and view information about their character, as well as see which of your friends are online. Players who are Coupled or Married, can also access features on the couples tab. Mentor-Pupil System options and information are also available within the community tabs.
All
The All tab allows you to see every player that is currently in the same location as you currently are in, along with their username, character icon, and their level. You can interact with players from this menu, such as viewing their equipment, adding them as a friend, or challenging them to a duel. It should be noted that a number of features require you to be standing close to the other player in order for them to work.
Friend
The Friend tab, gives you a list of all or your added friends, and shows you when they are online or offline. From here you can initiate a private chat between friends, which opens up an independent chat window that can be closed or minimized. You will receive a notification upon receiving messages from friends, which can be accessed by clicking on the community button.
Couple/Marriage
- Main Article: Wedding System
The Couple/Marriage tab allows you to see a full render of yourself, and your partner, as well as their current status and location. Married couples will have an option to request their partner to teleport to their exact location for free. Couples who wish to break up will also have the option to do so from this menu, for a fee.
Forming a Party
Forming a party allows you to play together with other players. There are multiple ways to form a party.
- Right-click on your character or portrait and select "Add Party", then type in a name.
- Accessing the Community [0], Friends [Y], or Guild window and inviting someone from the player lists.
- Right-clicking on a player in a town or field, and selecting "Party Invite".
- Using the Party List System.
Gallery
-
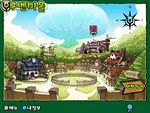
Example of the KR beta village UI circa 2007.
-
Old dungeon UI used between 2007 ~ 2009 (KR)
-
Old character UI used between 2007 ~ 2008 (KR)
-
Old character UI used between 2008 ~ 2009 (KR)
-
Old UI used between 2009 ~ 2012 (KR) and 2011 ~ 2013 (NA)


Trivia
- During early beta versions of the KR version of the game, most of the entire game functioned through a menu UI. Villages were all simply select screens where you choose which options you'd like to use, rather than a fully rendered village to walk around in.
Updates
| Date | Changes | |
|---|---|---|
| KR | NA | |
| 08/11/2012 | 06/04/2013 |
|
| 12/06/2018 | - |
|
| 11/25/2021 | - |
|
