Nature's Force System: Difference between revisions
No edit summary |
No edit summary |
||
| Line 7: | Line 7: | ||
== Nature's Force == | == Nature's Force == | ||
[[Image:Ns1.png]]<br> | [[Image:Ns1.png]]<br> | ||
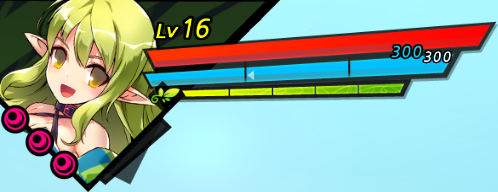
On 01/02/2014 in the Korean server, [[Rena]] received a new system, the '''Nature's Force''' system. '''Nature's Force''' is a system exclusive to only elves. The system interface is indicated below the MP bar. The orbs are indicated in game as '''NF.''' | On 01/02/2014 in the Korean server, [[Rena]] received a new system, the '''Nature's Force''' system. '''Nature's Force''' is a system exclusive to only elves. The system interface is indicated below the MP bar. The orbs are indicated in-game as '''NF.''' | ||
<br> | <br> | ||
=== How to obtain NF (Nature Orbs) === | |||
Rena is able to fill up the NF gauge by hitting targets with basic kicks, arrow commands, and Active skills. 1 NF is obtained for every 3 commands landed on a target. Even if a command deals multiple hits, it will only count as one command. For example, using {{CDRU}}{{CX}}{{CX}}{{CX}} counts as three commands despite dealing up to five hits. | |||
NF can also be obtained by entering [[Awakening Mode]], which will recover five NF. Any excess NF will grant 15 MP each. Entering [[Awakening Mode]] with three beads will also set your NF Gauge to five NF permanently for the entire duration of Awakening. | |||
Entering [[Awakening Mode | |||
As the bars fill, certain graphical effects will surround Rena: | As the bars fill, certain graphical effects will surround Rena: | ||
| Line 27: | Line 21: | ||
*4 NF: A second orb appears. It has the same appearance as the previous stage. | *4 NF: A second orb appears. It has the same appearance as the previous stage. | ||
*5 NF: A third orb appears. Same appearance. | *5 NF: A third orb appears. Same appearance. | ||
**Since the number of orbs | **Since the number of orbs does not match the number of bars filled, they aren't a good indicator of your gauge's current status. | ||
[[Image:NF2.png]] | [[Image:NF2.png]] | ||
<br> | <br> | ||
=== Nature's Force Buff === | |||
[[Image:Ns4.png|300px|right]] | [[Image:Ns4.png|300px|right]] | ||
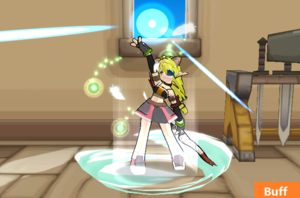
When Rena has at least one NF in her gauge, she gains a passive buff that increases Critical Chance, Critical Damage, Elemental Resistance, arrow MP gain and decreases her arrow MP usage. The effects are amplified if she possesses more NF. | |||
When | |||
<br> | <br> | ||
=== Nature's Force Damage Boost === | === Nature's Force Damage Boost === | ||
[[Image:NF5.png|300px|right]] | [[Image:NF5.png|300px|right]] | ||
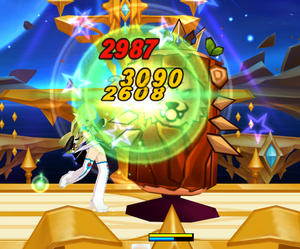
When | When Rena has at least one NF in her gauge, she is able to boost the damage done by commands. Most of her combos can use up one NF on the last command to deal an additional, non-flinching hit to the target. This does not apply to combos with only one command, such as {{CU}}{{CZ}}. No NF is consumed if no targets are hit by the command. Some commands can also consume multiple NF to deal multiple hits, such as Rena's {{CX}}{{CX}}{{CX}}({{CUX}}/{{CDX}}) consuming one NF for each of the 3 arrows. | ||
Most of her combos | |||
NF can also be consumed by most Special Actives to trigger an additional blast on their first hit. The number of NF consumed will vary for each skill but the damage of the blast will increase for each NF consumed. | |||
The | |||
=== List of NF Consumption Skills === | |||
{| cellpadding="3" style="border-collapse: collapse; border: 0px solid rgb(0, 0, 0); width=100%; valign=top;" | {| cellpadding="3" style="border-collapse: collapse; border: 0px solid rgb(0, 0, 0); width=100%; valign=top;" | ||
|- | |- | ||
| Line 56: | Line 45: | ||
|- | |- | ||
| width="40" | [[Image:Rail Stinger.PNG]]<br> | | width="40" | [[Image:Rail Stinger.PNG]]<br> | ||
| width="150" | [[Rail Stinger]]<br>: 1 | | width="150" | [[Rail Stinger]]<br>: 1 NF | ||
|- | |- | ||
| width="40" | [[Image:Perfect Strom.PNG]] | | width="40" | [[Image:Perfect Strom.PNG]] | ||
| width="150" | [[Perfect Storm]]<br>: 2 | | width="150" | [[Perfect Storm]]<br>: 2 NF | ||
|- | |- | ||
| width="40" | [[Image:Aero Tornado.PNG]] | | width="40" | [[Image:Aero Tornado.PNG]] | ||
| width="150" | [[Aero Tornado]]<br>: 3 | | width="150" | [[Aero Tornado]]<br>: 3 NF | ||
|- | |- | ||
| width="40" | [[Image:Assault Kick.PNG]]<br> | | width="40" | [[Image:Assault Kick.PNG]]<br> | ||
| width="150" | [[Assault Kick]]<br>: 1 | | width="150" | [[Assault Kick]]<br>: 1 NF | ||
|- | |- | ||
| width="40" | [[Image:Phoenix Strike.PNG]] | | width="40" | [[Image:Phoenix Strike.PNG]] | ||
| width="150" | [[Phoenix Strike]]<br>: 3 | | width="150" | [[Phoenix Strike]]<br>: 3 NF | ||
|} | |} | ||
| Line 77: | Line 66: | ||
|- | |- | ||
| width="40" | [[Image:Crecent Kick.png]] | | width="40" | [[Image:Crecent Kick.png]] | ||
| width="150" | [[Crescent Kick]] ([[Crescent Kick (Force)|Force]])<br>: 2 | | width="150" | [[Crescent Kick]] ([[Crescent Kick (Force)|Force]])<br>: 2 NF | ||
|- | |- | ||
| width="40" | [[Image:Spinning Kick.png]] | | width="40" | [[Image:Spinning Kick.png]] | ||
| width="150" | [[Spinning Kick]] ([[Spinning Kick (Force)|Force]])<br>: 1 | | width="150" | [[Spinning Kick]] ([[Spinning Kick (Force)|Force]])<br>: 1 NF | ||
|- | |- | ||
| width="40" | [[Image:TAI-HO-MING.png]] | | width="40" | [[Image:TAI-HO-MING.png]] | ||
| width="150" | [[Dive Kick Bombing]] ([[Dive Kick Bombing (Force)|Force]])<br>: 3 | | width="150" | [[Dive Kick Bombing]] ([[Dive Kick Bombing (Force)|Force]])<br>: 3 NF | ||
|- | |- | ||
| width="40" | [[File:Violent Attack.PNG]] | | width="40" | [[File:Violent Attack.PNG]] | ||
| width="150" | [[Violent Attack]] ([[Violent Attack (Force)|Force]])<br>: 3 | | width="150" | [[Violent Attack]] ([[Violent Attack (Force)|Force]])<br>: 3 NF | ||
|- | |- | ||
| width="40" | [[Image:SHOCK HO.png]] | | width="40" | [[Image:SHOCK HO.png]] | ||
| width="150" | [[Sharp Fall]] ([[Sharp Fall (Force)|Force]])<br>: 2 | | width="150" | [[Sharp Fall]] ([[Sharp Fall (Force)|Force]])<br>: 2 NF | ||
|- | |- | ||
| width="40" | [[Image:WSs1.png]] | | width="40" | [[Image:WSs1.png]] | ||
| width="150" | [[Slide Double Kick]]<br>: 1 | | width="150" | [[Slide Double Kick]]<br>: 1 NF | ||
|- | |- | ||
| width="40" | [[File:WSTrans1.png]] | | width="40" | [[File:WSTrans1.png]] | ||
| width="150" | [[Spinning Crescent]]<br>: 1 | | width="150" | [[Spinning Crescent]]<br>: 1 NF | ||
|- | |- | ||
| width="40" | [[File:WSTrans3.png]] | | width="40" | [[File:WSTrans3.png]] | ||
| width="150" | [[Gyro Kick]]<br>: 2 | | width="150" | [[Gyro Kick]]<br>: 2 NF | ||
|- | |- | ||
| width="40" | [[File:WSTrans6.png]] | | width="40" | [[File:WSTrans6.png]] | ||
| width="150" | [[Tempest (Wind Sneaker)|Tempest]]<br>: 3 | | width="150" | [[Tempest (Wind Sneaker)|Tempest]]<br>: 3 NF | ||
|} | |} | ||
| Line 110: | Line 99: | ||
|- | |- | ||
| width="40" | [[Image:Guide Arrow.png]] | | width="40" | [[Image:Guide Arrow.png]] | ||
| width="150" | [[Guided Arrow]]<br>: 2 | | width="150" | [[Guided Arrow]]<br>: 2 NF | ||
|- | |- | ||
| width="40" | [[Image:Wind Ward.png]] | | width="40" | [[Image:Wind Ward.png]] | ||
| width="150" | [[Wind Wall]] ([[Wind Wall (Force)|Force]])<br>: 1 | | width="150" | [[Wind Wall]] ([[Wind Wall (Force)|Force]])<br>: 1 NF | ||
|- | |- | ||
| width="40" | [[Image:Crazy Shot.png]] | | width="40" | [[Image:Crazy Shot.png]] | ||
| width="150" | [[Crazy Shot]] ([[Crazy Shot (Force)|Force]])<br>: 3 | | width="150" | [[Crazy Shot]] ([[Crazy Shot (Force)|Force]])<br>: 3 NF | ||
|- | |- | ||
| width="40" | [[Image:SI Aero-Strafe.png]] | | width="40" | [[Image:SI Aero-Strafe.png]] | ||
| width="150" | [[Aero Strafe]]<br>: 2 | | width="150" | [[Aero Strafe]]<br>: 2 NF | ||
|- | |- | ||
| width="40" | [[Image:Wind Blast.png]] | | width="40" | [[Image:Wind Blast.png]] | ||
| width="150" | [[Wind Blast]] ([[Wind Blast (Force)|Force]])<br>: 2 | | width="150" | [[Wind Blast]] ([[Wind Blast (Force)|Force]])<br>: 2 NF | ||
|- | |- | ||
| width="40" | [[Image:GAs1.png]] | | width="40" | [[Image:GAs1.png]] | ||
| width="150" | [[Freezing Arrow]] ([[Freezing Arrow (Force)|Force]])<br>: 1 | | width="150" | [[Freezing Arrow]] ([[Freezing Arrow (Force)|Force]])<br>: 1 NF | ||
|- | |- | ||
| width="40" | [[File:GATrans1.png]] | | width="40" | [[File:GATrans1.png]] | ||
| width="150" | [[Blast Arrow]]<br>: 1 | | width="150" | [[Blast Arrow]]<br>: 1 NF | ||
|- | |- | ||
| width="40" | [[File:GATrans3.png]] | | width="40" | [[File:GATrans3.png]] | ||
| width="150" | [[Cutlass Wind]]<br>: 2 | | width="150" | [[Cutlass Wind]]<br>: 2 NF | ||
|- | |- | ||
| width="40" | [[File:GATrans6.png]] | | width="40" | [[File:GATrans6.png]] | ||
| width="150" | [[Ace in the Hole]]<br>: 3 | | width="150" | [[Ace in the Hole]]<br>: 3 NF | ||
|} | |} | ||
| Line 143: | Line 132: | ||
|- | |- | ||
| width="40" | [[Image:Fatality.png]] | | width="40" | [[Image:Fatality.png]] | ||
| width="150" | [[Fatality]] ([[Fatality (Force)|Force]])<br>: 2 | | width="150" | [[Fatality]] ([[Fatality (Force)|Force]])<br>: 2 NF | ||
|- | |- | ||
| width="40" | [[Image:Humming Wind.png]] | | width="40" | [[Image:Humming Wind.png]] | ||
| width="150" | [[Humming Wind]]<br>: 1 | | width="150" | [[Humming Wind]]<br>: 1 NF | ||
|- | |- | ||
| width="40" | [[Image:Callofruin.png]] | | width="40" | [[Image:Callofruin.png]] | ||
| width="150" | [[Call of Ruin]] ([[Call of Ruin (Force)|Force]])<br>: 3 | | width="150" | [[Call of Ruin]] ([[Call of Ruin (Force)|Force]])<br>: 3 NF | ||
|- | |- | ||
| width="40" | [[Image:TA fungus.png]] | | width="40" | [[Image:TA fungus.png]] | ||
| width="150" | [[Trapping Arrow - Fungus]] ([[Trapping Arrow - Fungus (Force)|Force]])<br>: 2 | | width="150" | [[Trapping Arrow - Fungus]] ([[Trapping Arrow - Fungus (Force)|Force]])<br>: 2 NF | ||
|- | |- | ||
| width="40" | [[Image:NWSActive2.png]] | | width="40" | [[Image:NWSActive2.png]] | ||
| width="150" | [[Gliding Strike]] ([[Gliding Strike (Force)|Force]])<br>: 2 | | width="150" | [[Gliding Strike]] ([[Gliding Strike (Force)|Force]])<br>: 2 NF | ||
|- | |- | ||
| width="40" | [[Image:NWSActive1.png]] | | width="40" | [[Image:NWSActive1.png]] | ||
| width="150" | [[Furious Engage]]<br>: 1 | | width="150" | [[Furious Engage]]<br>: 1 NF | ||
|- | |- | ||
| width="40" | [[File:NWTrans1.png]] | | width="40" | [[File:NWTrans1.png]] | ||
| width="150" | [[Seed of Wrath : Icicle]] ([[Seed of Wrath : Icicle (Force)|Force]])<br>: 1 | | width="150" | [[Seed of Wrath : Icicle]] ([[Seed of Wrath : Icicle (Force)|Force]])<br>: 1 NF | ||
|- | |- | ||
| width="40" | [[File:NWTrans3.png]] | | width="40" | [[File:NWTrans3.png]] | ||
| width="150" | [[Rage Fungus]]<br>: 2 | | width="150" | [[Rage Fungus]]<br>: 2 NF | ||
|- | |- | ||
| width="40" | [[File:NWTrans6.png]] | | width="40" | [[File:NWTrans6.png]] | ||
| width="150" | [[Eradication]]<br>: 3 | | width="150" | [[Eradication]]<br>: 3 NF | ||
|} | |} | ||
|} | |}<br> | ||
<br> | |||
== Feature Information == | == Feature Information == | ||
Revision as of 13:06, 11 December 2018
- For the Wind Sneaker skill by the same name, see Nature's Force


Every character in Elsword has their own set of unique features that set them apart from other characters.
Nature's Force

On 01/02/2014 in the Korean server, Rena received a new system, the Nature's Force system. Nature's Force is a system exclusive to only elves. The system interface is indicated below the MP bar. The orbs are indicated in-game as NF.
How to obtain NF (Nature Orbs)
Rena is able to fill up the NF gauge by hitting targets with basic kicks, arrow commands, and Active skills. 1 NF is obtained for every 3 commands landed on a target. Even if a command deals multiple hits, it will only count as one command. For example, using ![]()
![]()
![]()
![]() counts as three commands despite dealing up to five hits.
counts as three commands despite dealing up to five hits.
NF can also be obtained by entering Awakening Mode, which will recover five NF. Any excess NF will grant 15 MP each. Entering Awakening Mode with three beads will also set your NF Gauge to five NF permanently for the entire duration of Awakening.
As the bars fill, certain graphical effects will surround Rena:
- 1 NF: A faint green orb appears.
- 2 NF: The orb has a green trail.
- 3 NF: The orb becomes more luminous.
- 4 NF: A second orb appears. It has the same appearance as the previous stage.
- 5 NF: A third orb appears. Same appearance.
- Since the number of orbs does not match the number of bars filled, they aren't a good indicator of your gauge's current status.
Nature's Force Buff

When Rena has at least one NF in her gauge, she gains a passive buff that increases Critical Chance, Critical Damage, Elemental Resistance, arrow MP gain and decreases her arrow MP usage. The effects are amplified if she possesses more NF.
Nature's Force Damage Boost

When Rena has at least one NF in her gauge, she is able to boost the damage done by commands. Most of her combos can use up one NF on the last command to deal an additional, non-flinching hit to the target. This does not apply to combos with only one command, such as ![]()
![]() . No NF is consumed if no targets are hit by the command. Some commands can also consume multiple NF to deal multiple hits, such as Rena's
. No NF is consumed if no targets are hit by the command. Some commands can also consume multiple NF to deal multiple hits, such as Rena's ![]()
![]()
![]() (
(![]() /
/![]() ) consuming one NF for each of the 3 arrows.
) consuming one NF for each of the 3 arrows.
NF can also be consumed by most Special Actives to trigger an additional blast on their first hit. The number of NF consumed will vary for each skill but the damage of the blast will increase for each NF consumed.
List of NF Consumption Skills
Feature Information
| Bars | Explosion Damage | Buff | |||||||
|---|---|---|---|---|---|---|---|---|---|
| Commands | Skills | Awakened Will: Wind Sneaker Awakened Will: Grand Archer Awakened Will: Night Watcher |
Critical Chance | Critical Damage | Elemental Resistance | Arrow MP Gain Increase |
Arrow MP Usage Decrease |
Movement Speed Increase | |
| 1 | 370% | 370% x 1.2 x [Skill NF Usage] | 193% | +6% | +6% | +50 | 5% | 10% | 4% |
| 2 | +12% | +12% | +100 | 10% | 20% | 8% | |||
| 3 | +18% | +18% | +150 | 15% | 30% | 12% | |||
| 4 | +24% | +24% | +200 | 20% | 40% | 16% | |||
| 5 | +30% | +30% | +250 | 25% | 50% | 20% | |||
Specialization (Not available anymore)
| Character |  Specialization A Specialization A
|
 Specialization B Specialization B
|
|---|---|---|
| x% chance of gaining extra NF (Max: 50%) | MP Usage decreases by how many NF consumed (Max: 40%) |
Tips and Details
- Explosion damage is based on the player's average attack power: (Physical Attack + Magical Attack) / 2.
- The damage is also affected by damage range on an equipped weapon and as such is affected by Maximize.
- The damage from Commands and any Awakened Will passives is also affected by the job command modifiers (so x1 to x1.15 depending on Base to 3rd Job). Explosion damage from skills is not affected by this, instead always being x1.2
- The explosion hits all targets in range and ignores defense and guard. After the Rena Reborn update (07/23/2015 KR Patch), it no longer inflicts hitstun, meaning it no longer prevents knockdown.
- Critical Chance increase is normalized.
- The increase in Movement Speed is not written in the tooltip of this system but it is written in the tooltip of the buff.
Trivia
- Although the poster states the system as Nature Force, a direct translation of the words indicate it as Nature's Spirit.
- In NA, this feature is named Nature's Force, similar to the KR poster. This can easily be confused with Wind Sneaker's Nature's Force.
Updates
- 01/02/2014 KR
- Nature's Spirit system added.
- 01/28/2014 KR
- Commands required to gain a nature orb reduced from seven to six.
- Skills increase your Nature's Spirit command count on activation.
- 07/23/2015 KR
- System revamped.
- 08/27/2015 KR
- Adjusted damage reduction buff per 1 NF point which was set too high.
- 02/04/2016 KR
- MP recovery effect decreased.
- Damage Reduction effect removed.
- 04/21/2016 (KR) / 05/18/2016 (NA)
- Change to be recovered NF more easily when using combo.
- 08/11/2016 KR
- Fixed issue where NF consume is affected by Specialization B and Skill Trait.
- 05/18/2017 KR
- Fixed issue where cannot gain NF when awaken during entering the next stage.
- 11/02/2017 (KR) / 11/15/2017 (NA)
- Passive MP Recovery decreased.
- 08/23/2018 (KR) / 09/06/2018 (NA)
- All Speed and Natural MP Recovery Increase per NF removed.
- Critical Chance, Critical Damage, and Elemental Resistance Increase per NF added.
- 09/20/2018 (KR) / 10/11/2018 (NA)
- Movement Speed per NF added.
- NF is no longer consumed in 3 bead Awakening.


